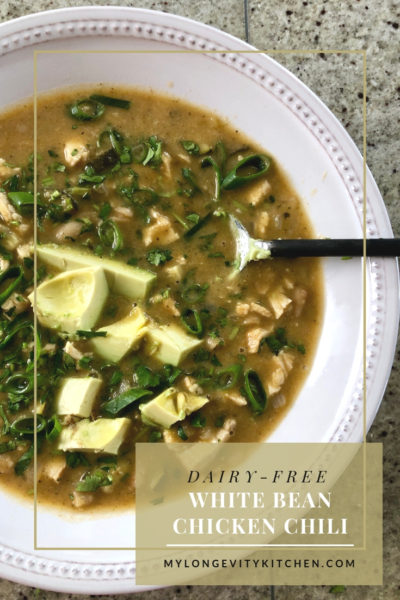
Not much can beat a warm bowl of chili when the snow starts fallin’…especially
when it’s on the table in 45 minutes. I’ll show you how to make this traditional white
chili without the dairy, and still get a rich and thick, comforting meal. You might want
to double up the portion of roasted chicken you make because this easy spice
mixture makes the chicken breast irresistible!
1 to 1.5 pounds Organic Boneless Skinless Chicken Breasts (skinless & bone-in works too)
1/2 teaspoon Chili Powder
1/2 teaspoon Fine Sea Salt
1.5 Tablespoons Extra Virgin Olive Oil
Chili
2 Tablespoons Extra Virgin Olive Oil
1 White or Yellow Onion
3 Garlic Cloves
1 Organic Zucchini, Diced Small
1 teaspoon Fine Sea Salt
1 Tablespoon Chili Powder
1 Tablespoon Ground Cumin
1 teaspoon Dried Oregano
3 Cups Chicken Bone Broth
1 Cup Salsa Verde (see notes)
1-15 oz Can Eden Organic Cannellini Beans, drained & rinsed (see notes)
Fresh Lime Juice
Optional Garnishes
Jalapeno
Scallion
Fresh Cilantro
Avocado
Instructions
Preheat oven 350 Degrees F. Line a baking sheet with foil or parchment and drizzle with 1.5 Tablespoons of Oil.
Line a cutting board with paper towels, and pat the chicken breasts dry. Cut the breasts in half (favoring the thinner side will help it cook more evenly), and separate the tenders if they are still attached.
Season the chicken with the chili powder and sea salt. Transfer the breasts to the baking sheet and turn them to coat them in oil. Roast the chicken for up to 30 minutes for larger pieces, and check it at 15 minutes for chicken tenders.
Meanwhile, chop 1 onion and mince the garlic cloves.
Heat 2 Tablespoons oil in a soup pot over medium heat, and measure out your chili spices so that they are ready to go (chili, cumin, oregano, salt).
Saute the onions and garlic for 3-5 minutes. While onions and garlic are cooking keep an eye on your roasting chicken.
When chicken is done cooking, remove it from the oven and let it cool.
Add the measured spices to the onions and garlic and stir until fragrant—about 1 min. Add the zucchini and cook for another minute.
Add 3 cups of chicken stock, 1 cup of salsa verde, and drained/rinsed cannellini beans to the pot. Stir. Turn the heat up to medium high and bring everything to a simmer.
Meanwhile, start shredding or dicing your chicken, keep it aside, and pour the chicken juices into the pot. Once your pot is simmering, turn heat down to medium low and cook for 10 minutes.
Scoop out 2 cups of the chili and put it into a blender. Holding the cover down with a kitchen towel, blend until smooth and add it back to the pot.
Now add the chicken to the pot. Cook for 5 more minutes. Squeeze the juice from a half or a full lime.
Taste for salt, and serve with optional garnishes (see ingredient list).
Notes
Salsa Verde: Find this traditional green salsa on grocery store shelves, in the Mexican food aisle; or buy some from your favorite Mexican restaurant.
Eden Organic Cannellini Beans: Eden Organic is the only brand of cooked beans on the market that I know of who prepares them the old-fashioned way. This company actually soaks their beans, dumps the soaking liquid, and cooks them with kombu seaweed (you can’t taste it). All of this is very important to eliminate toxins, release digestive enzymes, and make their nutrients more available to us. This brand is sold at Whole Foods Market and Jewel.
By Marisa Moon
My Longevity Kitchen https://mylongevitykitchen.com/
I shot my first Facebook Live cooking video alongside Chicago Biohacking Expert Anthony Diclementi. Anthony, a long time acquaintance and Hi-Vibe Ambassador, invited me into his kitchen for an informal live video about how to make my Nutty Butter Collagen Bars, all while we laughed and discussed why eating real food is so awesome. Watch the video to see Anthony’s reaction to my peanut butter substitution, and to see how you can make these low-carb, fudgy bars in 15 minutes Continue reading →
No time to read the full post? Listen here to the audio version:
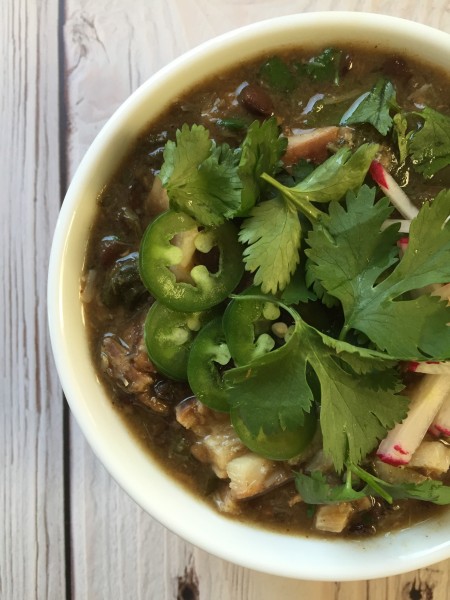
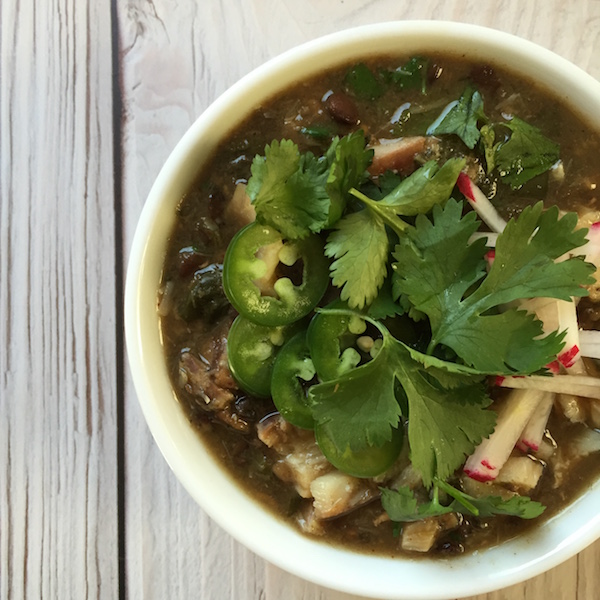
If you love tangy lime, cilantro, and a warm bowl of chili (who doesn’t?), you’ll love this spicy green chili that’s packed with leafy greens, protein, and gusto! The weather has been teetering in and out of single digits here in Chicago & Indiana, and now it’s freezing rain and yuck. I could seriously eat soup or chili Every. Single. Day. Did I tell you this is a slow cooker chili recipe? Ahhhhh, the beauty of convenience (especially when you’re in hibernation mode).
My Inspiration…
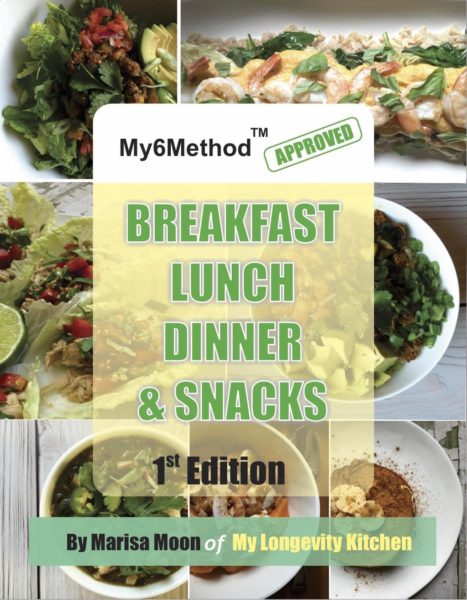
This is a recipe from the exclusive E-cookbook I created for the My6Method fitness participants. I have to start swapping out old recipes for some new ones, so I thought I should finally share one with YOU!
What’s My6Method, you ask? It’s a rewarding health coaching program where people participate in a 3 or 6-week diet and lifestyle overhaul guided by the personal trainer and former fitness competitor named Adrienne Hanover. Adrienne and I have been long-time friends; she was even a bridesmaid in my ridiculously large weddingd Adrienne has successfully led hundreds of clients through fat-shedding transformations with her dairy-free, alcohol-free, low sugar, low grain diet program because she does things differently. She critiques their food journals twice a week with some real talk, compassion, and expert advice; she provides you with an extensive manual to guide you through her recommendations and how to balance your macros depending on your specific fitness levels; she takes before and after pics for recording your progress, and of course she provides you with endless fitness ideas and inspiration. You don’t even have to live in the area; you can do everything online! Check out her website here. Another cool thing she does with the program is to provide a community for challengers to share their motivations, questions, and concerns together in a Facebook group where Adrienne and I both get involved. Adrienne came to me in late 2015 asking if I’d like to partner up with My6Method because she knew we were on a similar path with health and nutrition, and more importantly, she wanted help creating exclusive recipes for anyone who signs up. That’s where this recipe comes into the picture. I made a 60 page full color e-book with breakfast lunch and dinner ideas, all for the M6M participants. Since the release of the cookbook I have added new recipes every season! Eventually I can share some of my older recipes with you, just like this codfish chili!
I don’t think people make seafood chili often enough. Or ever. I made this recipe because I wanted to show people three things: how effortless a seafood meal can be, how and why you’d want to introduce sprouted lentils into your diet, and how to pack a ridiculous amount of veggies into one meal for the whole fam-assuming your family is like mine and loves flavor explosions and spicy food. Who’s with me? And if you’re traveling to places like California you may want to research the best places to eat in san francisco for seafood and get your fill there. No one is cooking on vacation!
Longevity tips…
Sprouted Lentils:
The key to making the healthiest chili here is to use SPROUTED green lentils. Sprouted lentils are just lentils that are prepared the old-fashioned way (make note that sprouted lentils are probably the most nutritious and safest legume to eat). Really they are soaked lentils, maybe sprouted like the video, but most-importantly they are soaked for several hours before cooking. Why? All beans, legumes, grains, nuts, and seeds contain anti-nutrients that are toxic to all mammals when consumed regularly for long periods of time; especially when they are hastily prepared. Some of these anti-nutrients include phytic acid, which I go into detail about in my last post called “The Truth About Overnight Oats“, and lectins, which we’ll discuss now…
Lectins are a category of plant chemicals that are concentrated in the seed of the plant, which is the actual lentil in this case. Seeds produce certain lectins to protect themselves from harm (insects, microorganisms, and UV rays), and many of the toxic lectins damage our intestinal tract as they pass through our system undigested. We cannot break them down in our body, and they trick our cells into incorporating them into normal cellular functions. Because of this, long-term lectin consumption often leads to leaky gut, Irritable Bowel Syndrome (IBS), heartburn, migraines, allergies, arthritis, and eventually autoimmune diseases like fibromyalgia or Hashimoto’s thyroiditis. Yes, conditions like fibromyalgia can be managed with some of the treatments offered at https://www.everydayoptimalcbd.com/product/fibromyalgia-relief-cbd-capsules-25mg-cbd-oil, but we should still be doing all we can to prevent the problem from getting worse. Whilst CBD is useful in easing symptoms, some may prefer to use marijuana itself instead of a cannabinoid. If this is a choice people make, they must do their research on sites like https://fatbuddhaglass.com/collections/bubblers. Some of the most common reactions include gas and bloating-symptoms we consider normal and just live with. Do you ever wonder where the gas and bloating is coming from? Do you believe it is something you can actually control, and avoid? You can.
A key way to avoid these consequences, and promote long-term health, is to switch to sprouted legumes, nuts, seeds, and grains (fermented grains are even better; but grains are complicated and I am not ready to get into it. Eat grains sparingly or read this to learn more). It’s extremely important to consider this change for whichever foods in this category you eat most often. For instance, if you eat a lot of bread, pasta or treats, read that article I just linked to above to learn how you can possibly make them a health food; if you eat a lot of nuts then start buying sprouted/soaked nuts or make your own; if you eat a lot of beans, listen up and I’ll tell you what to do below. If you’re not willing to spend more on brands that sprout them for you, then you should try doing it yourself…the old-fashioned way. And if you’re not willing to do either then you can join the massive Paleo camp who generally avoids all legumes and grains. Forever. Doesn’t sound fun does it? So here’s how you can enjoy lentils, broken down into three categories from the best-most nutritious way, to the least sufficient way Continue reading →
No time to read the full post? Listen here to the audio version:
My Inspiration…
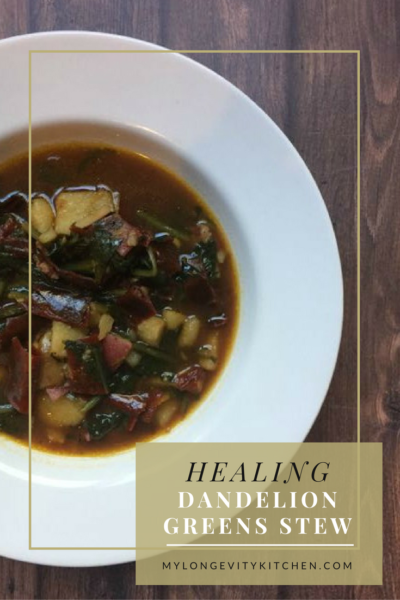
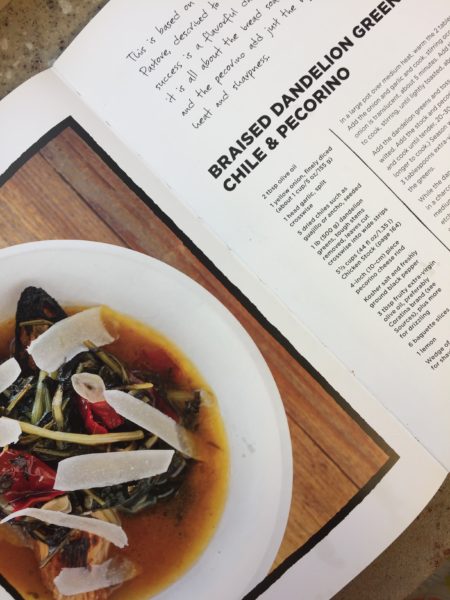
One of the first, most-interesting soups I ever made was a braised dandelion greens recipe by Top Chef Master, Chris Cosentino. It was bitter, and spicy, and full of dimension. It’s not for everyone, but that’s okay. This recipe is for anyone who appreciates bitter greens like rapini (broccoli rabe), frisse, escarole, and of course dandelion greens. The way Chris paired the greens with ancho chilies, lemon, olive oil, and true parmigiano reggiano just spoke to me. This is totally my language.
I’ve made it time and time again, swaying a bit from the recipe to make it compliant with my food and lifestyle choices. For instance, he suggests a crusty piece of bread on the bottom of your bowl so it will soak up all of the dandelion broth…and I know that sounds heavenly. But, I don’t really eat bread any more. I eat it on special occasions if it’s gluten free, or if I’m in the mood for a burger with a real bun-but otherwise I avoid it. So, I started adding potatoes to the soup instead. Bitter greens and potatoes are a popular combo with Italians, so that one was a no-brainer. I also changed the chicken broth base to a bone broth base, and the combination of bone broth with dandelion greens is what makes this recipe especially healing. Interested in Chris Cosentino’s cookbook? It’s called Beginnings – My Way To Start A Meal. It’s a beautiful book full of vegetables, cured meats, and artisanal cheeses; and it’s organized by seasons to highlight year-round ingredients for appetizers and small bites.
Longevity Tips…
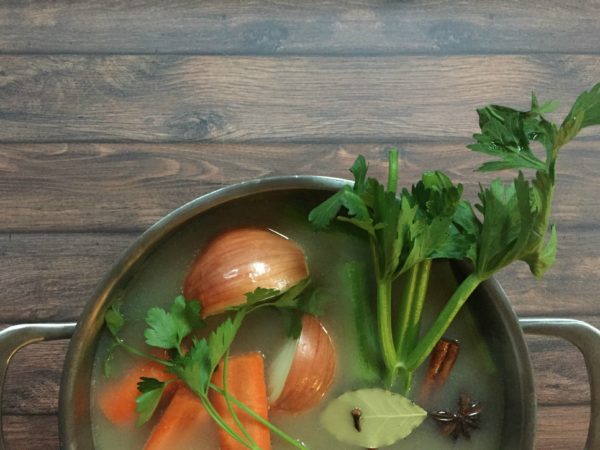
Bone Broth:
If you are a vegetarian then don’t worry, this soup can be made with water, or vegetable stock, and still turn out great! But for everyone else, let’s talk about bone broth. That’s possibly the main reason I called this recipe “Healing Dandelion Stew”; it’s the bone broth that makes it especially healing. The name “Bone Broth” either gets you excited, or Continue reading →
I feel so lucky being able to visit Austin for THE Paleo conference, working alongside passionate foodies, and visionary leaders whom I admire.
I had an exciting moment when it was time to announce the Best New Blog of the Year because I was a nominee! Even though I didn’t win, I was already feeling so accomplished after being voted into to the top 4 new blogs. On the day leading up to the awards ceremony, I had the chance to speak with Tony Federico, the host of Paleo Magazine Radio, and do a short impromptu interview about my experience at PFX. You can find my interview on the Paleo Magazine Radio podcast here. (I’m the first interview which starts at 2 minutes in.)
Okay, on to my favorite products!
I’m still going gaga over some products I purchased at paleo f(x), and I knew I had to share them with you! I’m going to keep it as brief as possible, on some items more than others, because if I try to explain each item and all of the benefits, I’d be writing this post for 12 days straight. So, if you have any questions about each item please comment below or just click the product photo to head over to the company’s site.
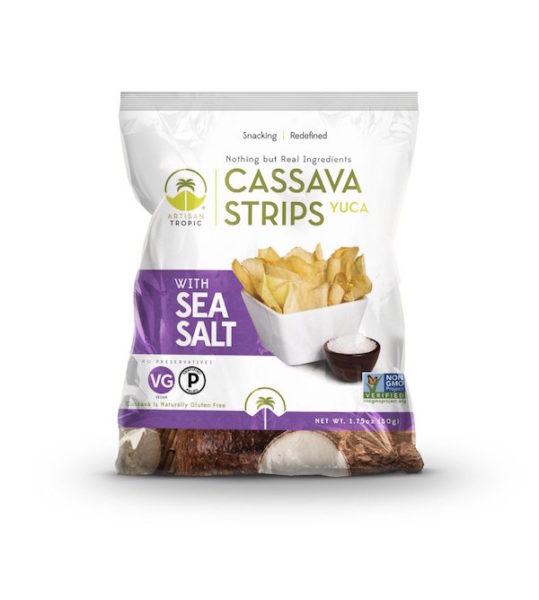
Artisan Tropics – Cassava Strips
Vegan, Grain-free, Diary-free, Soy-free, Non-GMO
These chips or strips are pretty awesome. If you’ve given up on chips because you believe there’s no such thing as a healthy chip, then think again! Continue reading →
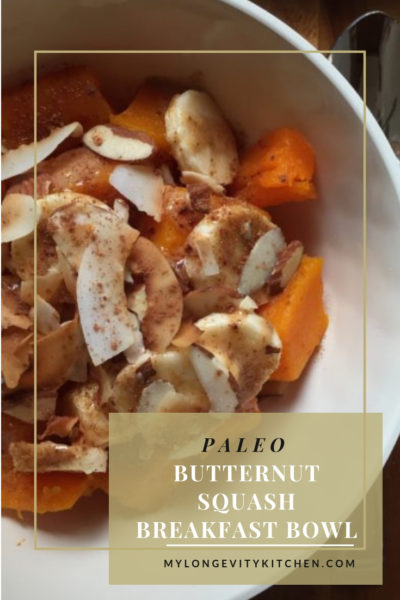
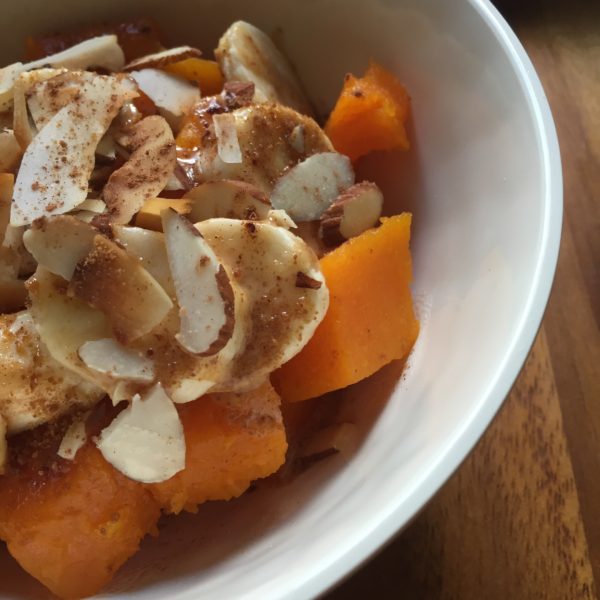
It may be difficult at first to imagine your breakfast without grains, but there are plenty of foods to replace the standard oatmeal breakfast. Winter squash is available all year round and makes for a great base in this versatile breakfast.
If you’ve been following me since January 2016, you would have heard that I created an e-cookbook for participants in the 6-week fitness and diet program called My6Method. This ebook helps My6Method (M6M for short) clients stick to the recommended food list, and get cookin’! This cookbook is exclusive to the M6M participants, but soon I’ll be replacing winter recipes with warm-weather recipes. That’s why I decided to share a recipe with you…the Butternut Squash Breakfast Bowl!
Longevity Tips…
I created this recipe to show oatmeal-lovers that there is a grain-free alternative they will love just the same! It’s important for me to point out that I believe protein is a significant part of a healthy breakfast, as well as keeping sugary carbs, grains, or flour-based foods to a minimum (the only instance I believe protein is not important at breakfast is if you practice intermittent fasting and have a breakfast full of healthy fats, like with bulletproof coffee).
That being said, I highly recommend enjoying this butternut breakfast bowl alongside some scrambled eggs & quality bacon (made from pork that is pasture-raised and antibiotic free), or try a simple grass-fed whey protein shake to get your protein in without filling up too much.
I’ll show you how to roast a whole butternut squash, saving you time and effort…have you ever tried slicing raw winter squash? Difficult. So, let’s skip that step. This whole-roasted squash technique results in an extra sweet, irresistible flavor that’s perfect with breakfast. Continue reading →
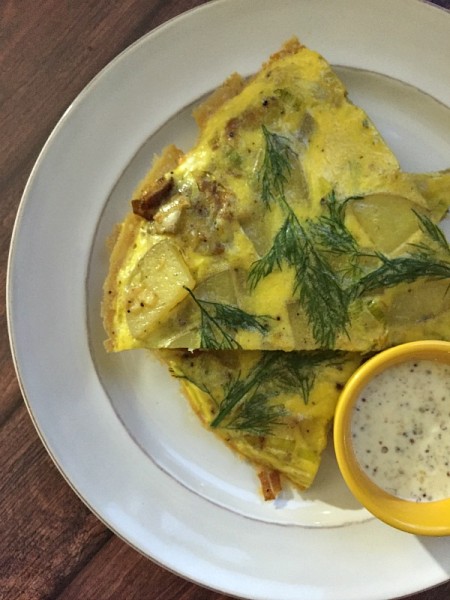
Did you know you can make anything into a frittata? ANYTHING, I tell you!
It’s so flippin’ easy to make frittata…even when you flip it out of the pan after baking it. Easy! You’ll be impressed how much flavor and familiarity comes out of this recipe. Leeks are a thing of the past for most home cooks today, but here you’ll find they really shine with yukon potatoes, eggs from pastured hens, and delicate sprigs of fresh dill. And the best part about all frittatas?!? Well…the best part comes in layers…
You can put anything in a frittata (I know, I already said that)
You can eat it for breakfast, lunch or dinner
It’s so delicious room temperature AND cold! This is a fact people: frittata is arguably better when it’s NOT warm. I don’t know why, I just know it’s true.
Longevity Tips
Butter, from grass-fed cows
Butter is making a comeback! People are starting to realize that fats originating in nature, with the least amount of processing, are the healthiest fats there will ever be. Butter, from grass-fed cows, is rich in important vitamins and amino acids that optimize our brain-function and can even protect us from heart disease! It’s important to understand that there is a huge difference from grass-fed butter to conventional butter because when the cows eat grass, they convert those plant nutrients into nutrients that are essential for humans!
Just look at the color difference…grass-fed butter is yellow, and conventional butter is white. The former gets its rich color from the beta-carotene (vitamin A) content, Grass-fed butter is available at almost every grocery store now, so it’s time to make the switch. Look out for brands like Kerrygold, Organic Valley (pasture-raised), Anchor, and Vital Farms. Want to learn more about the benefits of grass-fed butter? I love this article by Authority Nutrition.
Eggs, from pasture-raised hens
Have you noticed that there are new egg cartons popping up on the grocery store shelves, and they are nearly twice the price of standard eggs? If you haven’t joined the bandwagon yet, you’re probably looking at those fancy eggs like “there’s no way I’m payin’ $7 for a carton of eggs!”. An egg from a hen that lives outdoors, under the sun, and able to roam in the soil, eating grubs and bugs galore; that’s a completely different food than a conventional egg! Continue reading →
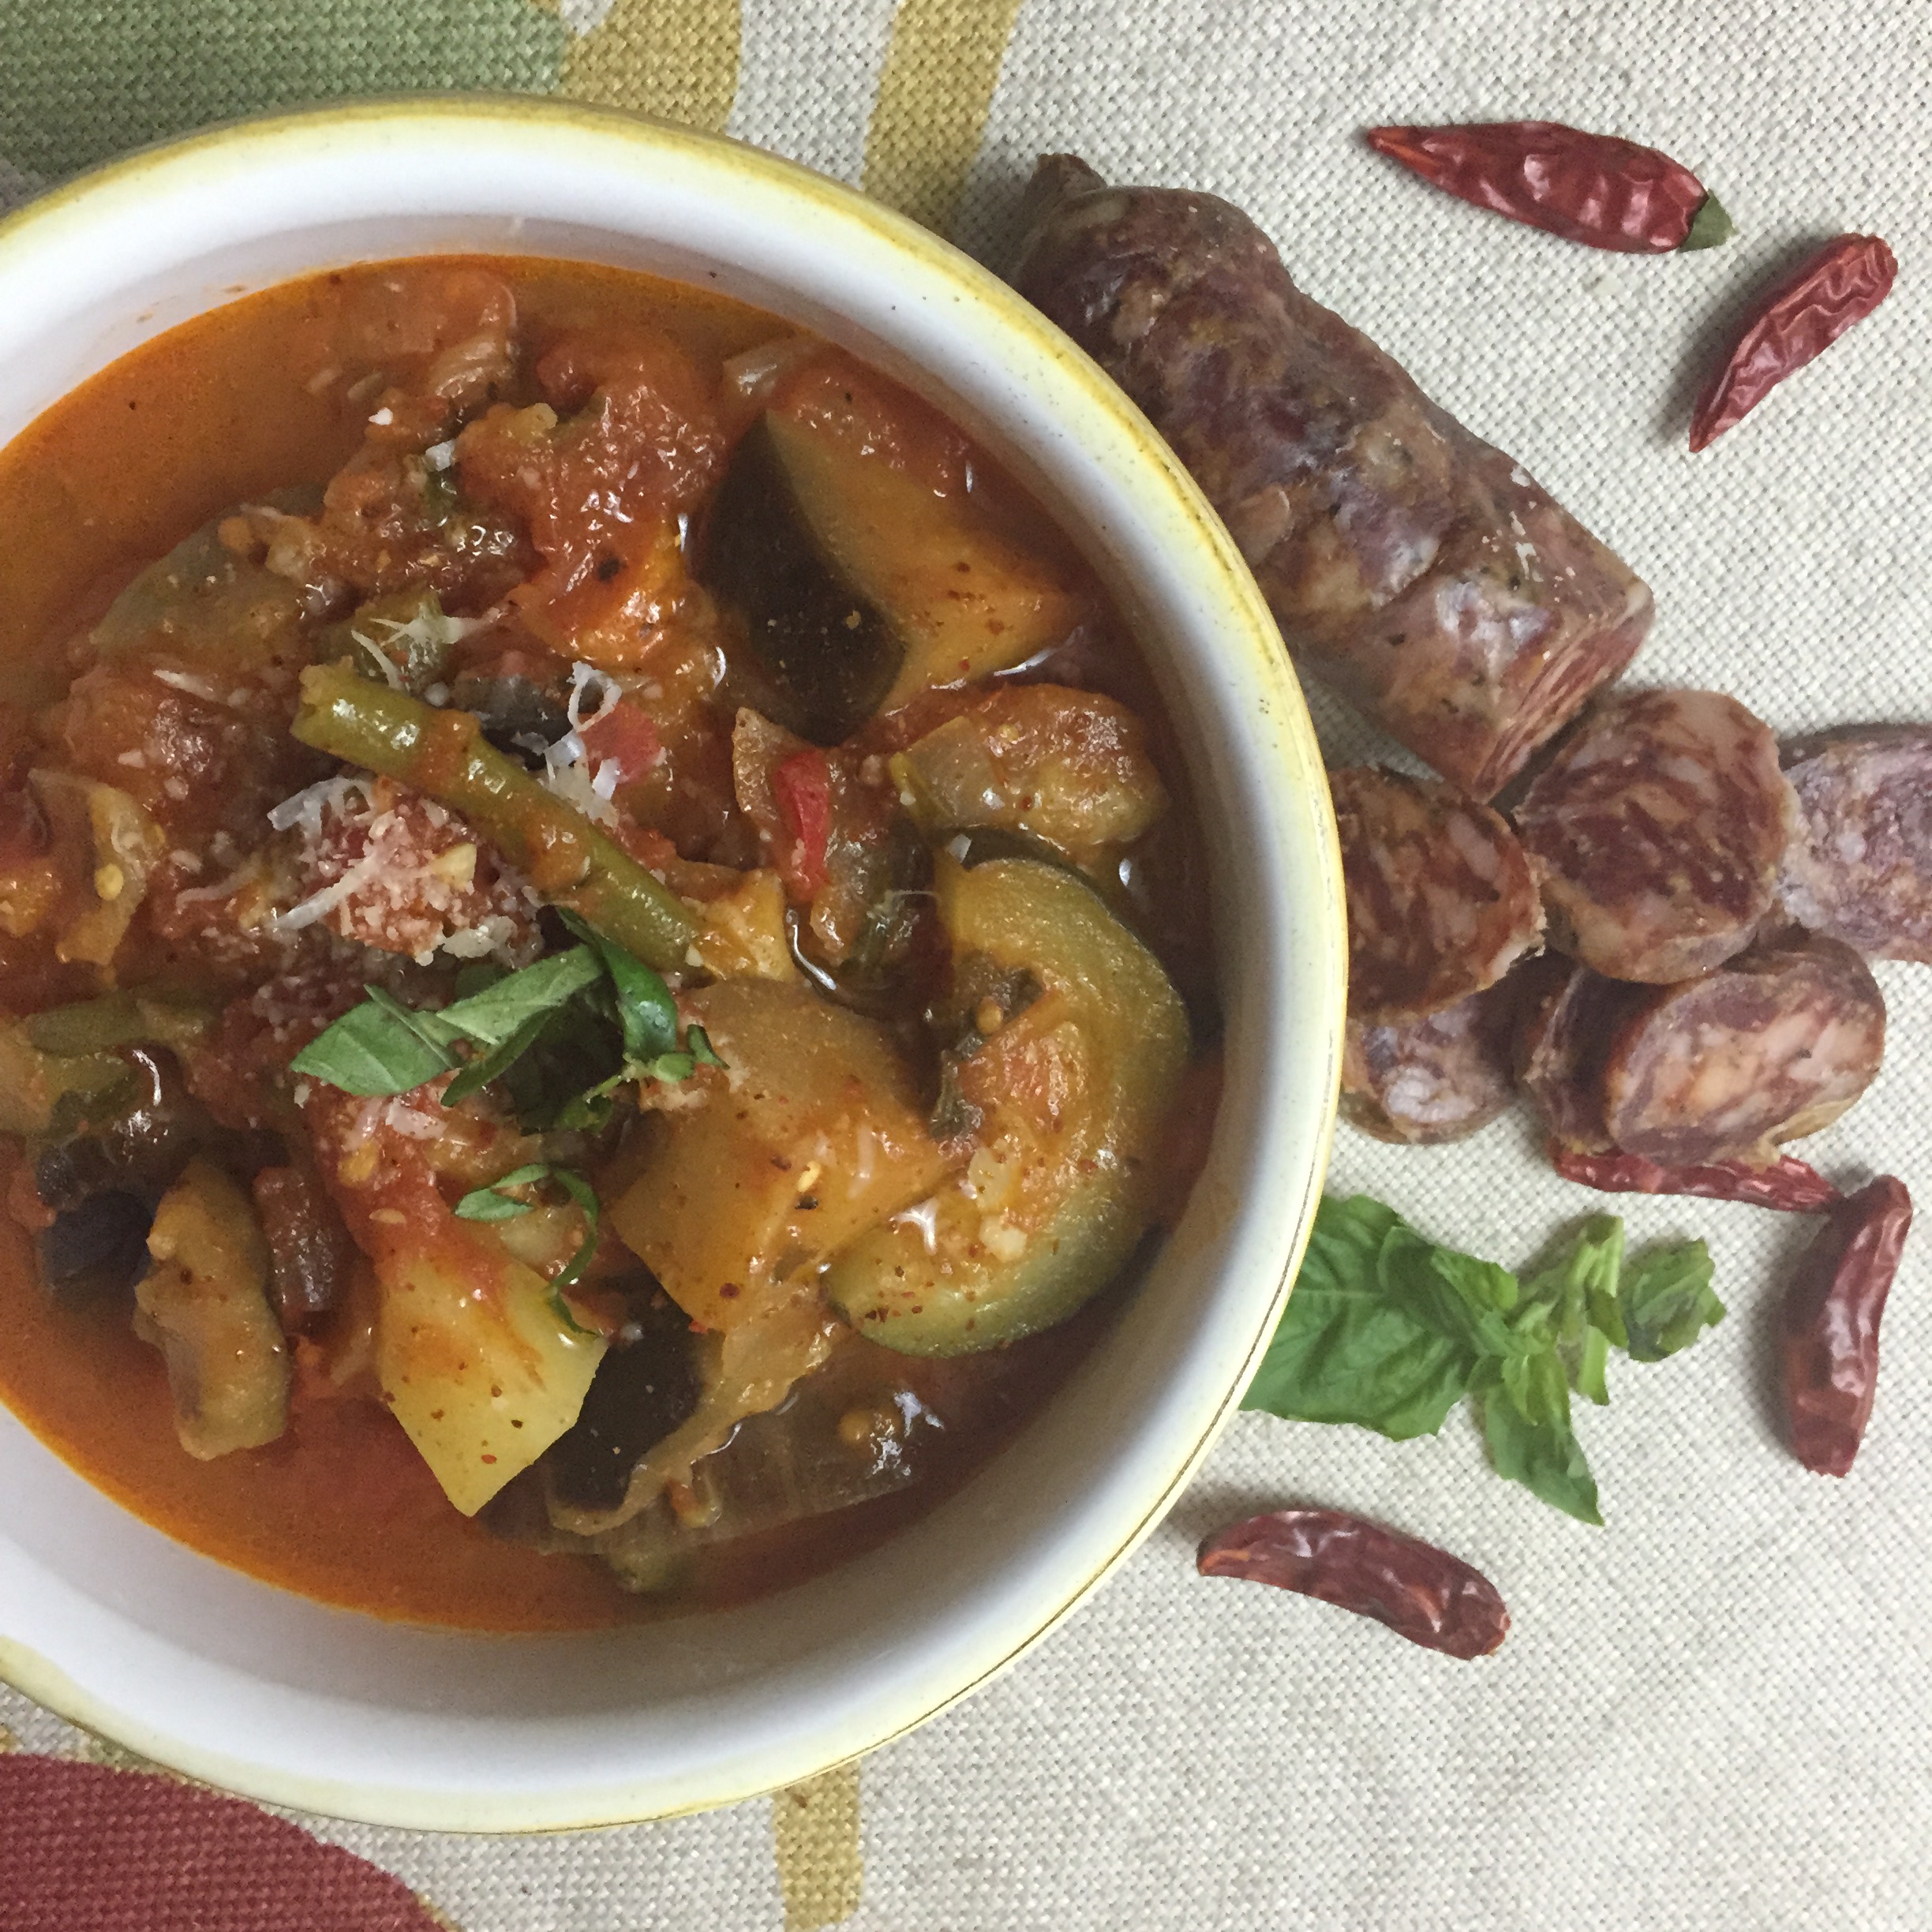
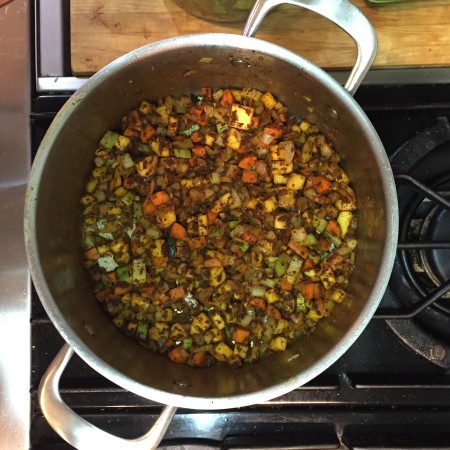
Sure enough, whenever the leaves are thinking about falling, I’m thinking about Ciambotta—pronounced Chom-BOAT-ah. This Italian vegetable stew is a southern Italian tradition. It gives you the opportunity to celebrate the bounty of your garden (or farm stand, CSA, and local produce section), kiss the Summer goodbye, and say hello to a 50 degree day. I’m okay with that.
I love Ciambotta for so many reasons! Most importantly, I grew up eating it—anything in a red sauce, with parmigiano reggiano and crushed red pepper was my favorite. But ciambotta is awesome because it’s cheap, versatile, and reminiscent of a bowl of pasta. (I should mention it freezes fantastically too. BONUS!)
Longevity Tips…
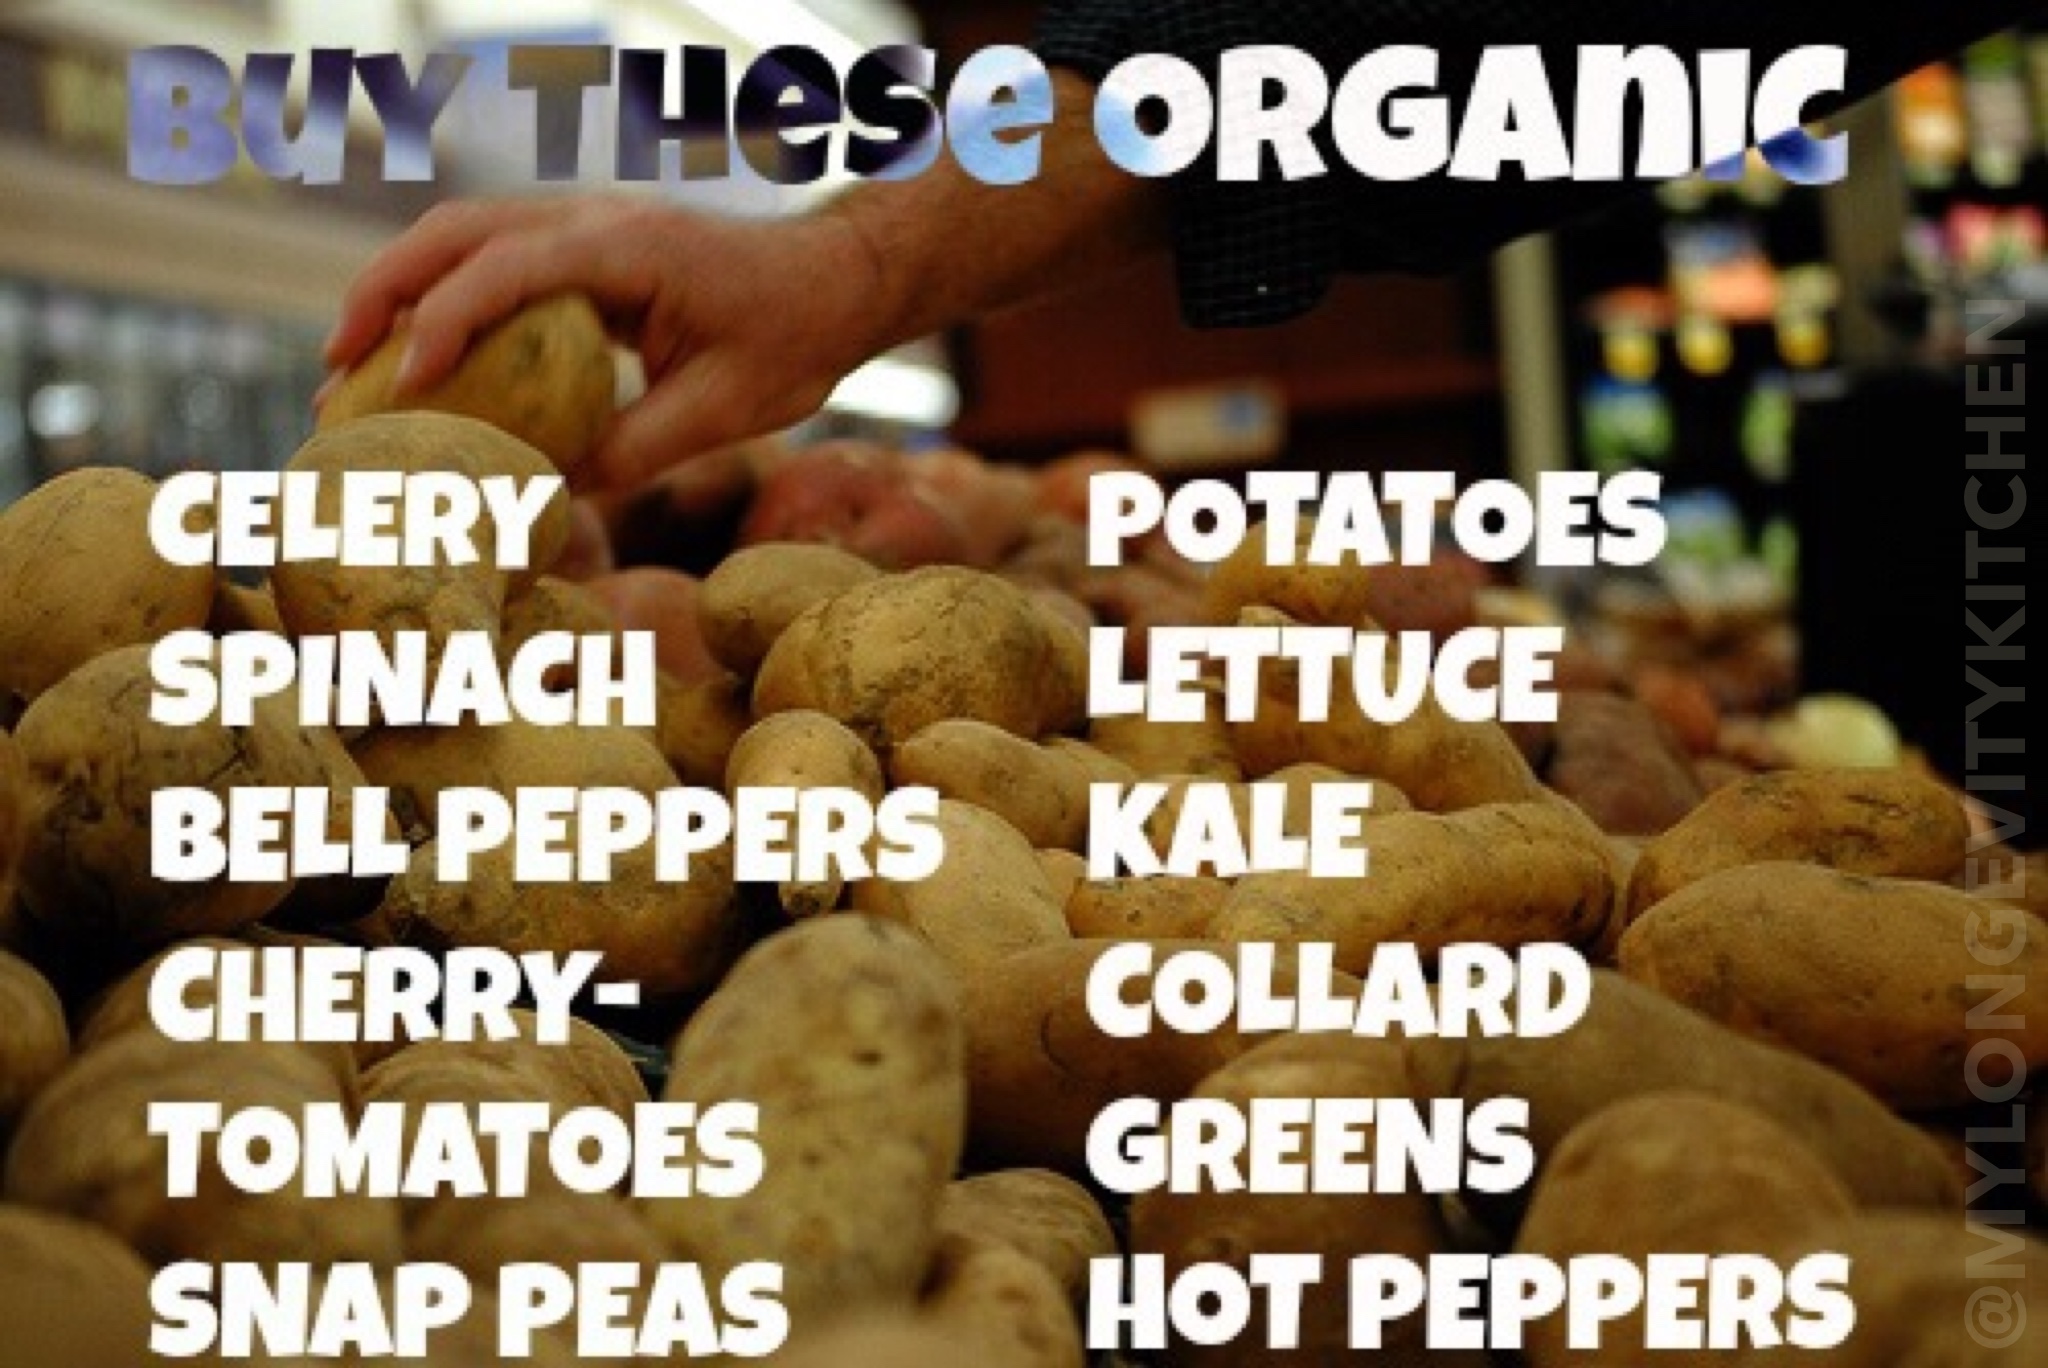
Are you buying organic produce yet? I understand it’s tough to get used to paying more, so check out this list of vegetables that are highest in pesticides (we are talking over 50 different pesticides detected on some of these veggies; not to mention that kale and hot peppers often contain chemicals that are so dangerous they should be illegal). If you buy these organic, you’ll be cutting out a majority of the pesticides/herbicides your family is exposed to.
Watch this 2 minute video to see what chemicals are in your body before switching to organic. You’ll be shocked!
I’ve said this before and I’ll say it again:
If you aren’t already buying organic tomatoes, you should start right now. Standard tomatoes are sprayed with some of the highest levels of herbicides/pesticides being used. These chemicals are “classified as ‘bad actors’ by the Pesticide Action Network (PAN). A “bad actor” is a chemical that is toxic, promotes cancer in lab tests and animal studies, interferes with reproduction, or contaminates the environment.”
And skip the traditional cans because they are lined with all sorts of chemicals that tomatoes leach from (even if they are BPA free). Go for glass jars or cartons of organic tomato products…stock up when they are on sale around $3 and save big! I heart organic tomatoes.
It’s Time To Cook…
Okay so you’re ready to make your Ciambotta, and you notice the ingredients in my recipe aren’t in precise amounts. Welcome to the world of Italian cooking! And honestly people, this is my style. Recipes don’t have to be so rigid to be great!
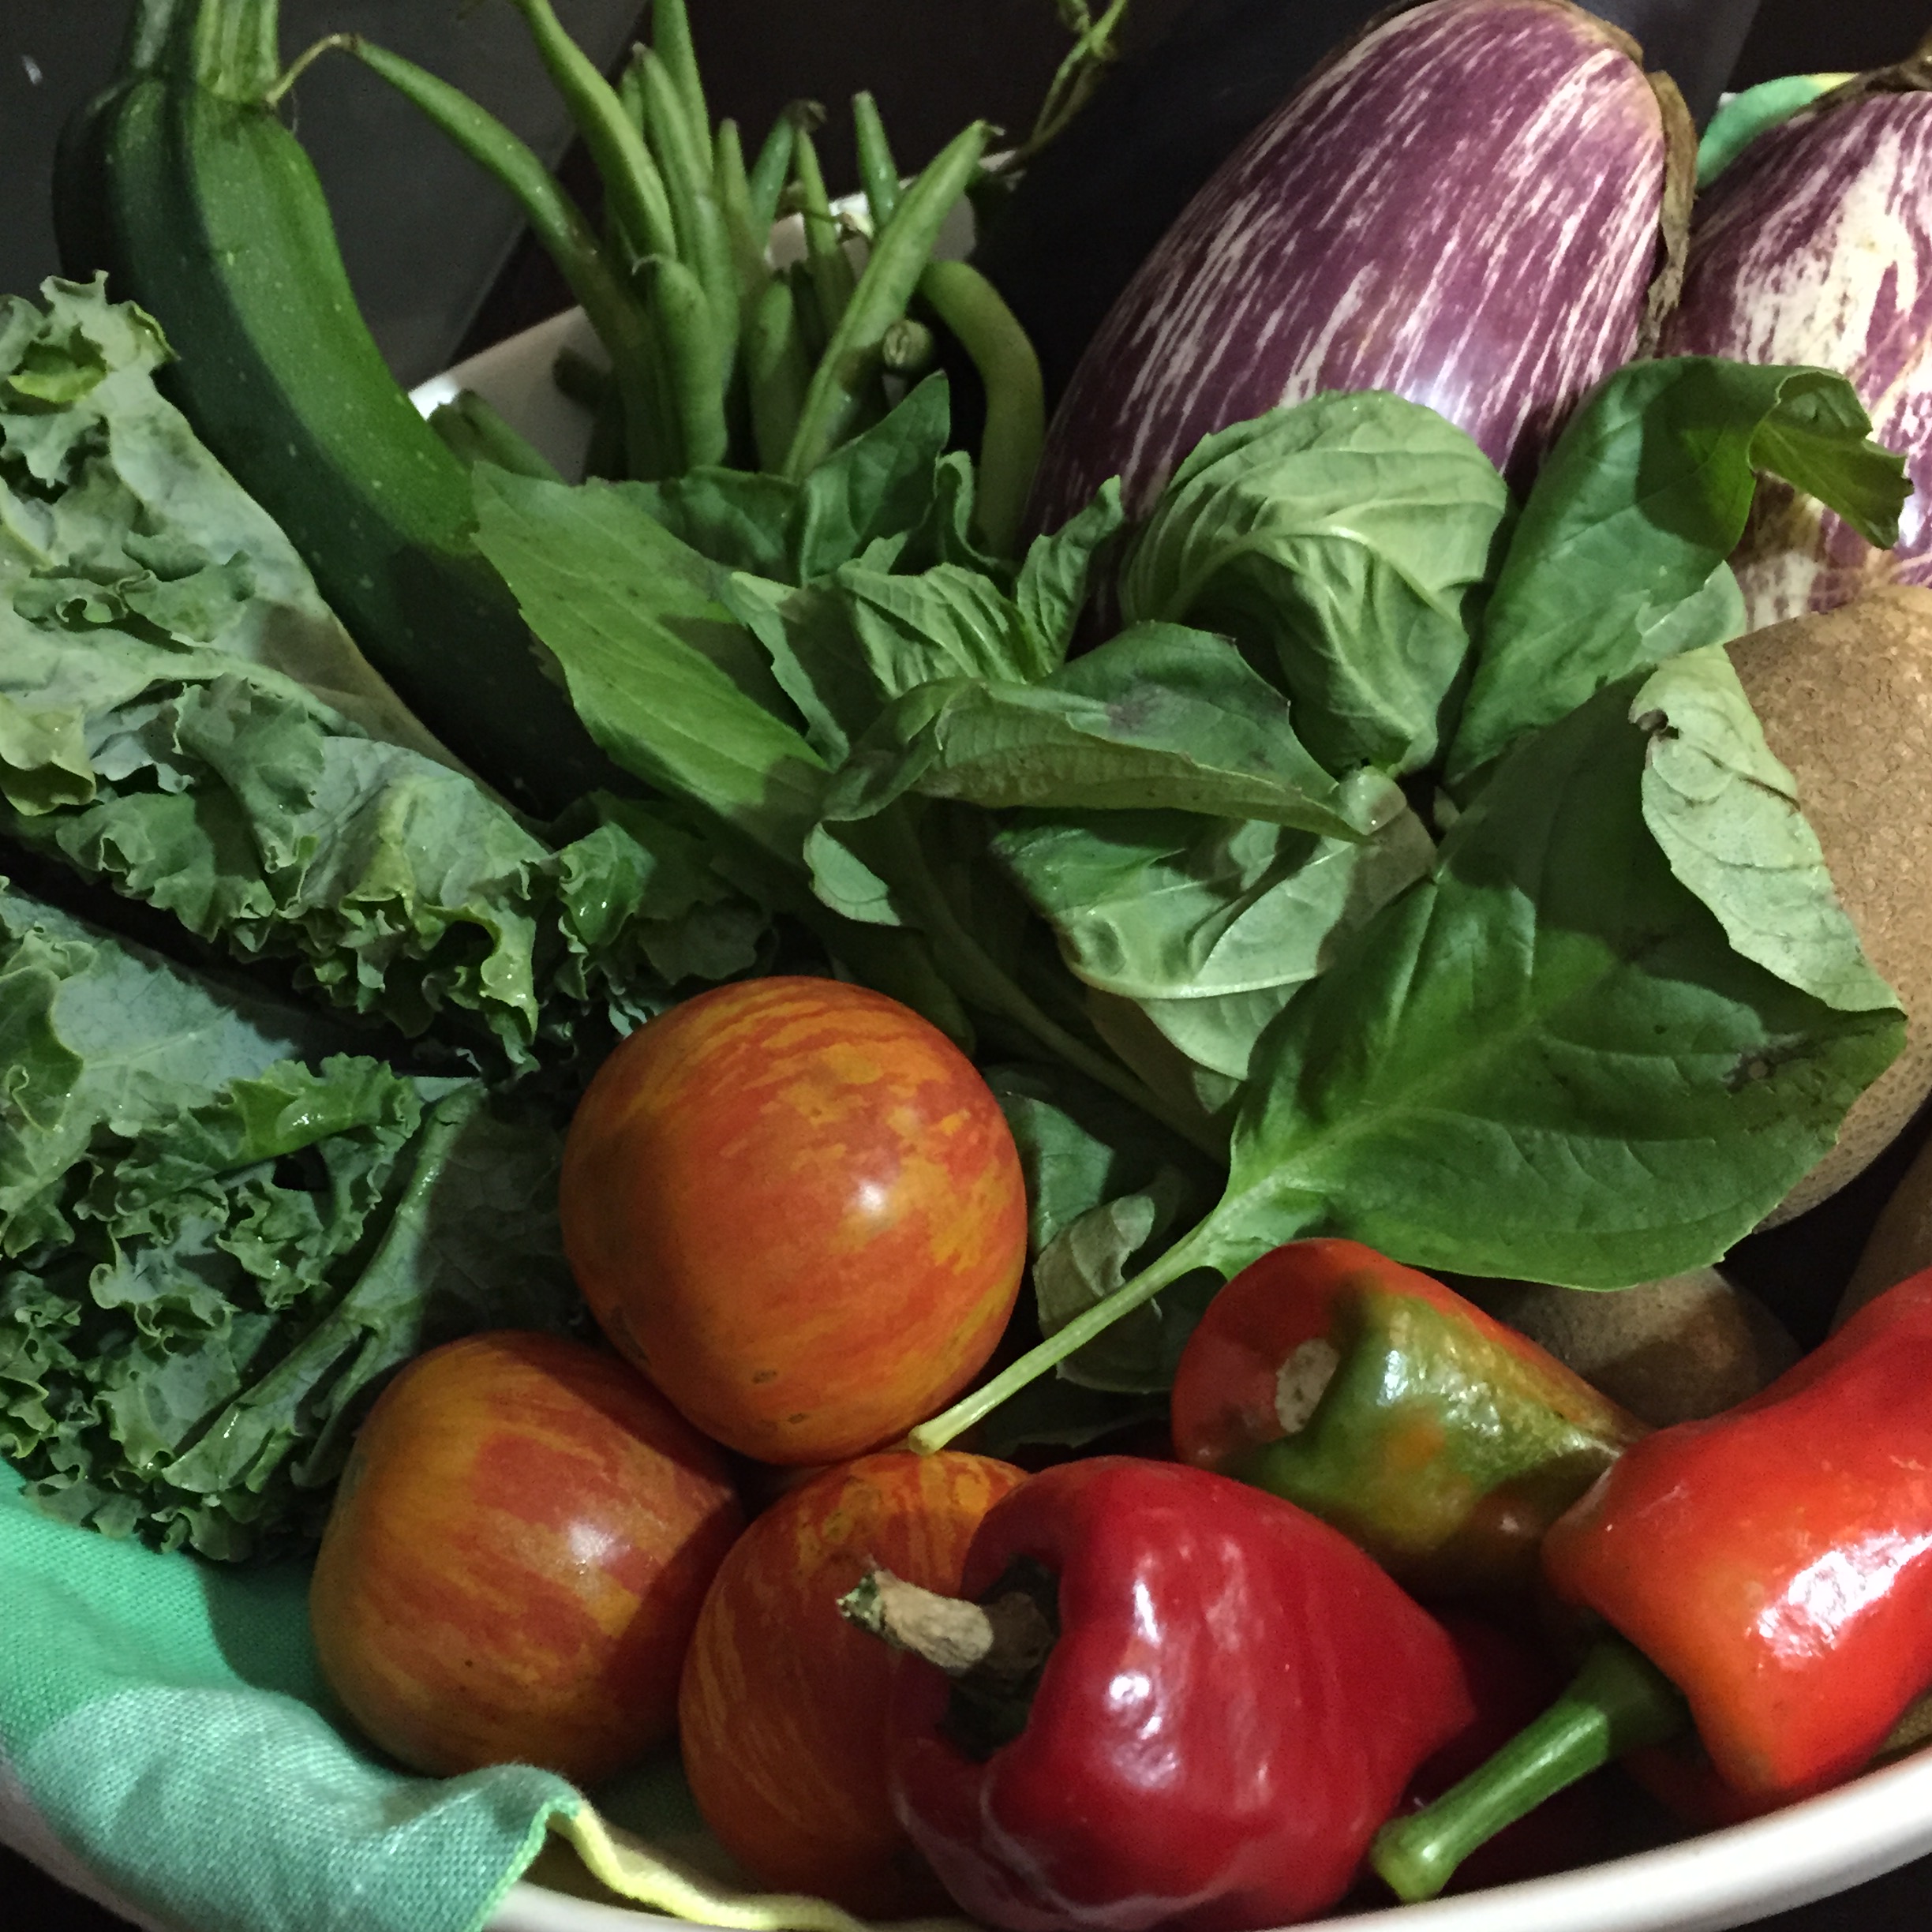
I want you to use whatever you like, and whatever you have access to. The base of a great ciambotta is usually tomatoes, eggplant, zucchini, and potatoes; but there are SO MANY GREAT WAYS to make it! My family often puts green beans or peas in this stew. Don’t like eggplant? I say try it in this dish, and you might be surprised…but you can always leave it out. Even the amount of liquid is not precise. All you need to worry about is that there is just enough liquid to cover those veggies.
Let me know how this works for you! I always make it on the stove top, but I know you can do it in the slow cooker. Give it a shot, and tag me #MyLongevityKitchen on Instagram and Facebook @MyLongevityKitchen, or comment right here!
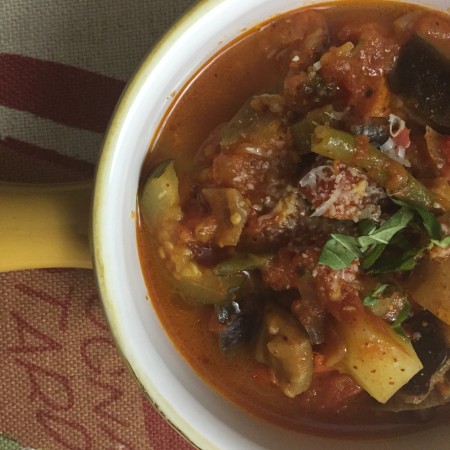
Ciambotta: Italian Vegetable Stew
2015-10-09 20:10:24
Serves 3
Pronounced Chom-BOAT-ah, this Italian vegetable stew is a southern Italian tradition. It is a celebration of the garden's bounty slowly cooked in a rich tomato sauce.
Optional: ¼ Cup GRATED Pecorino Romano or Parmigiano Reggiano cheese (More nutritious compared to “parmesan”)
Stovetop Method
Using a large pot, heat 2 tablespoons of olive oil over medium heat.
Add the onions, carrots, and celery (if using), and a heavy pinch of salt. Stir and saute for 3 minutes.
Add the garlic and crushed chili pepper flakes, stir and cook for 1 minute.
Add all of your vegetables, tomatoes, and ¼ cup olive oil. Stir and add enough broth or water to just cover the vegetables.
Turn the heat to high, stir in the herbs, bay leaf, 2 teaspoons of salt, and 1 teaspoon of pepper.
Once it starts to boil, reduce the heat to low and cover.
Cook on low heat for 1 hour, stirring around every 15 minutes to prevent burning on the bottom.
After 1 hour, and all the veggies are super soft, you may leave off the cover to reduce the amount of liquid remaining. Simmer for 10-15 minutes until you reach the desired thickness.
Stir in the grated cheese (if using), and taste for salt. If it tastes like something is missing, add more salt.
Slow Cooker Method
Add all of the ingredients—except the grated cheese¬—to the slow cooker.
Cook on high for 3-4 hours, or on low for 8 hours, until the veggies are super soft.
If it’s too soupy, continue cooking uncovered on high or transfer to the stove uncovered and the liquid will evaporate as it simmers.
Stir in the grated cheese and taste for salt. Something missing? Add salt.
Serve with fresh herbs, grated cheese, and crushed pepper if desired.
Notes
Ingredients marked organic are specifically high in pesticides when grown conventionally
Variations: Add organic leafy greens, and ANY cooked meat to change it up.
This is hearty enough to serve as a main course and can be stretched by serving over rice or Non-GMO polenta
By Marisa Moon
My Longevity Kitchen https://mylongevitykitchen.com/
Isn’t it awesome when you find a tasty recipe that only requires a few ingredients?
Check your spice cabinet for ground cumin and smoked paprika…
Not in there? Go and get some!
These two spices are at the very top of my list. Cumin gives you that warm taco meat flavor, and smoked paprika gives you a smokey red pepper kick!
That’s basically all you need for this recipe. And the star ingredient?
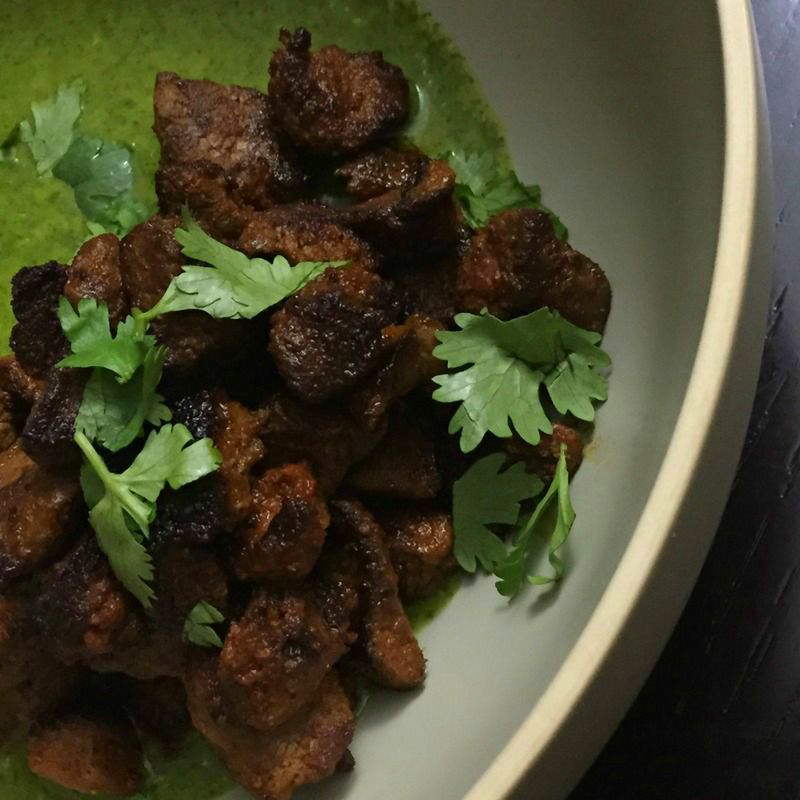
My favorite meat: Lamb.
Besides the superior flavor, do you know what’s so great about lamb? Lamb is not as mass produced as beef, chicken, and pork, so you can be sure the lamb you are buying is almost always living a good life…which means it’s healthier for us to eat. When you see New Zealand on the lamb label, that tells you the lamb was eating grass just like nature intended. This means that the meat is higher in omega 3’s and lower in the inflammatory omega 6’s (compared to animals fed grain).
Sheep Farming in New Zealand (Wikipedia)
What do we do with this super easy, 3 ingredient spice rub????
You can use this spice rub on lamb chops, kabobs, and mix it into lamb burgers. But the easiest preparation (which I choose to make time and time again) is to get some diced, trimmed, leg of lamb, marinate for 30+ minutes in this spice rub, and give it a quick sear in a hot pan.
Longevity Tip: Choose your oil, or what I like to call “cooking fat” wisely. Oils that have lower smoke points (temperatures at which they break down) will release dangerous stressors in the body…so it’s important to choose specific cooking fats for high heat cooking! I give you many options in the recipe notes, but just grab a bottle of avocado oil if you want something pour-able and easy to use. Want to understand more about fats and their smoke points? Read this
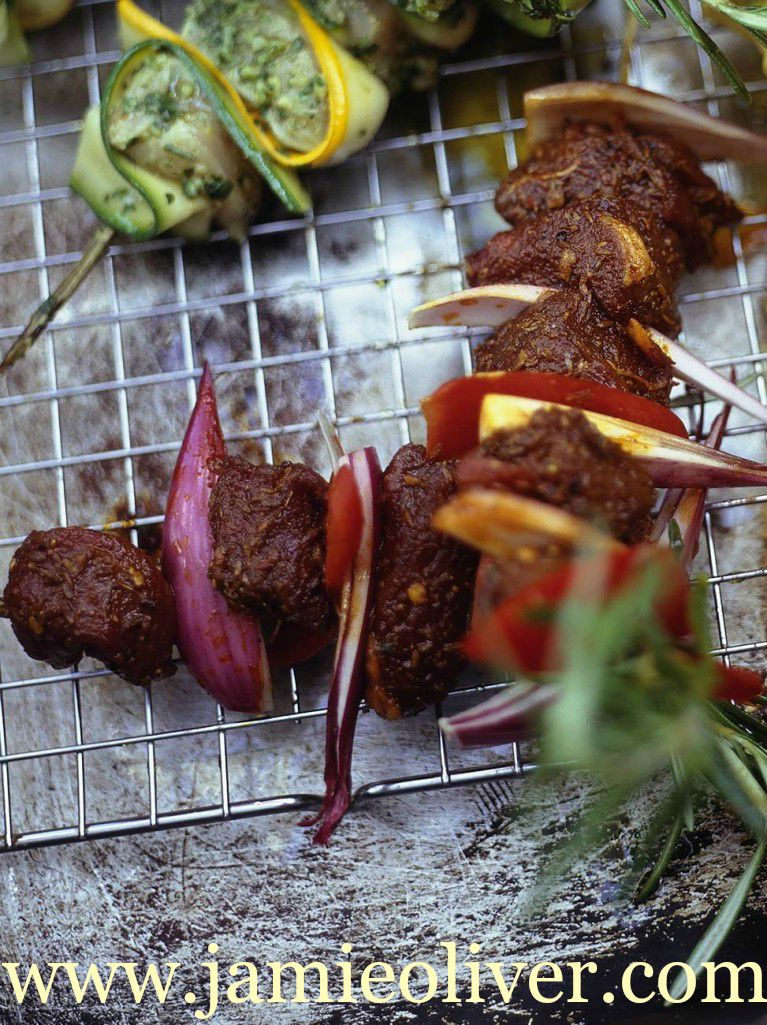
If you want to make lamb kebabs, ask the butcher for a boneless leg of lamb, trimmed and cubed into 1.5 inch pieces. They’ll do it for you, so just ask! The trimming is important because the fat won’t have time to cook when you are using a high heat method like the grill. Coat the meat in the spice rub about 30 minutes before hitting the grill, and let it marinate at room temperature. When skewering the meat, it is best to do the meat on its own, with space between each piece of meat. I know it looks pretty mixed with vegetables (like Jamie Oliver’s version below), but make it worth your money and cook it properly. Space between the meat allows each piece to cook more evenly, and there aren’t any veggies getting in the way either. On a hot grill, you cook the meat for just a few minutes max, per side. If you have big pieces of meat, you’ll have to find a cooler spot on the grill so the spices don’t burn before it’s cooked. Pull the lamb off when it’s medium rare! It will continue to cook when it cools, and you want it to be tender.
The inspiration for my spiced lamb came from Jamie Olivers Marinated Lamb Kebabs Recipe. I made the kebabs for a party, and people were goin’ crazy for them! I mean, we went through 10 lbs of New Zealand Lamb in no time! 3 people asked me for the lamb recipe, so I knew I had to post it on my blog one day. I originally altered Jamie Oliver’s recipe by simplifying the ingredient list…using only cumin, smoked paprika, and salt. It was a huge hit, and I never turned back.
I made it the past few times with a locally sourced lamb stew/kebab meat from Seven Sons Farms. Seven Sons Farms distributes and deliveries responsibly raised meat from farms all over the midwest! Check it out if you live in Illinois, Michigan, Indiana, Wisconsin, or Kentucky.
Buying from a local farm can mean a little more fat trimming at home. You can see here the before and after photo of lamb I trimmed.
You want this lamb to be tender, and succulent, and worth every penny. That’s why we trim. The fatty white tissue will be too chewy in this quick-cooking method. I saved all the fat and scraps for a tomato sauce (just sear the fat, add garlic, tomatoes, olive oil, salt, and cook partially covered for an hour, stirring occasionally). These small cubes of lean meat I ended up with are perfect for a quick sear in the pan.
Are you ready to make the quick and easy version of my 3 Ingredient Spice-Crusted Lamb?
This lamb, or any meat for that matter, goes perfectly with chimichurri sauce. The vinegar and bold flavors are perfect for this spicy smoky masterpiece. I LOVE it with a cilantro based chimichurri because the cilantro is strong enough to stand up to the lamb. Try and make your own chimichurri with my recipe template here. You can make this fresh Argentinian sauce in so many different ways, and I show you how in this build-your-own Chimichurri recipe!
Tag me in your lamb photos on facebook or instagram @mylongevitykitchen #mylongevitykitchen
3 Ingredient Spice-Crusted Lamb
2015-09-29 18:57:30
Serves 2
An unexpected combination of cumin and smoked paprika makes this 3 ingredient lamb so easy and satisfying. People will be asking for your recipe! I show you how to make it quickly in a hot pan so you can have a lamb dinner on the table in 5 minutes!
1 lb leg of LAMB, 1 inch cubes trimmed of most visible fat (see notes for variations)
Instructions
Check to be sure your lamb is cut into about 1 inch pieces, and trimmed of most the white fat and tissue.
Mix all of the ingredients together EXCEPT the lamb, and make a spice paste to coat the lamb.
Add the lamb and rub the marinade all over. Let it sit, partially covered for 30 minutes to 1 hour at room temperature, or longer in the fridge (bring back to room temp before cooking).
Heat a heavy pan over high heat, or heavy duty foil on a hot grill. Add a little avocado oil or other high heat cooking fat to the pan a minute before you are ready to drop in the lamb.
Add the marinated lamb to the hot pan letting it sear on one side for 1 minute.
Flip the lamb pieces using tongs or a spatula and leave for 1 more minute to sear another side of the meat.
Pull out a smaller piece and check for doneness. I usually transfer all of the meat to a plate after only 2 minutes of cooking! It will continue to cook as it rests.
Sprinkle with a little salt when done cooking, serve with potatoes or rice, and chimichurri sauce if desired (see previous post or links above in this article)
Notes
Lamb Cuts: You can use this spice rub on lamb chops, kebabs, and mix it into lamb burgers. See this blog post article for kebab instructions.
Cooking Fats for High Heat: Ghee, macadamia nut oil, palm oil, palm shortening, beef tallow
By Marisa Moon
My Longevity Kitchen https://mylongevitykitchen.com/
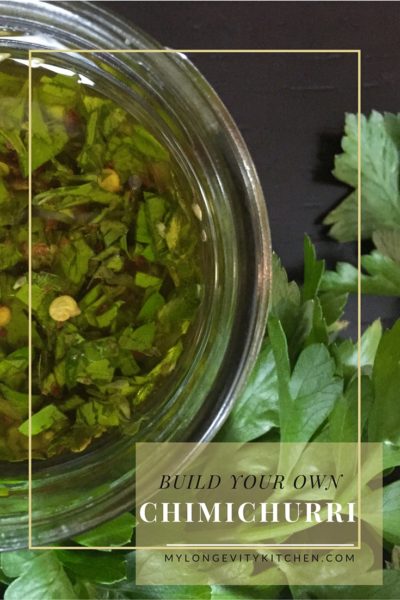
This recipe will save any dish that goes wrong in your kitchen.
It’s a game changer.
I’m talkin’ about a flavor-packed meal in the blink of an eye. With this sauce you can transform just about anything. Trust me, people will be asking for seconds.
I’ve been making chimichurri for many years now. My husband fell in love with chimichurri long before he met me because he spent some time in Brazil. Together, years later, we dined at a famous Argentinian steak house in Chicago, called Tango Sur (white tablecloth, Argentinian staff, no reservations, and BYOB!). Tango Sur serves up steaks the size of the dinner plate, and along-side is a bowl of this glorious tangy garlicky sauce: Chimichurri.
Thank you Argentina, for bringing this to the American table.
Basically, Chimichurri is like a vinegary pesto, without the cheese or nuts. It is herbs, fresh and dried, with garlic, vinegar, plenty of oil, water, sometimes lime, and peppers, onions, and spices.
What do I serve it with?
Almost ANYTHING. This stuff is like money in the bank. It will last in your fridge for weeks, and kick all your dishes up about ten notches. Try it with any seafood, any meat, and as a dip or salad dressing. Saute shrimp and greens in this sauce, or just pour it over the finished product. One of my favorite things to do with chimichurri is a quick tomato salad – especially when I am serving something with chimichurri already – putting it in the salad dressing just ties the whole meal together. And it’s so fast and easy!
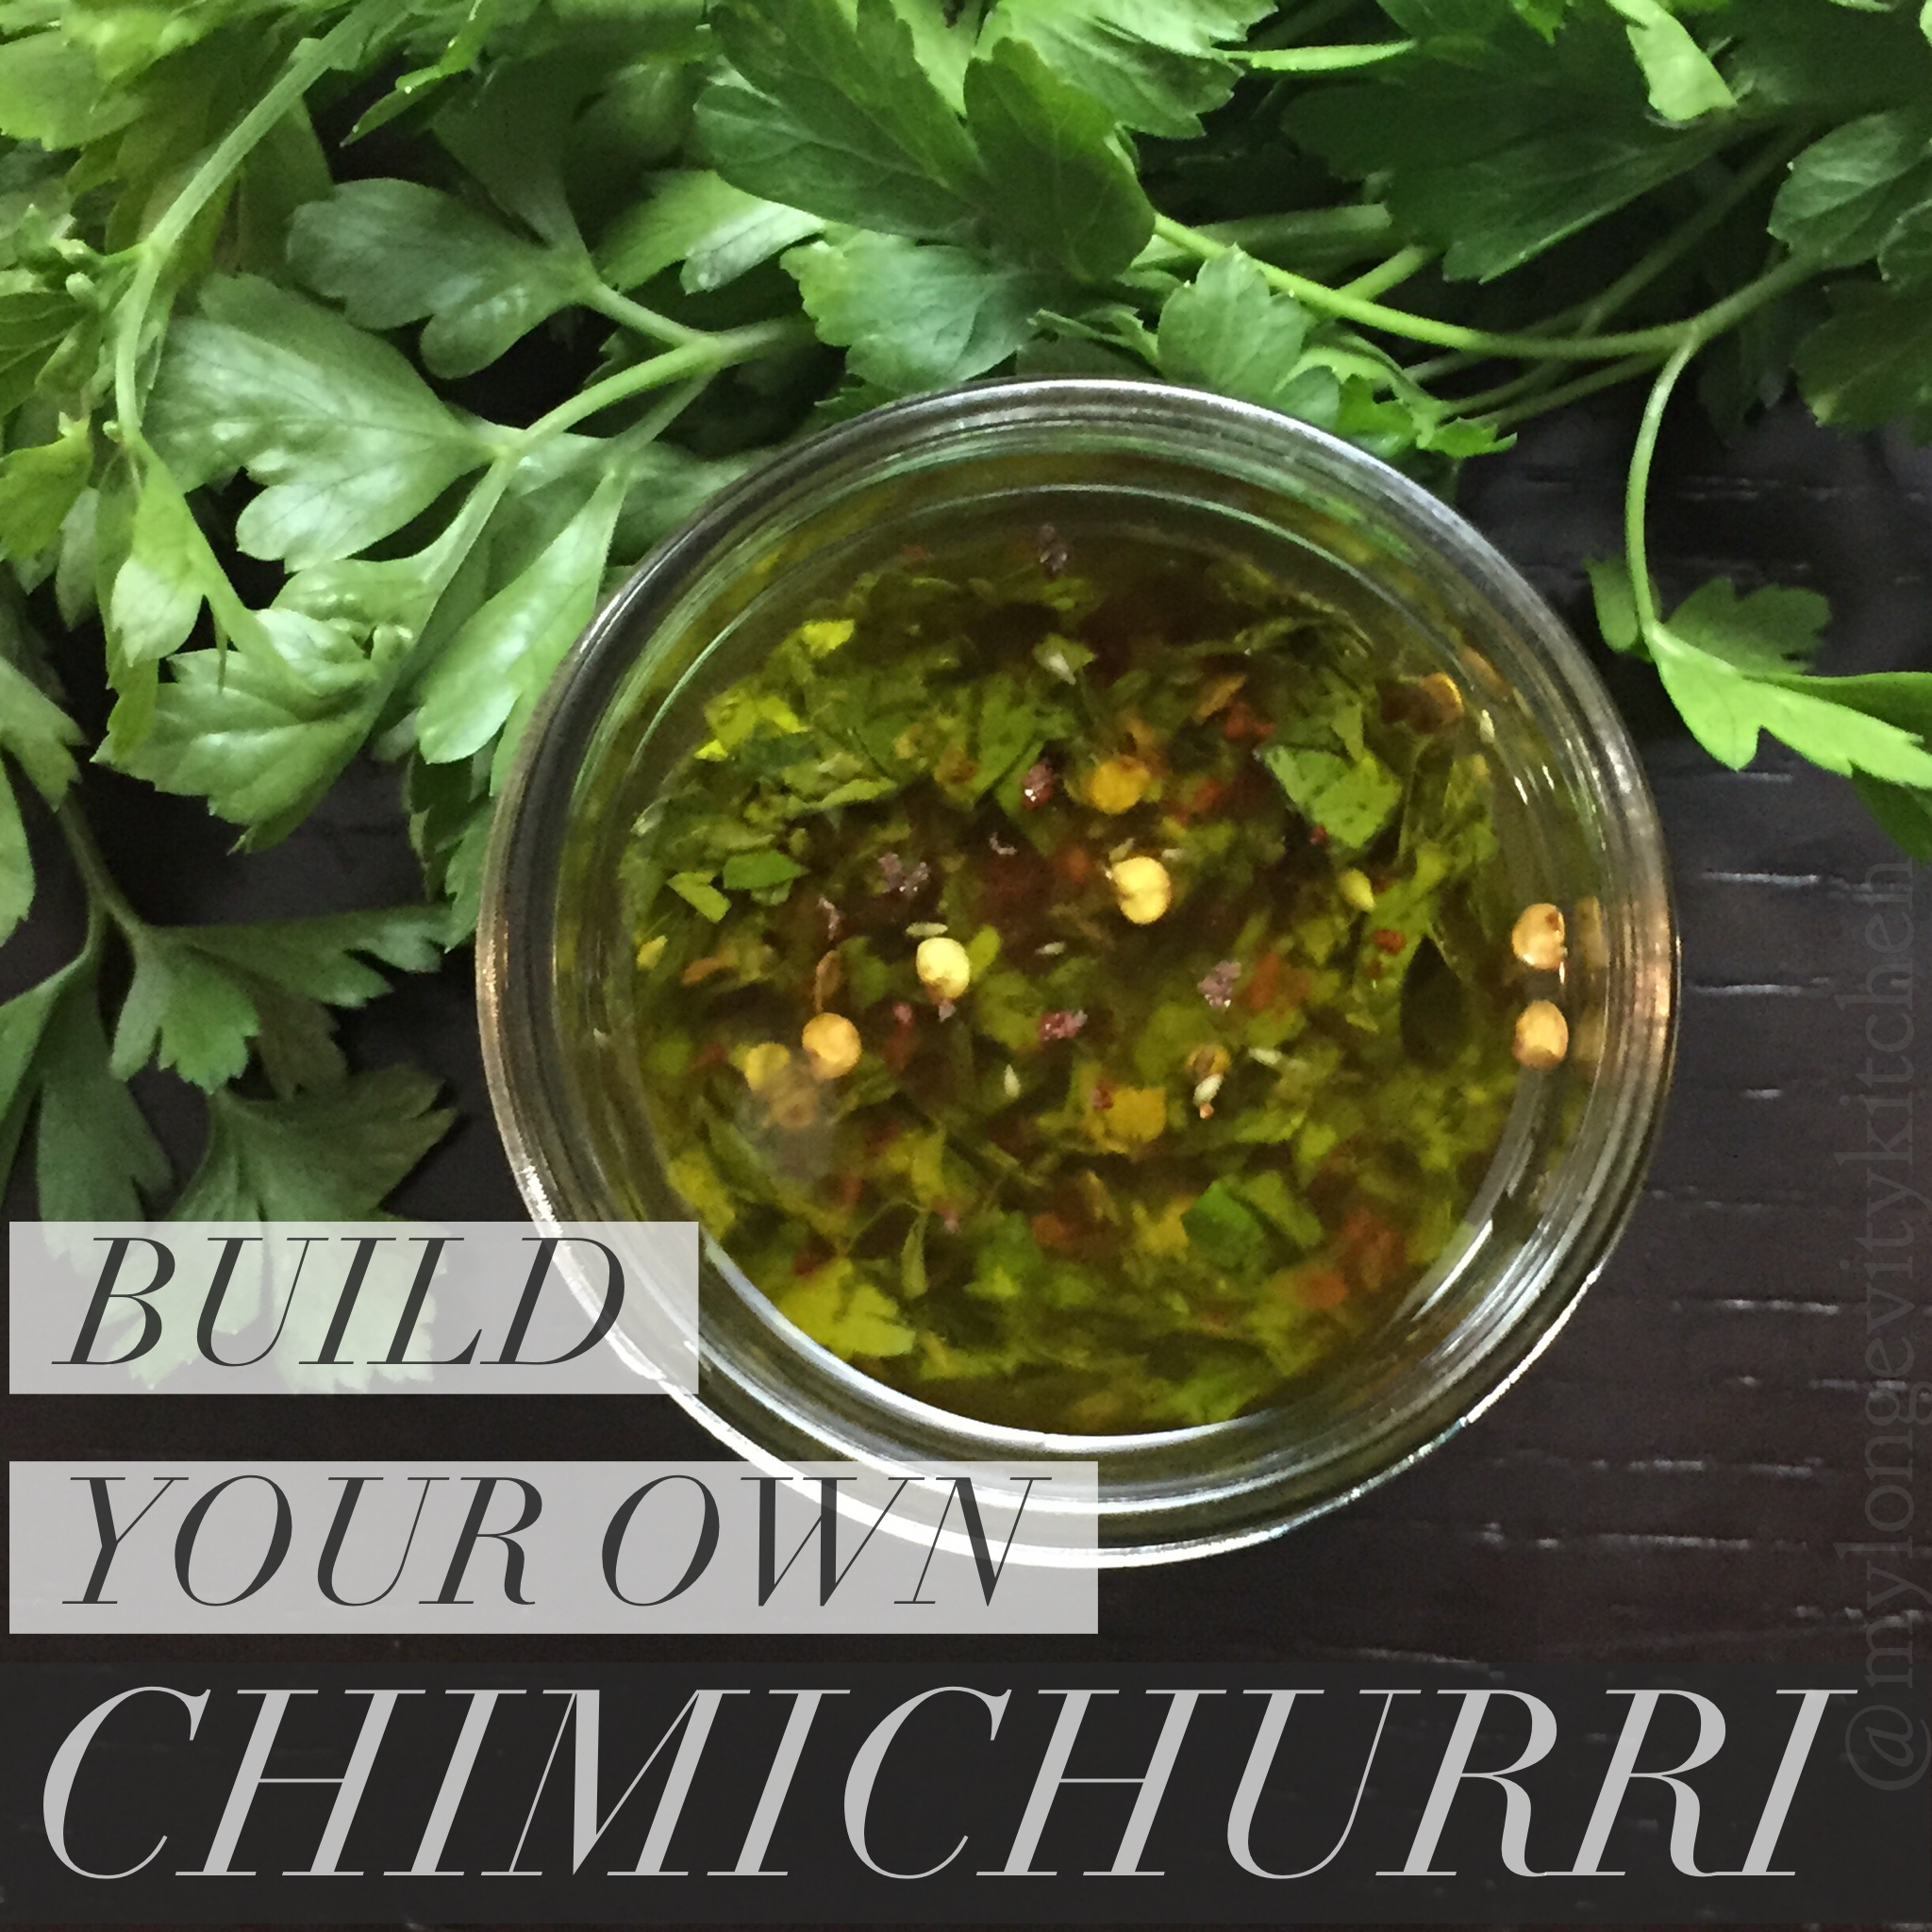
I made this recipe BUILD-YOUR-OWN because you can truly customize it to your liking. I love making chimichurri with Cilantro…but honestly? That’s not really chimichurri. The authentic version would not use cilantro. BUT WE LOVE IT! It’s fun to combine cilantro and parsley in different quantities. And it’s great to be able to swap out ingredients according to what you already have on hand!
The best part is there are two ways to actually make this. You can do it by hand, chopping everything real fine, just like they would in an Argentinian kitchen; or you can use a food processor like we do in the modern world because we like everything to be FAST AND EASY! Am I wrong?
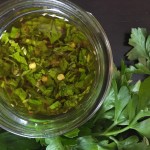
Authentic Version by Hand
Spiced Lamb with Chimichurri
Garnished Food Processor Version
Cilantro Base, in Food Processor
Food Processor Version
Authentic Version by Hand
I would like to take a moment to send a shout out to the Italian man who started The Slow Movement, in 1986. From the farming of the food, to the preparation in our homes, to the time we finish eating; food should be cherished. Time should nearly stand still.
Food is a wonderful thing, especially when it’s made with your own two hands.
Go on and rock this recipe out whichever way you’d like. Don’t be afraid to try new things, ask questions, and taste as you go! And look at my notes at the bottom of the recipe for some great ideas for serving and storing this sauce!
Tag @mylongevitykitchen on Instagram or Facebook, or #mylongevitykitchen.
Build-Your-Own-Chimichurri
2015-08-28 20:17:50
Yields 1
This vinegary herb based sauce is so versatile already. But this recipe makes it more versatile than ever! Build-your-own Argentinian-style chimichurri based on what you have on hand! Chop it up the old fashioned way, or blend it in the food processor to save time. You pick the ingredients, and you pick the method!
FRESH OR DRIED OREGANO, MARJORAM, or THYME. ¼ Cup Fresh OR 1 Tbsp Dried (oregano is traditionally used)
1 tsp each SALT & PEPPER
1/3 Cup ANY Combination of WINE VINEGAR and/or Lime Juice (Red Wine Vinegar is traditionally used)
2-4 Tbsp WATER
3-4 Cups loosely packed FRESH PARSLEY OR CILANTRO or ANY COMBINATION of these herbs (Parsley is traditional, Cilantro is a flavor explosion)
¾ Cup EXTRA VIRGIN OLIVE OIL
Optional Additions
1 FRESH HOT PEPPER OR ½ BELL PEPPER, minced
½ SHALLOT OR ¼ ONION, minced
2 teaspoons CRUSHED RED PEPPER
1 teaspoon PAPRIKA
Directions to Make By Hand (traditional method, rustic sauce, beautiful finish)
Mince all of the garlic, fresh herbs, and any onions or peppers.
To take the edge off the garlic (and onion if using), mix all base ingredients except for the parsley/cilantro and olive oil, PLUS now you will add your “optional add-ins”. Let this mixture soak for 30 minutes room temp or longer in the fridge (overnight is fine). You may also add the herbs now, which is more traditional, but the bright green herbs will turn a dull color. To save time you can skip this step and add everything at once.
Add the herbs and 3/4 cup of olive oil.
Taste and decide if the vinegar is too strong for your taste. You can add up to 2 more tablespoons of water (when you use mostly parsley, you will want to add more water; cilantro can stand up to the vinegar much better). Taste for salt, and Enjoy!
Keep this in a jar in the fridge for weeks. See notes for more ideas.
Directions to Make in Food Processor (less chopping by hand, smoother sauce)
If using food processor, still roughly chop the garlic, onion and fresh pepper to assist in proper mixing.
To take the edge off the garlic, mix all of the base ingredients EXCEPT the fresh herbs and olive oil, PLUS the “optional add-ons”. Let this mixture rest for 30 minutes at room temp, or longer in the fridge (overnight is fine). To save time you can skip the step of resting 30 minutes.
Add the fresh herbs to the food processor and pulse just a few times.
Now add everything else to the food processor and turn it on for literally a second, just to mix. For a creamier sauce you can add everything EXCEPT the olive oil, and pour it into the machine while it is running. This will thicken the sauce a bit, and really blend it smooth.
Taste if you like the strong vinegar flavor, or add up to two tablespoons of water (using parsley calls for more water, but cilantro can stand up to the vinegar better). Taste for salt, and enjoy!
Keep this in a jar in the fridge for weeks. See notes for more ideas.
Notes
My Favorite version is mostly cilantro, some parlsey, and some fresh oregano. I mix red wine vinegar and lime juice, and blend in the food processor. The flavor is insane!
You can even freeze chimichurri in ice cube trays. Once they are frozen, transfer to a freezer bag, and then use them to add flavor to dinner whenever you want!
Try it as a Salad dressing
Boil/Steam Potatoes and toss with Chimichurri for a killer potato salad
Amazing with any type of fish or meat
By Marisa Moon
My Longevity Kitchen https://mylongevitykitchen.com/
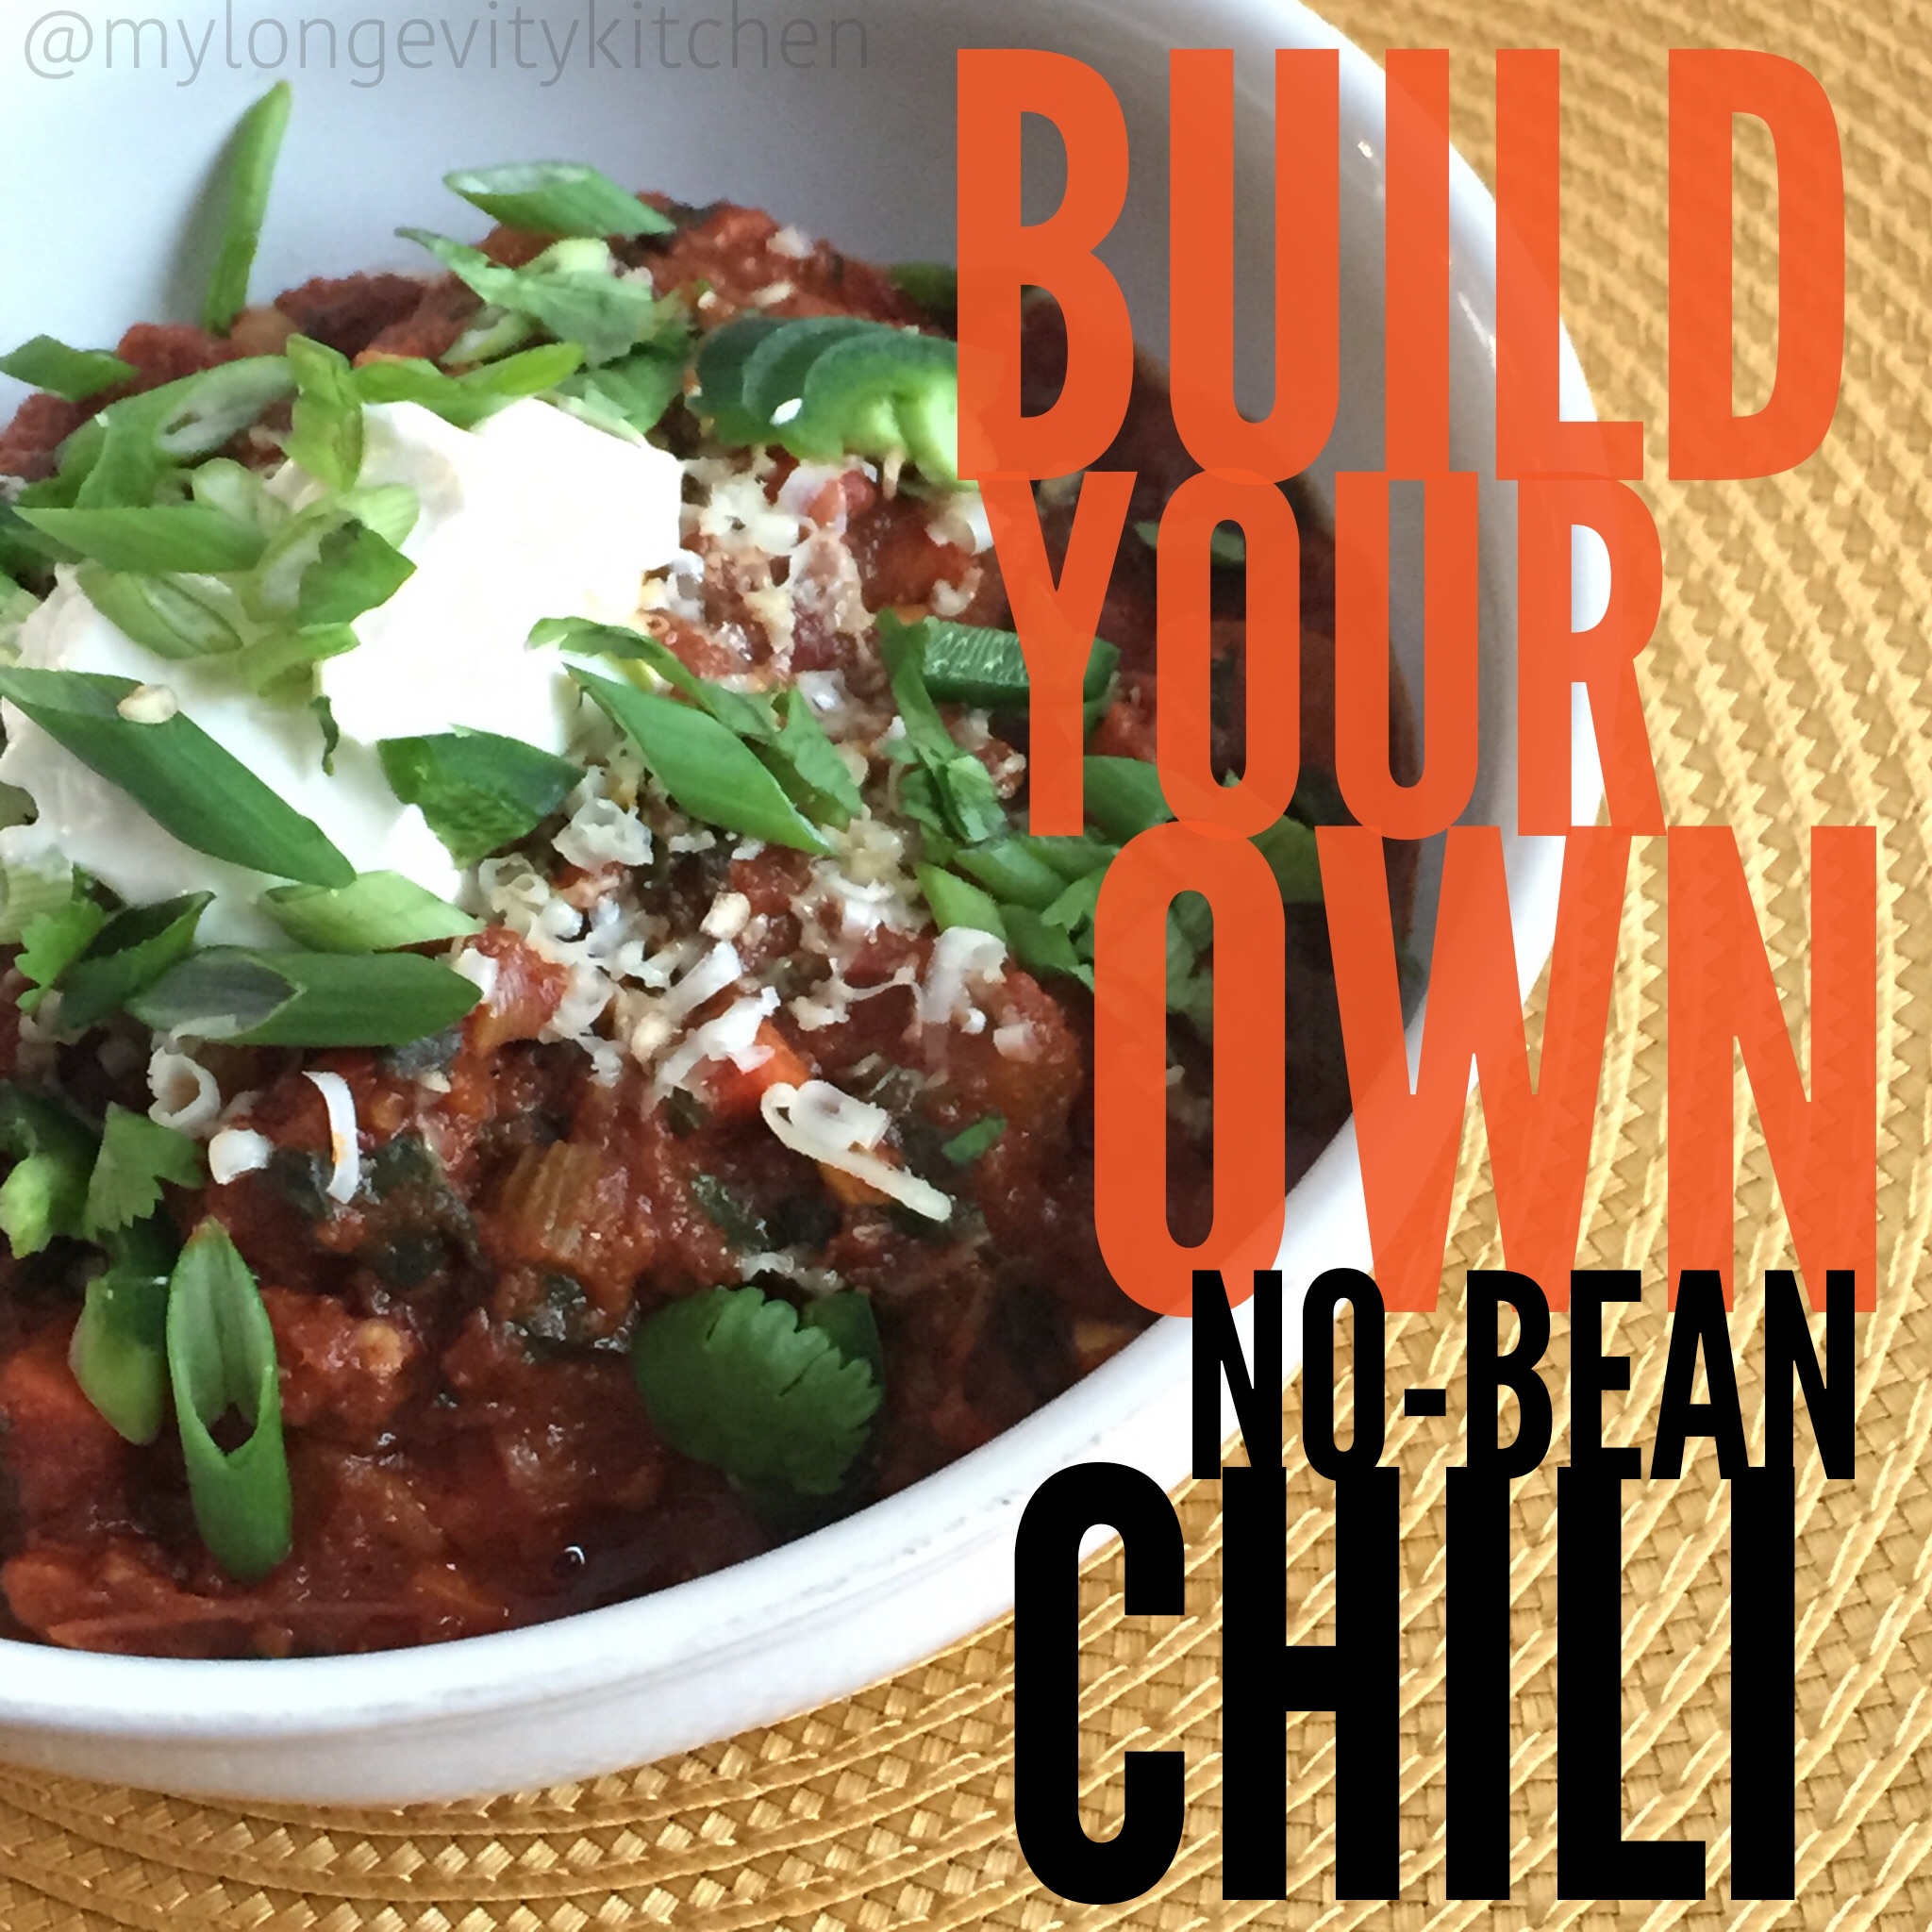
A good bowl of chili is like a warm hug in front of the fireplace…and a GREAT bowl of chili is homemade and packed with veggies!!!
Chili can be so flexible. So forgiving. It can be fast or slow, meaty or vegan. It can be thick or stewy, spicy or mild. It can be a one pot meal, a crock pot meal, and it freezes perfectly for your convenience. I just HAD to make this recipe “Build-Your-Own”.
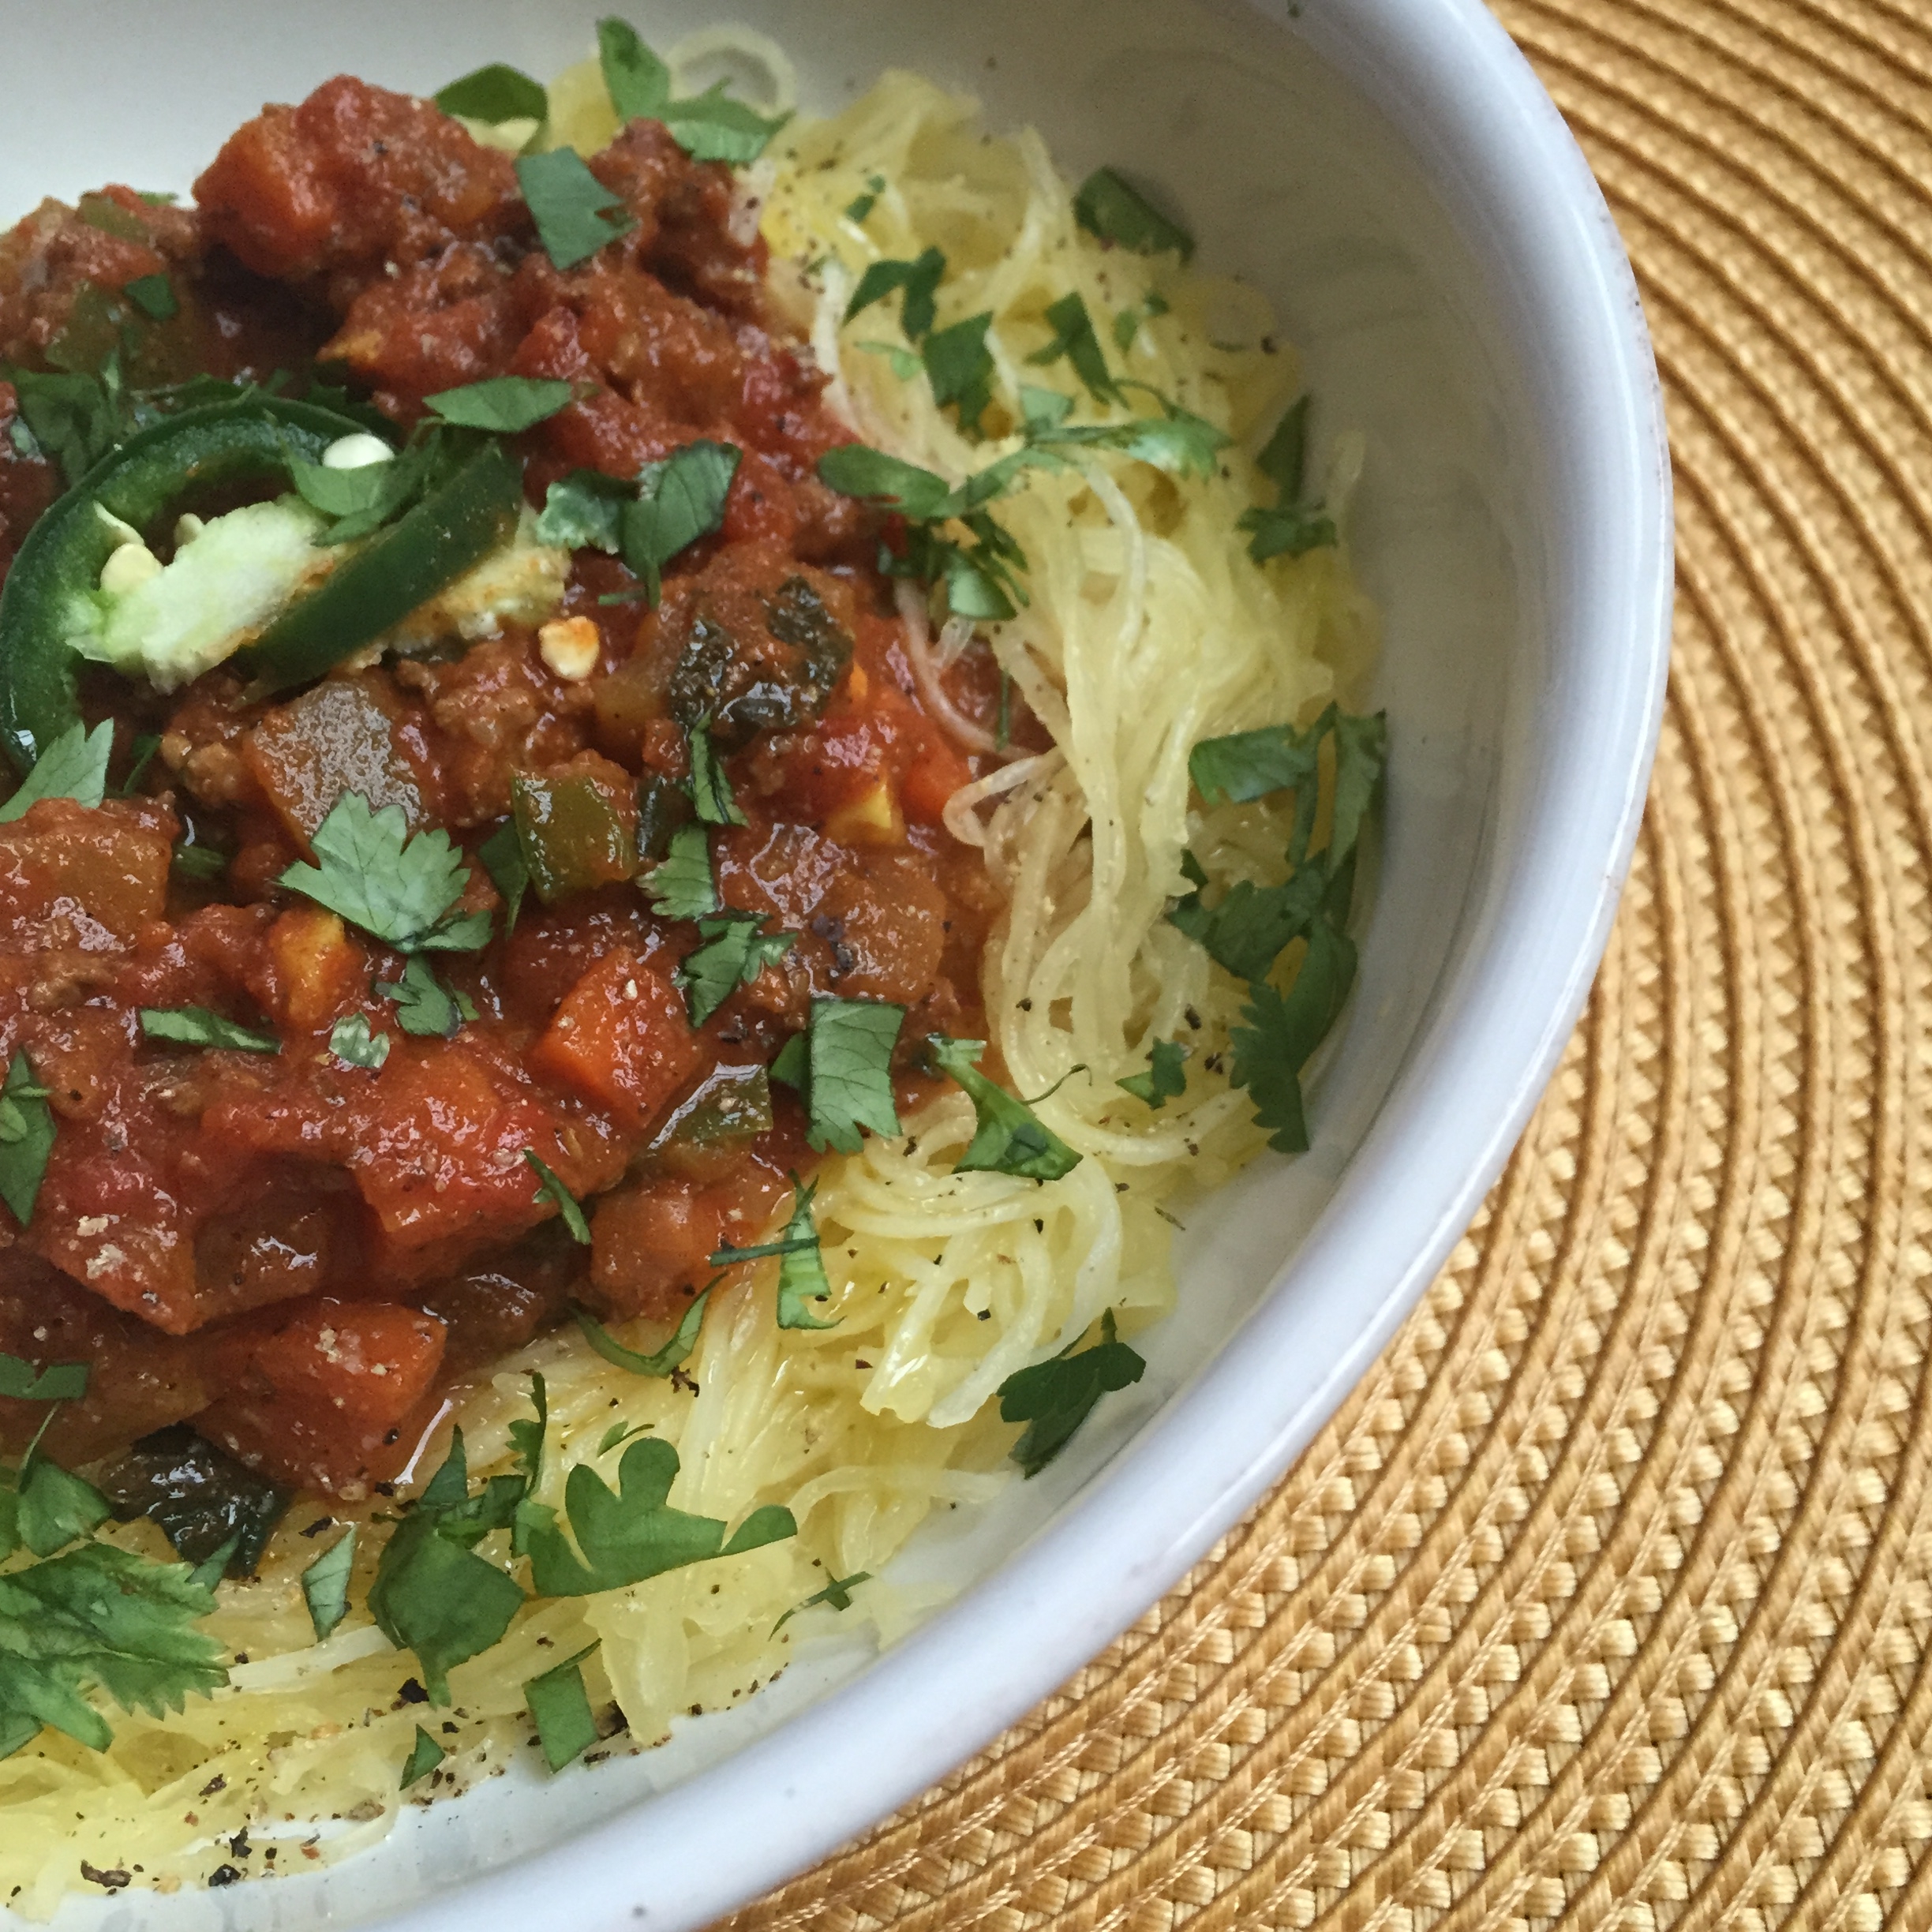
This is not a precise recipe that you have to adhere to. You don’t have to run out and shop for the ingredients. You can make the chili spice blend from scratch, or you can cheat and skip a few steps (see recipes at the bottom). You can choose your favorite veggies and meat, or just use whatever you’ve already got! I love it on a bed of spaghetti squash…
I have made this chili several times this winter, and it’s perfect every time.
Longevity Tips…
What kind of meat will you use? Chili enthusiasts will argue which cuts of meat are appropriate for chili.
I say anything goes!
This is a great opportunity for you to cook with grass-fed beef or bison if you don’t already. The grass-fed ground beef can be found for as low as $3/lb, and the bison may be expensive, but in this veggified chili dish you will be stretching that $8/lb ground bison into 4-6 meals! Bison is more wild, and has even more longevity benefits than grass-fed beef. You may also use grass-fed beef stew meat diced small, chuck roast/pot roast diced small in 1/2 inch pieces. You can change it up entirely and go with some organic ground turkey or chicken…although I always suggest ruminant meats (grass grazing mammals: cows, lambs, bison, and goats) over poultry because they are more nutritious.
Now…WHY NO BEANS?? You might be thinking beans will add bulk for less buck; but that’s not the way I look at beans or legumes.
I look at beans or legumes as a specialty item you should be cooking with only if you take the time to prepare them the old-fashioned way.
You’ve probably seen few recipes that instruct you to soak the beans overnight. Soaking beans and legumes overnight (grains too), is the proper way to treat these foods in order to ensure proper digestion and mineral absorption. Not until the last 30-50 years have we been in such a hurry to skip this crucial step required to cook nutritious legumes. When you use beans in the can, you can be sure they were not soaked or cooked properly. They can cause digestive distress and block the absorption of all those beneficial minerals they are known to contain. So, only use those canned beans when you are in a bind! And take the time to learn more about cooking your beans. Soaking overnight sounds hard, but it’s hands free and only takes a little planning! Read more about the big legume debate here, from my favorite myth busting expert Chris Kresser
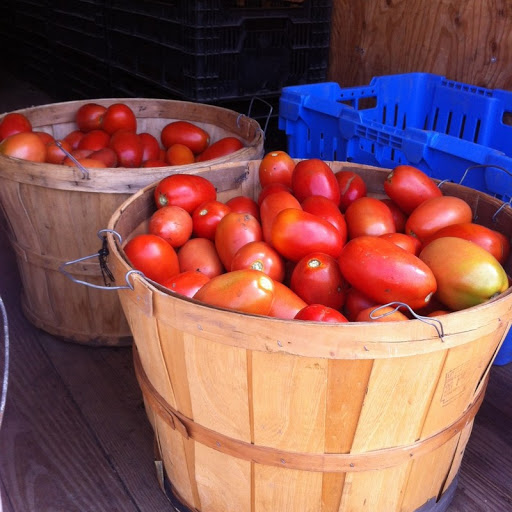
Bushels of organically grown tomatoes from my friends at Smits Farms in IL/IN
Lastly, lets take a minute to recognize the star of this dish. The cooked tomatoes.
Tomatoes, like other fruit, multiply in nutrients when you cook them. And the longer you cook them, the more nutrtients they will provide you! “Just 30 minutes of cooking can more than double their lycopene content,” and lycopene is the cancer-fighting, skin-enhancing compound that makes tomatoes red! Start cooking with organic tomato paste for the big win. This concentrated form of tomatoes has up to 10 times the lycopene of raw tomatoes!
Time out.
If you aren’t already buying organic tomatoes, you should start right now. Standard tomatoes are sprayed with some of the highest levels of herbicides/pesticides being used. These chemicals are “classified as ‘bad actors’ by the Pesticide Action Network (PAN). A “bad actor” is a chemical that is toxic, promotes cancer in lab tests and animal studies, interferes with reproduction, or contaminates the environment.”
And skip the traditional cans because they are lined with all sorts of chemicals that tomatoes leach from (even if they are BPA free). Go for glass jars or cartons of organic tomato products.
“But Marisa! They’re wayyyy too expensive!”
Everything healthy is expensive if you buy it at regular price. I stock up on organic tomato products when they are on sale. You can often get glass jars around $3 a piece or less! Keep your eyes peeled and start stocking up (hello Costco). It is worth it people. Why use a cancer-fighting food if you are going to burden your body with loads of chemicals at the same time? I heart organic tomatoes.
It’s Time To Cook…
This is the type of dish you make on a Sunday when you might be interrupted a million times while cooking, you are feeling kinda lazy, and you want to make a dish worthy of family praise. Although very simple, this is the type of dish you have to prep the ingredients first!You cannot chop-as-you-go! This might sound a little troublesome, but it’s actually to your advantage in many ways. You can chop all the veggies up to a day in advance. Consider making a triple batch of chili seasoning in the recipe below, and use it later to give anything a spicy, smokey, warming flavor.
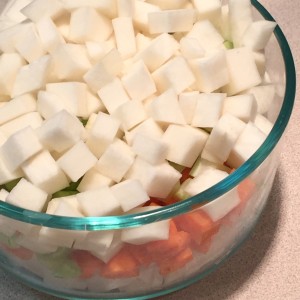
Veggie Prep: Onion Carrot Celery Turnip
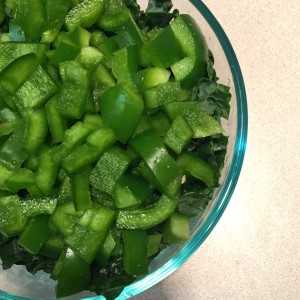
Veggie Prep: Bell Pepper, Jalapeno, Kale
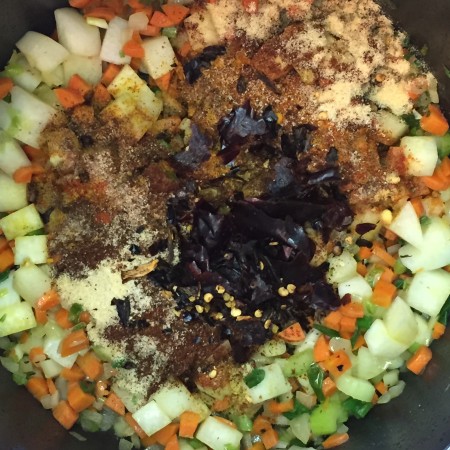
The Time I Added Dried Chiles
The Yummy Spices All Mixed In
Because this recipe is so chillaxed, you will need to get your salt and pepper arsenal ready and spice this chili with some intention! We will likely use different broths, different meats, or different tomatoes, different veggies; our salt is probably different types or grain sizes, and we may even be using different spices! For that reason, I cannot tell you how much salt you need; I can only guide you.
OH! ANDBUY YOURSELF A SALT CROCK ALREADY!
Stop using the salt shaker from the table, and get real chef! You need to be picking up the salt with three fingers, and sprinkling it over your food like they do on TV. That’s how you get your food to taste good! Buy a salt crock, buy a bag of fine sea salt, and start practicing your salt showers today! P.S. It is almost impossible to get too much sodium in your diet when the food is homemade and you use sea salt.
Now that you are armed and ready to make a pot of longevity chili, you better get goin! Tag me in your delicious photos, and tell me how it goes! @mylongevitykitchen #mylongevitykitchen
Build-Your-Own No-Bean Chili
2015-03-11 00:04:45
Serves 4
You'll find it hard to believe that 8 cups of veggies are jam packed into this no-bean chili. With the combination of grass-fed meats, slow cooked tomatoes, all those veggies, and homemade spice blends, you can really deliver the nutrition in this old-time family favorite. AND with this flexible recipe, you can customize it to your liking! Try it with different veggies, different meats, the slow-cooker method, and build-your-own spice blend. I've laid it all out for you in this DIY chili template.
1 tsp TURMERIC (optional, brightens the red color in chili)
½ tsp GROUND MUSTARD(optional)
½ tsp CHIPOTLE Powder, or any Hot Chile Powder like cayenne (optional for spicy food lovers; Chipotle adds smoky flavor)
Cheater Chili Powder (if you reallllly don't want to make the above recipe)
4 Tbsp CHILI Powder
½ Tbsp GARLIC Powder
½ Tbsp ONION Powder
1 tsp CUMIN
Veggie Prep
4 Cups HARD VEGGIES, diced (any combination of Onions, Celery, Carrots, Turnip, Rutabaga, Squash; I suggest 1 cup of onions, 1 cup of carrots, and any combo for the last 2 cups)
3 Cups of LEAFY GREENS (any combo of any combination of kale, swiss chard, mustard greens, collards, or spinach)
4 Cloves GARLIC, peeled and chopped at least 10 minutes before cooking (activates anti-cancer properties)
COOKING FAT, for High Heat (e.g. palm oil, ghee, avocado oil, organic lard, palm shortening, bacon fat)
1 lb Grass-fed/Organic MEAT (e.g. grass-fed ground beef, grass-fed stew meat diced 1/2 inch small, organic/pastured ground turkey or chicken, and my favorite is ground grass-fed bison)
1 batch of Longevity Chili SEASONING (approximately ½ Cup or as measured above)
40 oz Organic canned/jar TOMATOES (approximately 4-5 cups; you may used diced, peeled, crushed, or I prefer whole peeled tomatoes smashed)
1.5 Cups Bone BROTH or Stock (beef or chicken)
Sea Salt and Black Pepper
Instructions
Prepare your chili seasoning blend, and prep all of your vegetables.
If cooking with the old-fashioned stove-top method, continue to step 4.
If using the crockpot/slow-cooker, throw all of the ingredients in and set timer for Low (8 hrs) or High, (5 hrs) depending on your schedule. Use the browning method if your cooker has one, and brown the meat first for more flavor. If you like a thicker chili, transfer to the stove top for 10 minutes at a light simmer, uncovered and most of the liquid will reduce. See notes for toppings!
Heat a stock pot with 2 Tbsp of cooking fat.
When it's hot, add your meat, and season with salt and pepper. You should hear the meat sizzle.
When the meat is browned on all sides, remove it with a slotted spoon, and set aside.
Now add 2 more Tbsp of COOKING FAT, turn the heat to high, and throw in your 4 cups of the HARD VEGGIES (onions, carrots, etc...)
SEASON with salt and pepper and cook for 3 minutes, stirring occasionally.
ADD GARLIC and LEAFY GREENS. Cook 1 minute, stirring occasionally.
Add your MEAT and your longevity CHILI SEASONING, and stir. Can you smell the lovely spices?
When the spice mixture aroma fills the air, about 1 or 2 minutes, you will add the TOMATOES and the bone BROTH/stock.
Stir and bring everything to a simmer. Stir again and REDUCE HEAT to low, COVER PARTIALLY and set a timer for 30 minutes (partially covering it allows liquid to evaporate, and your chili to thicken).
ADD your diced PEPPERS and 1 TBSP SALT, partially cover, and set timer for 15 more minutes.
Uncover and STIR. If your chili is soupy, simmer for 10 more minutes uncovered. Taste for salt, and serve. See notes below for yummy toppings!
Notes
Suggested Chili Toppings include scallions, fresh jalapenos, cilantro, pickled peppers, organic sour cream or yogurt, diced avocado, and guacamole.
Stretch this dinner by serving over spaghetti squash or rice that is seasoned with olive oil, salt and pepper.
This recipe is freezer friendly.
Tag me in your photos! @mylongevitykitchen #mylongevitykitchen
By Marisa Moon
My Longevity Kitchen https://mylongevitykitchen.com/
Braising is cooking something in liquid, at a low temp, usually after searing it first.
Why do I love braising?
It is easy; almost foolproof (unless you have too little liquid and burn your food), it always yields a flavorful, professional quality dish; and it is one of the greatest cooking methods for longevity.
What makes it healthier than other cooking methods?
Just like our modern lifestyle, we like everything fast. We usually crank up the heat on our grills, ovens, and stoves, and quick cook our favorite foods to get a crusty, smoky, texture and flavor. This is tasty, no doubt, but I would rather leave that for the grilling season… allow me to explain with a quote from my favorite nutrition book, The Perfect Health Diet by Paul Jaminet, PH.D., and Shou-Ching Jaminet, PH.D.:
“In meats that are grilled, barbecued, or pan fried, heterocyclic amines (HCAs) form from amino acids, sugars, and creatine. Formation of HCAs is substantial at temperatures around 400 degrees F. HCAs can cause cancer.”
Take a look at the warnings on www.cancer.gov, and see for yourself.
Is this definitive? Can we be positively sure? No. It’s nearly impossible to test such a thing in controlled studies, especially on humans.
But, gathering the information we have so far, HCAs and PAHs are dangerous to our DNA and might be making us especially vulnerable to cancers.
What are HCAs and PAHs? They are chemicals created during the process of cooking meats at high temperatures, or over an open flame.
I love the smells and flavors from grilling and roasting meats just like everyone else, but I am content now knowing that those cooking methods should be saved for specific occasions.
Braising is a great technique to learn. You will find this cooking method works well on many of your favorite foods! This works especially well with inexpensive cuts of meat, meat on the bone, and hearty vegetables.
This slideshow requires JavaScript.
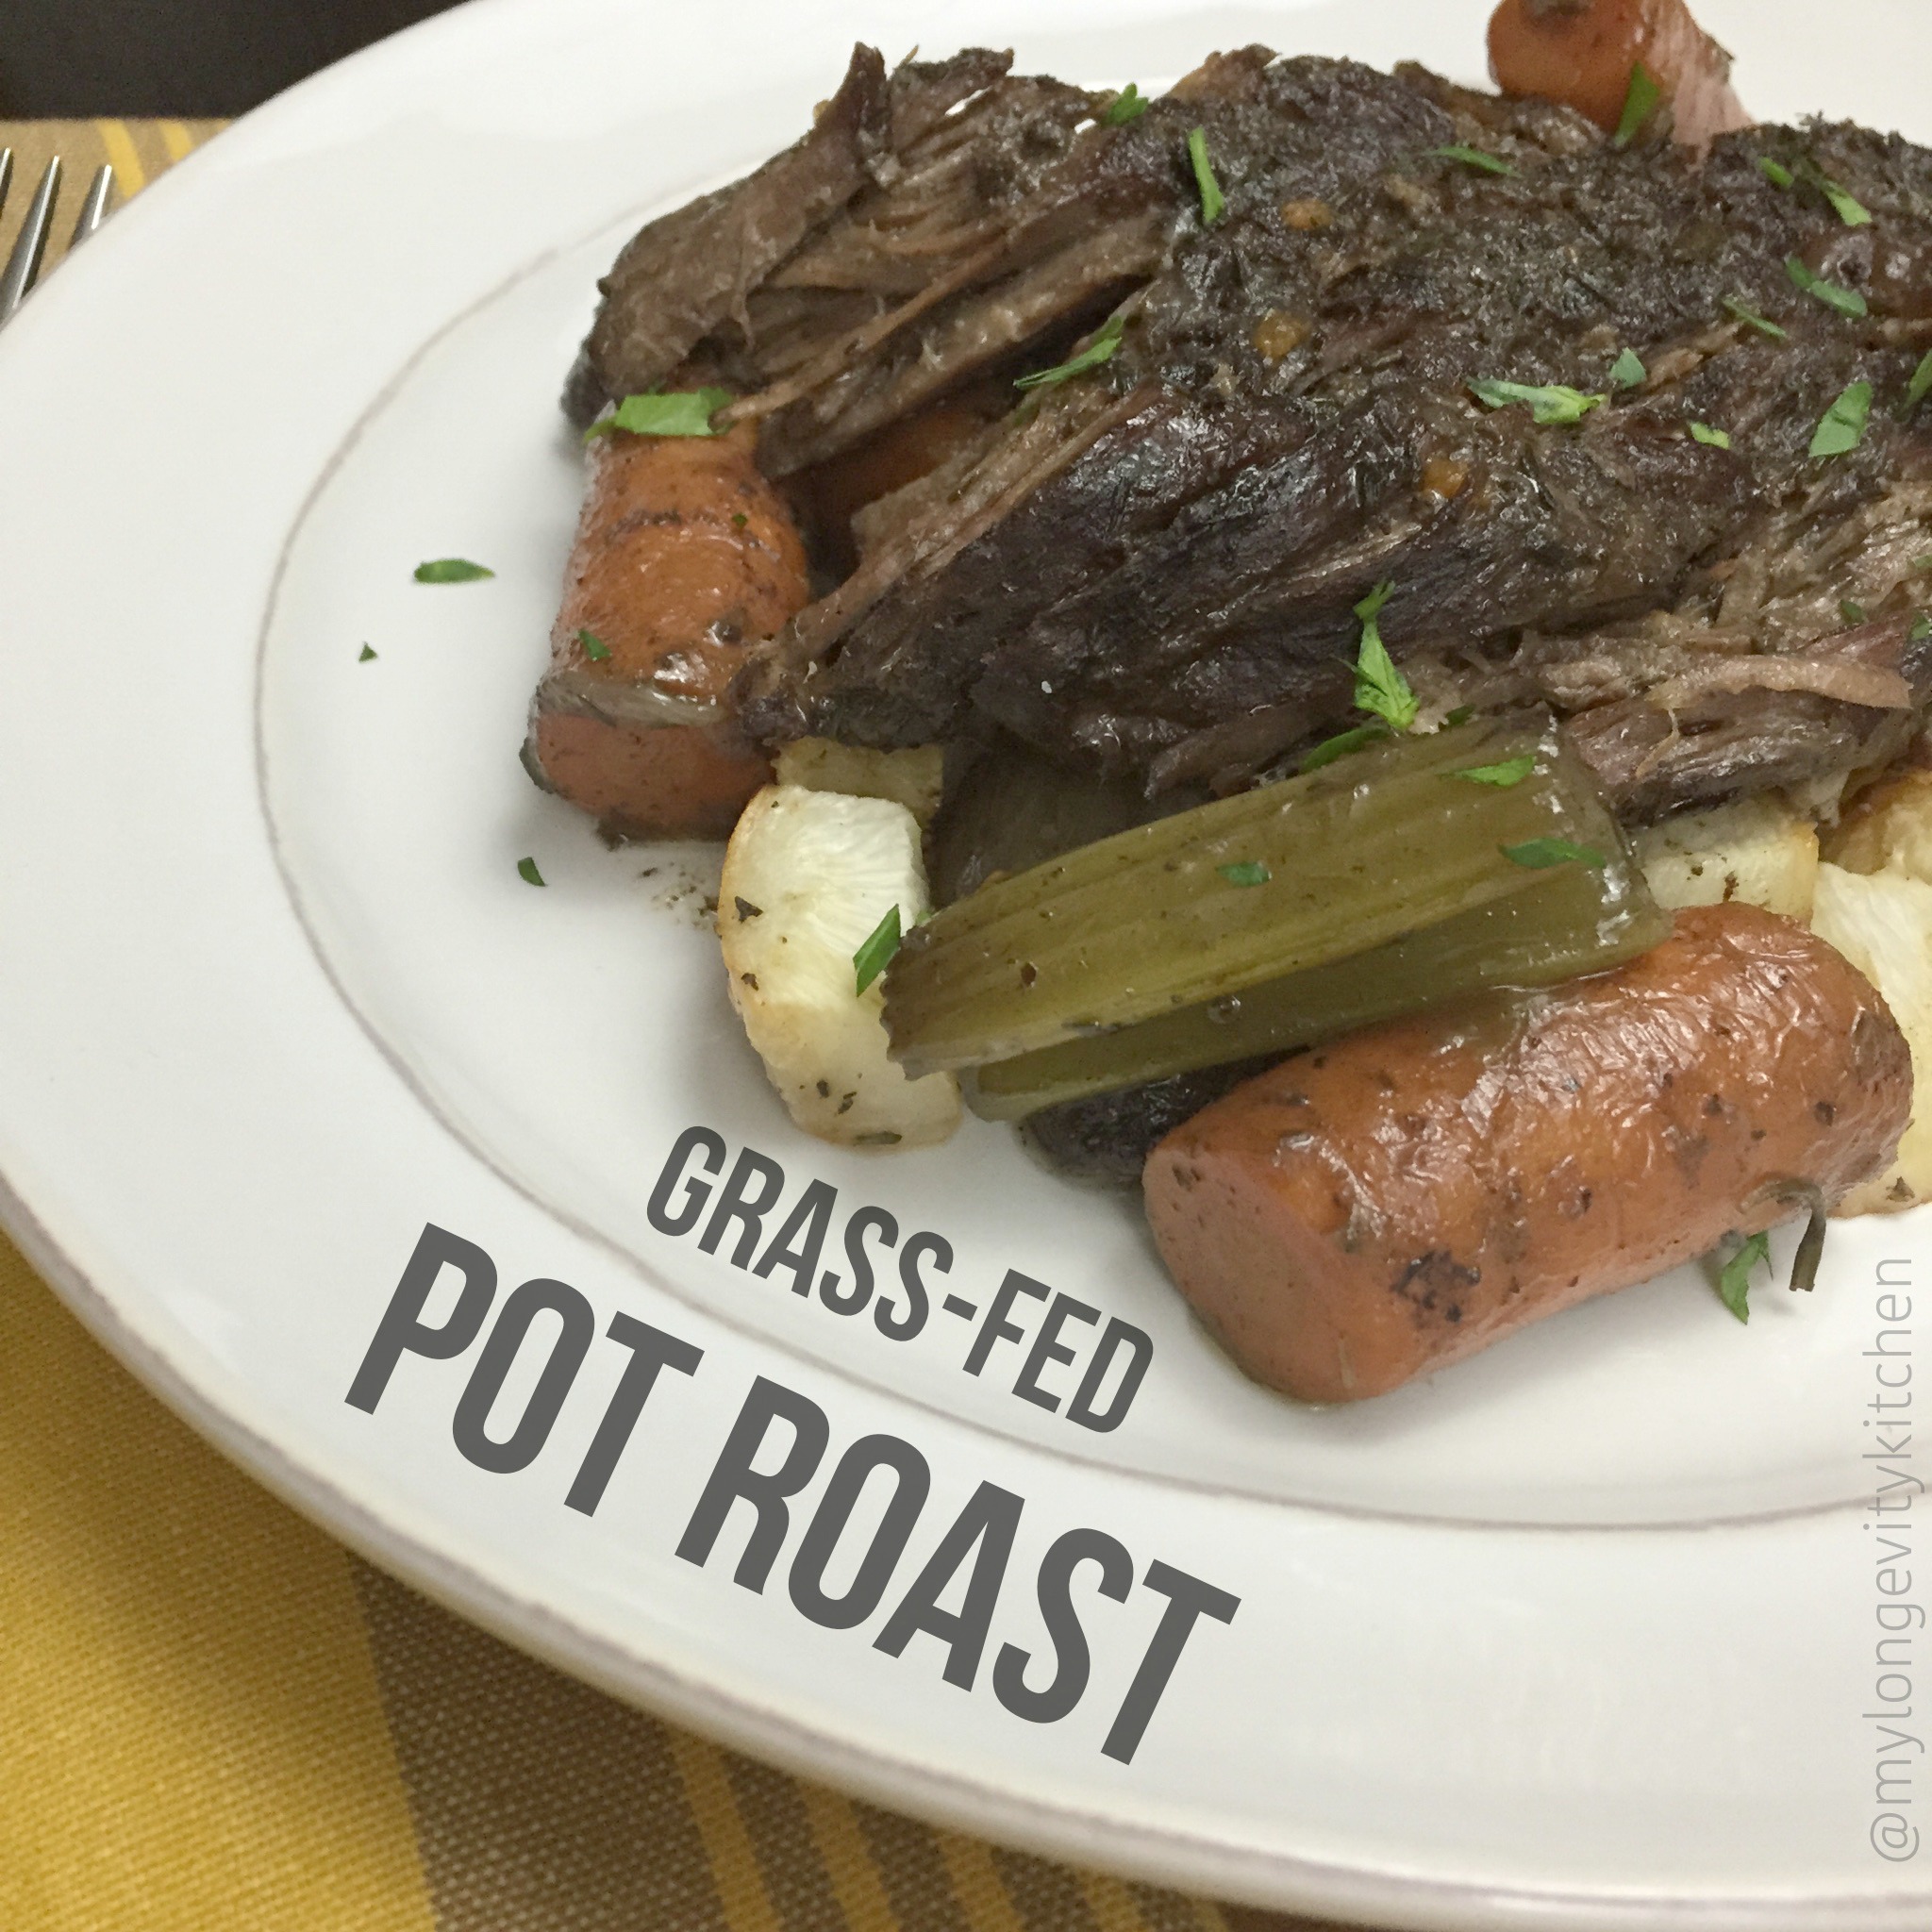
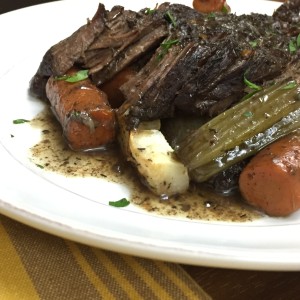
Speaking of inexpensive cuts of meat, the chuck roast, or pot roast, is an economical cut of beef. It comes from the shoulder of the cow, and has lots of connective tissue which makes it perfect for slow cooking.
This is a great cut of meat to buy when switching over to grass-fed meats, trying to feed a family on high quality meats, and if you love tender, slow-cooked beef. If you find one with bone in, then go for it! Bones equal more flavor, and you can even reuse them to make stock after you scarf down this lovely meal.
See the recipe notes for ideas how to stretch this meal, or even save hands-on cooking time using the slow cooker. This traditional braising method will give you the meatiest result though, so go for the big win!
Grass-fed Pot Roast
2015-02-12 01:15:48
Serves 4
A traditional dish with tried and true cooking methods that delivers tender and flavorful results every time. This flour-less pot roast recipe is made with grass-fed chuck roast, bone broth, and assorted winter vegetables. This warming, soulful dish will be a repeat in any house. This amount can serve 2 adults and 2 children, or 2-3 hungry adults. This makes great leftovers, so when it doubt, make more!
1-2 Turnips, or small/medium Potatoes; peeled, cut into 2 inch pieces
½ Cup Red Wine
1.5 to 2 Cups Bone Broth or Organic Beef Broth (Water or any broth can be used in a pinch)
1 teaspoon Dried Rosemary, or 1 Tablespoon Fresh
1 teaspoon Dried Thyme, or 1 Tablespoon Fresh
Heavy pot/dutch oven with a lid
Instructions
Preheat your oven to 275 degrees F
Heat 1 Tablespoon ghee on high heat, and season the roast with plenty of salt and pepper on all sides.
Once the pan is surely hot, place the roast in the pan using tongs. You should hear a loud sizzle. Time approximately 3-4 minutes on the first side to get a good sear.
Sear both sides of the roast. You want dark brown color which takes about 3 minutes per side.
Remove the roast from the pan and set it aside on a plate.
Add 1 Tablespoon of fat, then the onion halves, flat-side-down, and the carrots. Brown the onions and the carrots.
Now add the ½ cup of red wine, and using tongs, scrape the bottom of the pan with the onions...you want all the beefy goodness that is stuck on the bottom of the pan.
Cook the wine for 2-3 minutes on a good simmer, so you reduce the amount of wine by half.
Add the celery, turnips/potatoes, the rosemary, thyme, and some more sea salt and pepper. Give everything a good mix.
Now make room for the steak in the center, placing it in the middle, and moving all the veggies to the outsides of the pan (it’s okay if they are on top of the steak)
Add 1.5 Cups of broth. Use more broth if needed to cover at least half of the steak.
Cover the pot, and transfer to the oven for 2 hours.
Your roast is ready when it is fork tender, and flaking nicely. You may serve it sliced or shredded, on top of the braised vegetables. I usually finish with a sprinkle of coarse sea salt.
Notes
For a quick gluten-free gravy, while the roast is cooking, heat 2 Tbsp of butter/fat in a sauce pan. Then add 2 Tbsp of rice flour stirring for 2 minutes, careful not to burn. Now add 1 Cup of warm or room temperature broth, and whisk to incorporate. Bring to a simmer and continue stirring occasionally. The gravy will thicken as the heat rises. Season with salt, and herbs.
If you are making the roast ahead of time, it is a great idea to use the broth left in the roasting pan to make this gravy as directed above.
Stretch this meal by braising extra root veggies on the side. Peel and cube the veggies, rub with fat, season with salt pepper and dashes of rosemary and thyme, and place them in a pot/pan with enough broth to cover half of the veggies. Cover and cook in the oven while making your pot roast, but check your veggies after 1 hour.
Slow Cooker Method: This method can be great if you don't have time to do the full recipe. Season your meat with plenty of salt and pepper, place in the slow cooker, top with the veggies and spices, and pour 1/4 Cup Wine and 1.5 Cups Broth over the top of everything. Cook on low for 6-8 hours.
If cooking larger roasts, use extended cooking times as follows
3 lb roast, 3 hours in oven
4-5 lb roast, 4 hours in oven (8 hours in slow cooker)
By Marisa Moon
My Longevity Kitchen https://mylongevitykitchen.com/
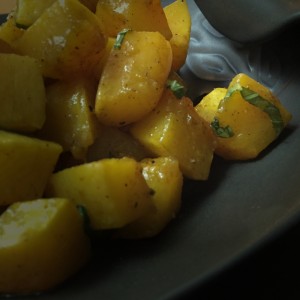
The butternut is more than just a squash. It is a long-lasting, flu-fighting, time-saving winter veggie. Dice up this golden beauty and you have a super simple side dish just when you thought you were out of veggies.
I’m talking about that day when you have used up all your greens, all your potatoes, and all your produce. You look over at your pantry and think, “there’s gotta be some canned artichokes in here or somethin!” Nope. Just when you’re about to give up and skip the veggies, you see something out the corner of your eye. It’s been decorating your kitchen with this fall harvest ornamental flair, and you think to yourself, “YES! BUTTERNUT! I am so glad you’re here!” I absolutely love butternut squash, but don’t even tell me for a second you can’t relate. Sometimes I forget it is in my kitchen, and then boom! Two weeks later that baby is still standing tall and ready to be put to use (right when I need it the most). If this hasn’t happened to you then you need to just buy one, and set it aside, and wait. It’ll happen.
We shouldn’t leave winter squash on the sidelines, however, because these starchy, hearty vegetables have some powerful immune-boosting properties that we should take advantage of.
Sweet winter squash doesn’t need much attention from the cook. But, considering it’s much less sugary than its tuberous friend the sweet potato, it makes sense to spruce it up with some sweet and spicy flavors. I only used a few ingredients here, but many of them may be new to you.
First, I will mention the spices. Have you heard of Five-Spice Chinese Powder? I first purchased a bottle of this spice blend years ago when making one of Eric’s favorite foods from his homeland in Hawaii. Shoyu chicken. It is a dynamite dish of stewed chicken thighs in a sweet and salty umami bath. (If you’re feeling adventurous or have longed for a good shoyu chicken recipe, I recommend this one from Reggies Kau Kau Time blog . I am definitely going to make a longevity version of this dish for the blog one day. It’s on the list!) Chinese Five-Spice is typically a blend of Cinnamon, Clove, Peppercorn, Fennel, and Star Anise. I recently bought a version containing ginger, but traditionally it is made without. A little goes a long way, and you’d be surprised how useful it is in the winter! I seasoned the squash here with five-spice powder, and some warming ground cumin. If you’re not familiar with cumin, I’d have to disagree with you (huh?). It’s the name “cumin” that people are unfamiliar with, not the taste. Cumin is the most important flavor in every taco seasoning packet ever!..so I’m sure you will recognize the flavor quite well. I LOVE IT.
Lastly, I’d like to introduce you to Coconut Aminos. It is a sweeter alternative to soy sauce that is prized in the paleo world, and new to the culinary scene. It’s basically salty coconut sap, but without the coconut flavor you might expect. One bottle will last you a while (unless you go coconut aminos crazy like some of us do at first) so I suggest you go for it! Tossing the butternut squash in this sauce really helps bring all the flavors together. Are you nervous about trying all of these new flavors??? I sure hope not. If you like Thai Food, or Indian Food, Moroccan Food, or trying new things, then you’ll love this dish!
PS I admit I ate it cold several times right out of the fridge. mmmm.
Six-Spice Butternut Squash
2015-01-15 09:32:37
Butternut squash coated in a warming blend of spices including cumin, cinnamon, clove, star anise, ginger, and fennel.
Cut off both ends of the squash by root and stem, and peel the skin off with a vegetable peeler.
Cut the squash in half crosswise. Then, cut both halves lengthwise and use a spoon to scoop out the seeds.
Cut the squash into 1 inch cubes.
In a mixing bowl, combine the melted fat with the coconut aminos, coconut sugar, and the rest of the spices except for the basil.
Add the squash to the mixing bowl, and toss well to coat
Roast for 25 minutes, turning the pieces after 15 minutes.
Thinly slice the basil by stacking the two leaves, rolling tightly like a cigar, and slicing across to create ribbons. Carefully mix the basil ribbons into the hot squash.
Notes
Enjoy this sqush on the side of a juicy steak or any tender braised meats.
The spices compliment many asian and latin flavors.
Try it with my Lime Marinated Grass-fed Skirt Steak.
We also ate the leftovers for breakfast in a one-pan scramble of eggs, kale, and the six-spice squash.
Tag me in your squash photos! @mylongevitykitchen #mylongevitykitchen
By Marisa Moon
My Longevity Kitchen https://mylongevitykitchen.com/
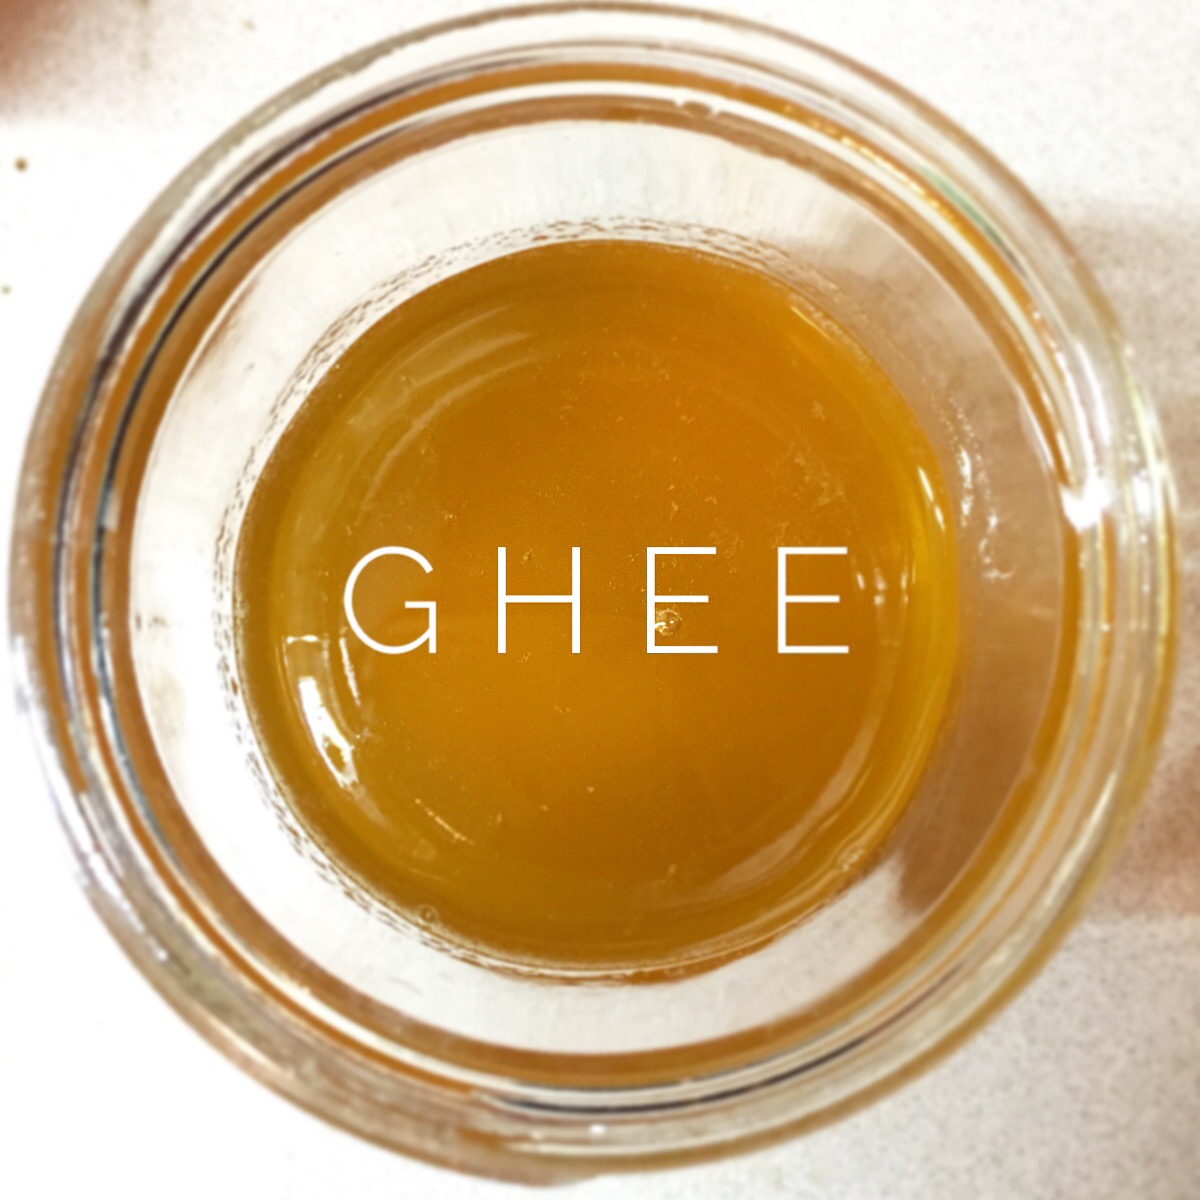
If you haven’t heard of this popular cooking fat that is making a comeback right now, I would be very surprised! GHEE is everywhere! But WHY?
This ancient form of clarified butter has been used as a healthy cooking fat for longer than documentation can confirm. Ghee is essentially strained brown butter, resulting in “butter oil“. When the butter is slowly warmed on the stove, the water evaporates, milk solids and proteins begin to separate from the fats, and you can easily separate these fats to retrieve the clarified butter (clarified butter is the star ingredient in the mother sauce, known as Hollandaise). Now, cook that butter a little longer, and browning begins to occur. Soon, you develop a nutty depth and complexity that can only be found in Ghee. Both Ghee and Clarified Butter have incredible health benefits. As long as the butter is from a healthy source (such as cows raised on pastures, fed grass, free of growth hormones and antibiotics, fed non-gmo supplemental feed), the resulting “butter oil” is high in conjugated linoleic acid (CLA combats cancer and cardiovascular disease, and inflammation), Vitamin A, Vitamin K2, beta carotene (you can tell this by comparing the golden color of grass-fed butter next to the pale white color of conventional butter), and has a far better Omega-3 fatty acid ratio than conventional butter. You should also note that most of the milk solids and proteins (lactose and casein) are removed during the process of making ghee and clarified butter. This means nearly everyone but the most sensitive individuals can enjoy the benefits of ghee in their diet. Did I mention that ghee and clarified butter have a much higher smoke point than regular butter? You can pan fry and roast foods in ghee without causing damaging free radicals!
Sure you can buy grass-fed organic ghee at the supermarkets now, but they are more than $1.00 per ounce! You can make your own ghee for less than half that price. Try out this step by step tutorial, and let me know how it goes!
Homemade Ghee
Step 1:
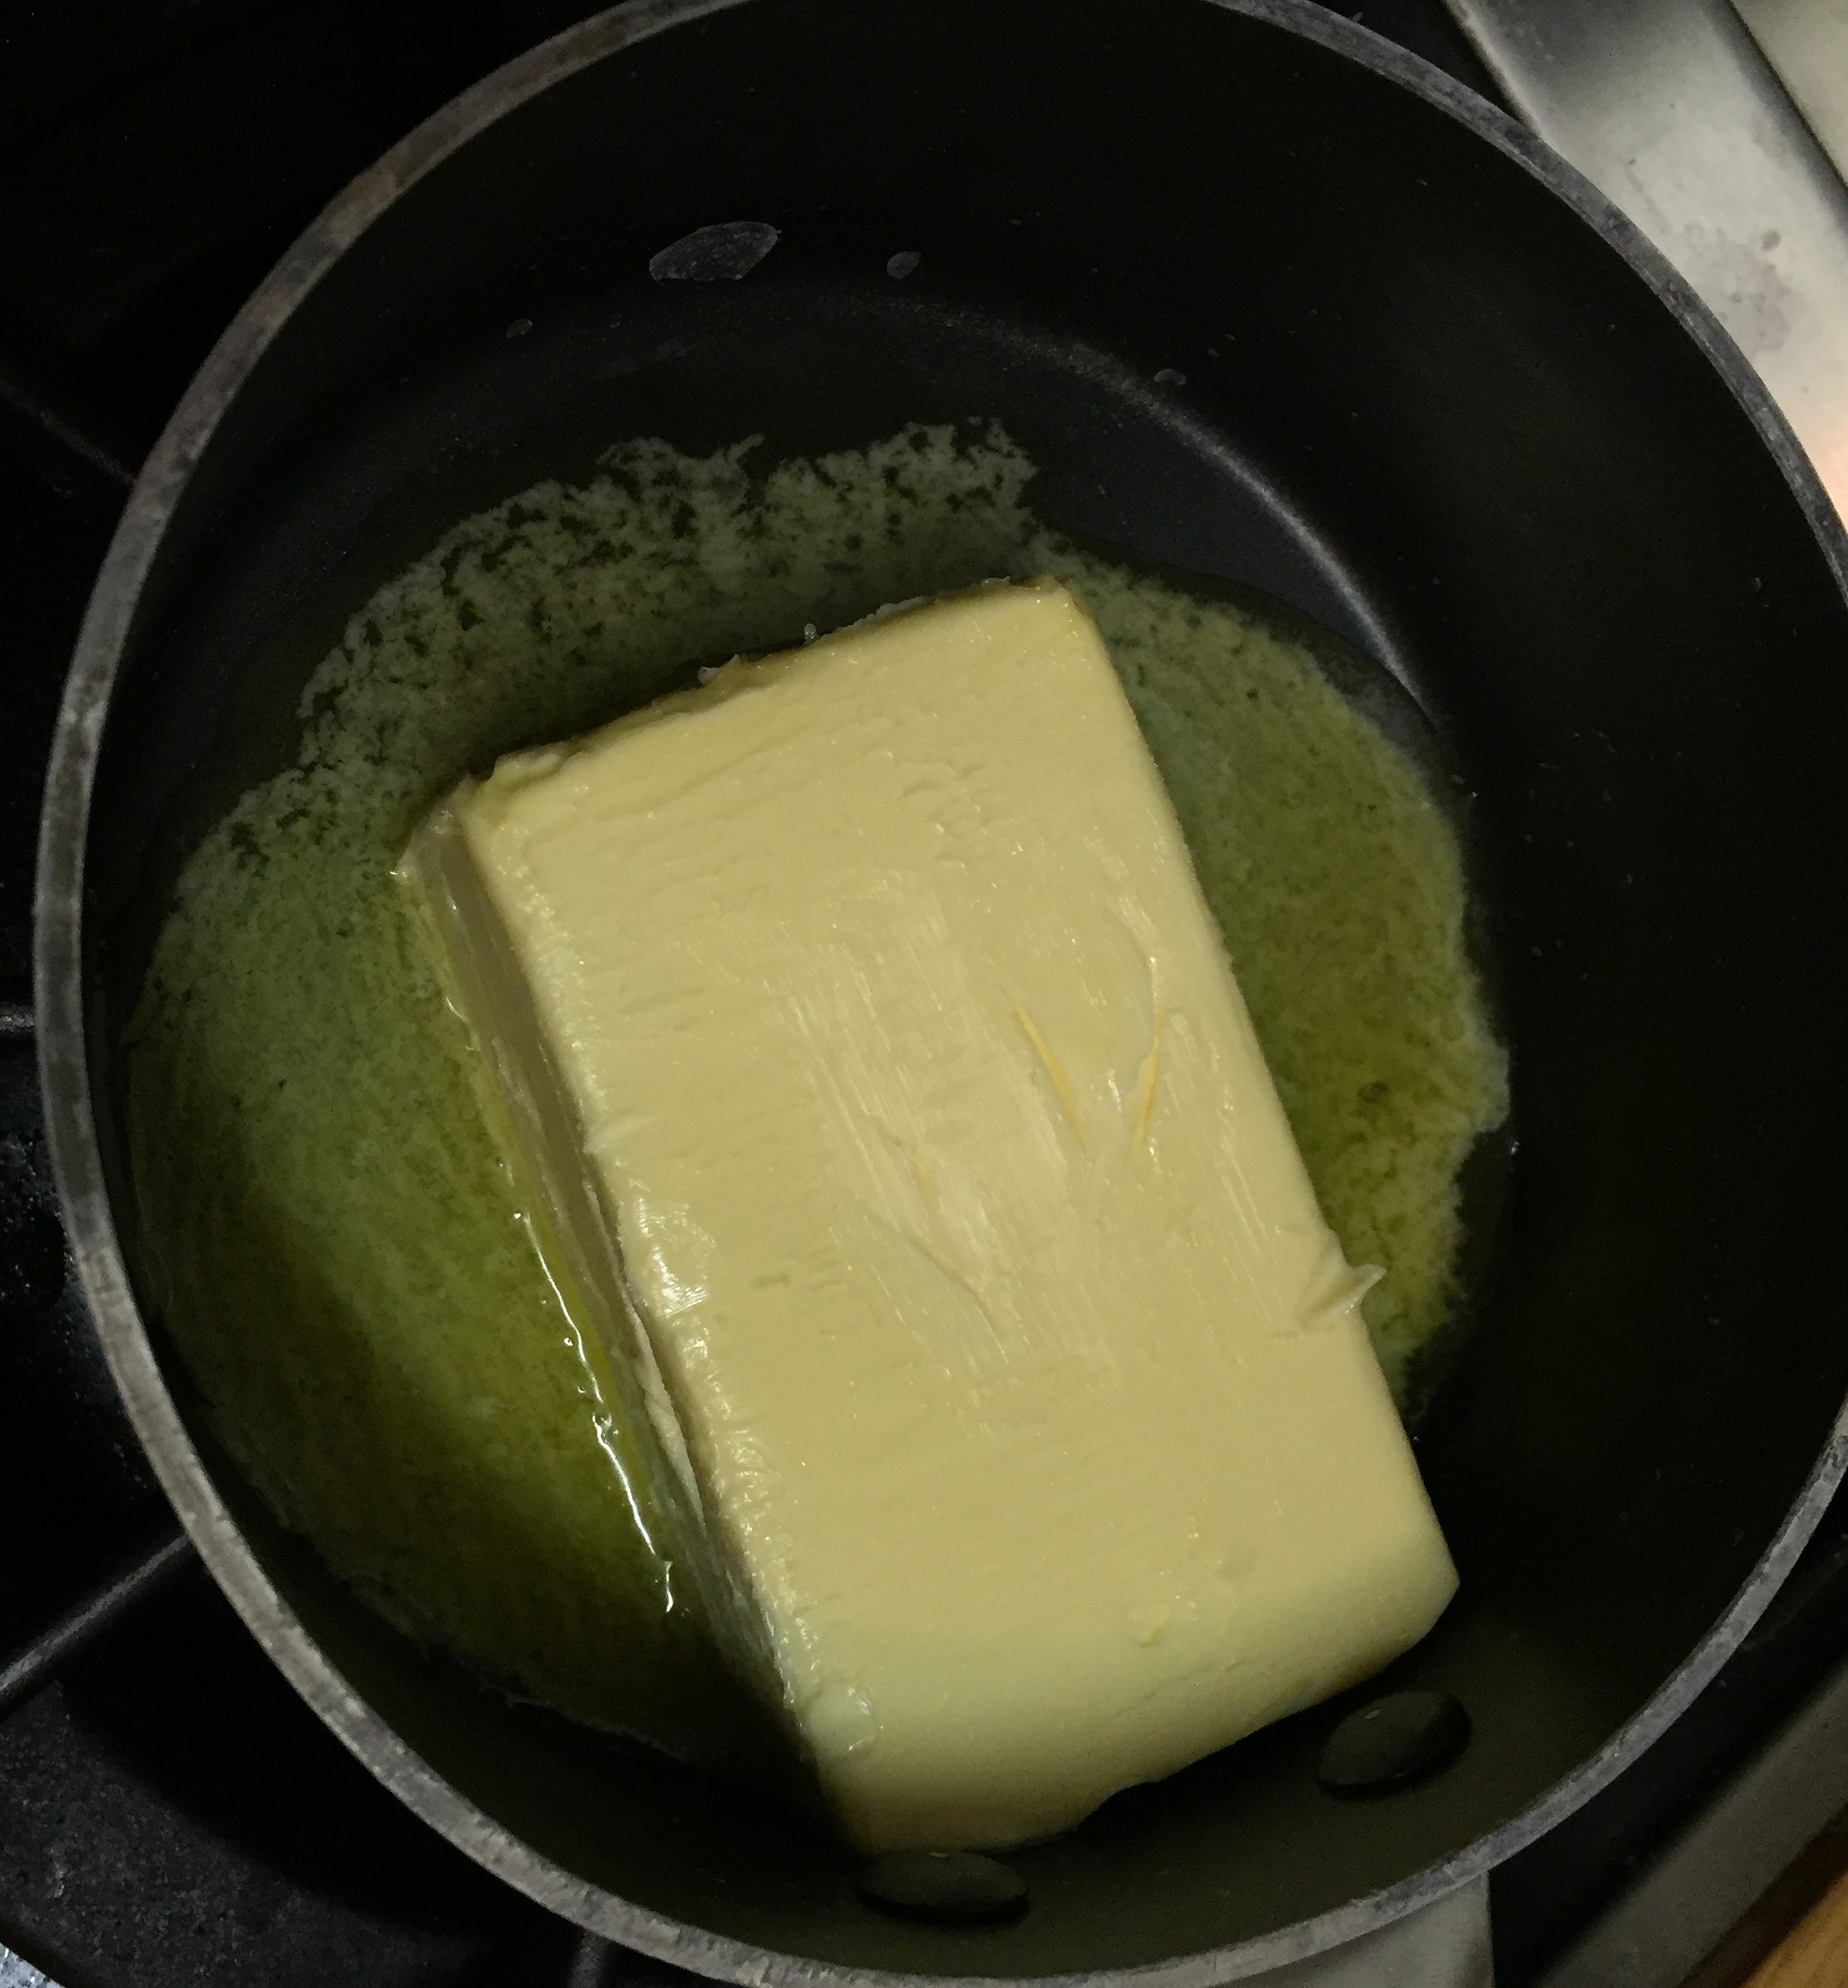
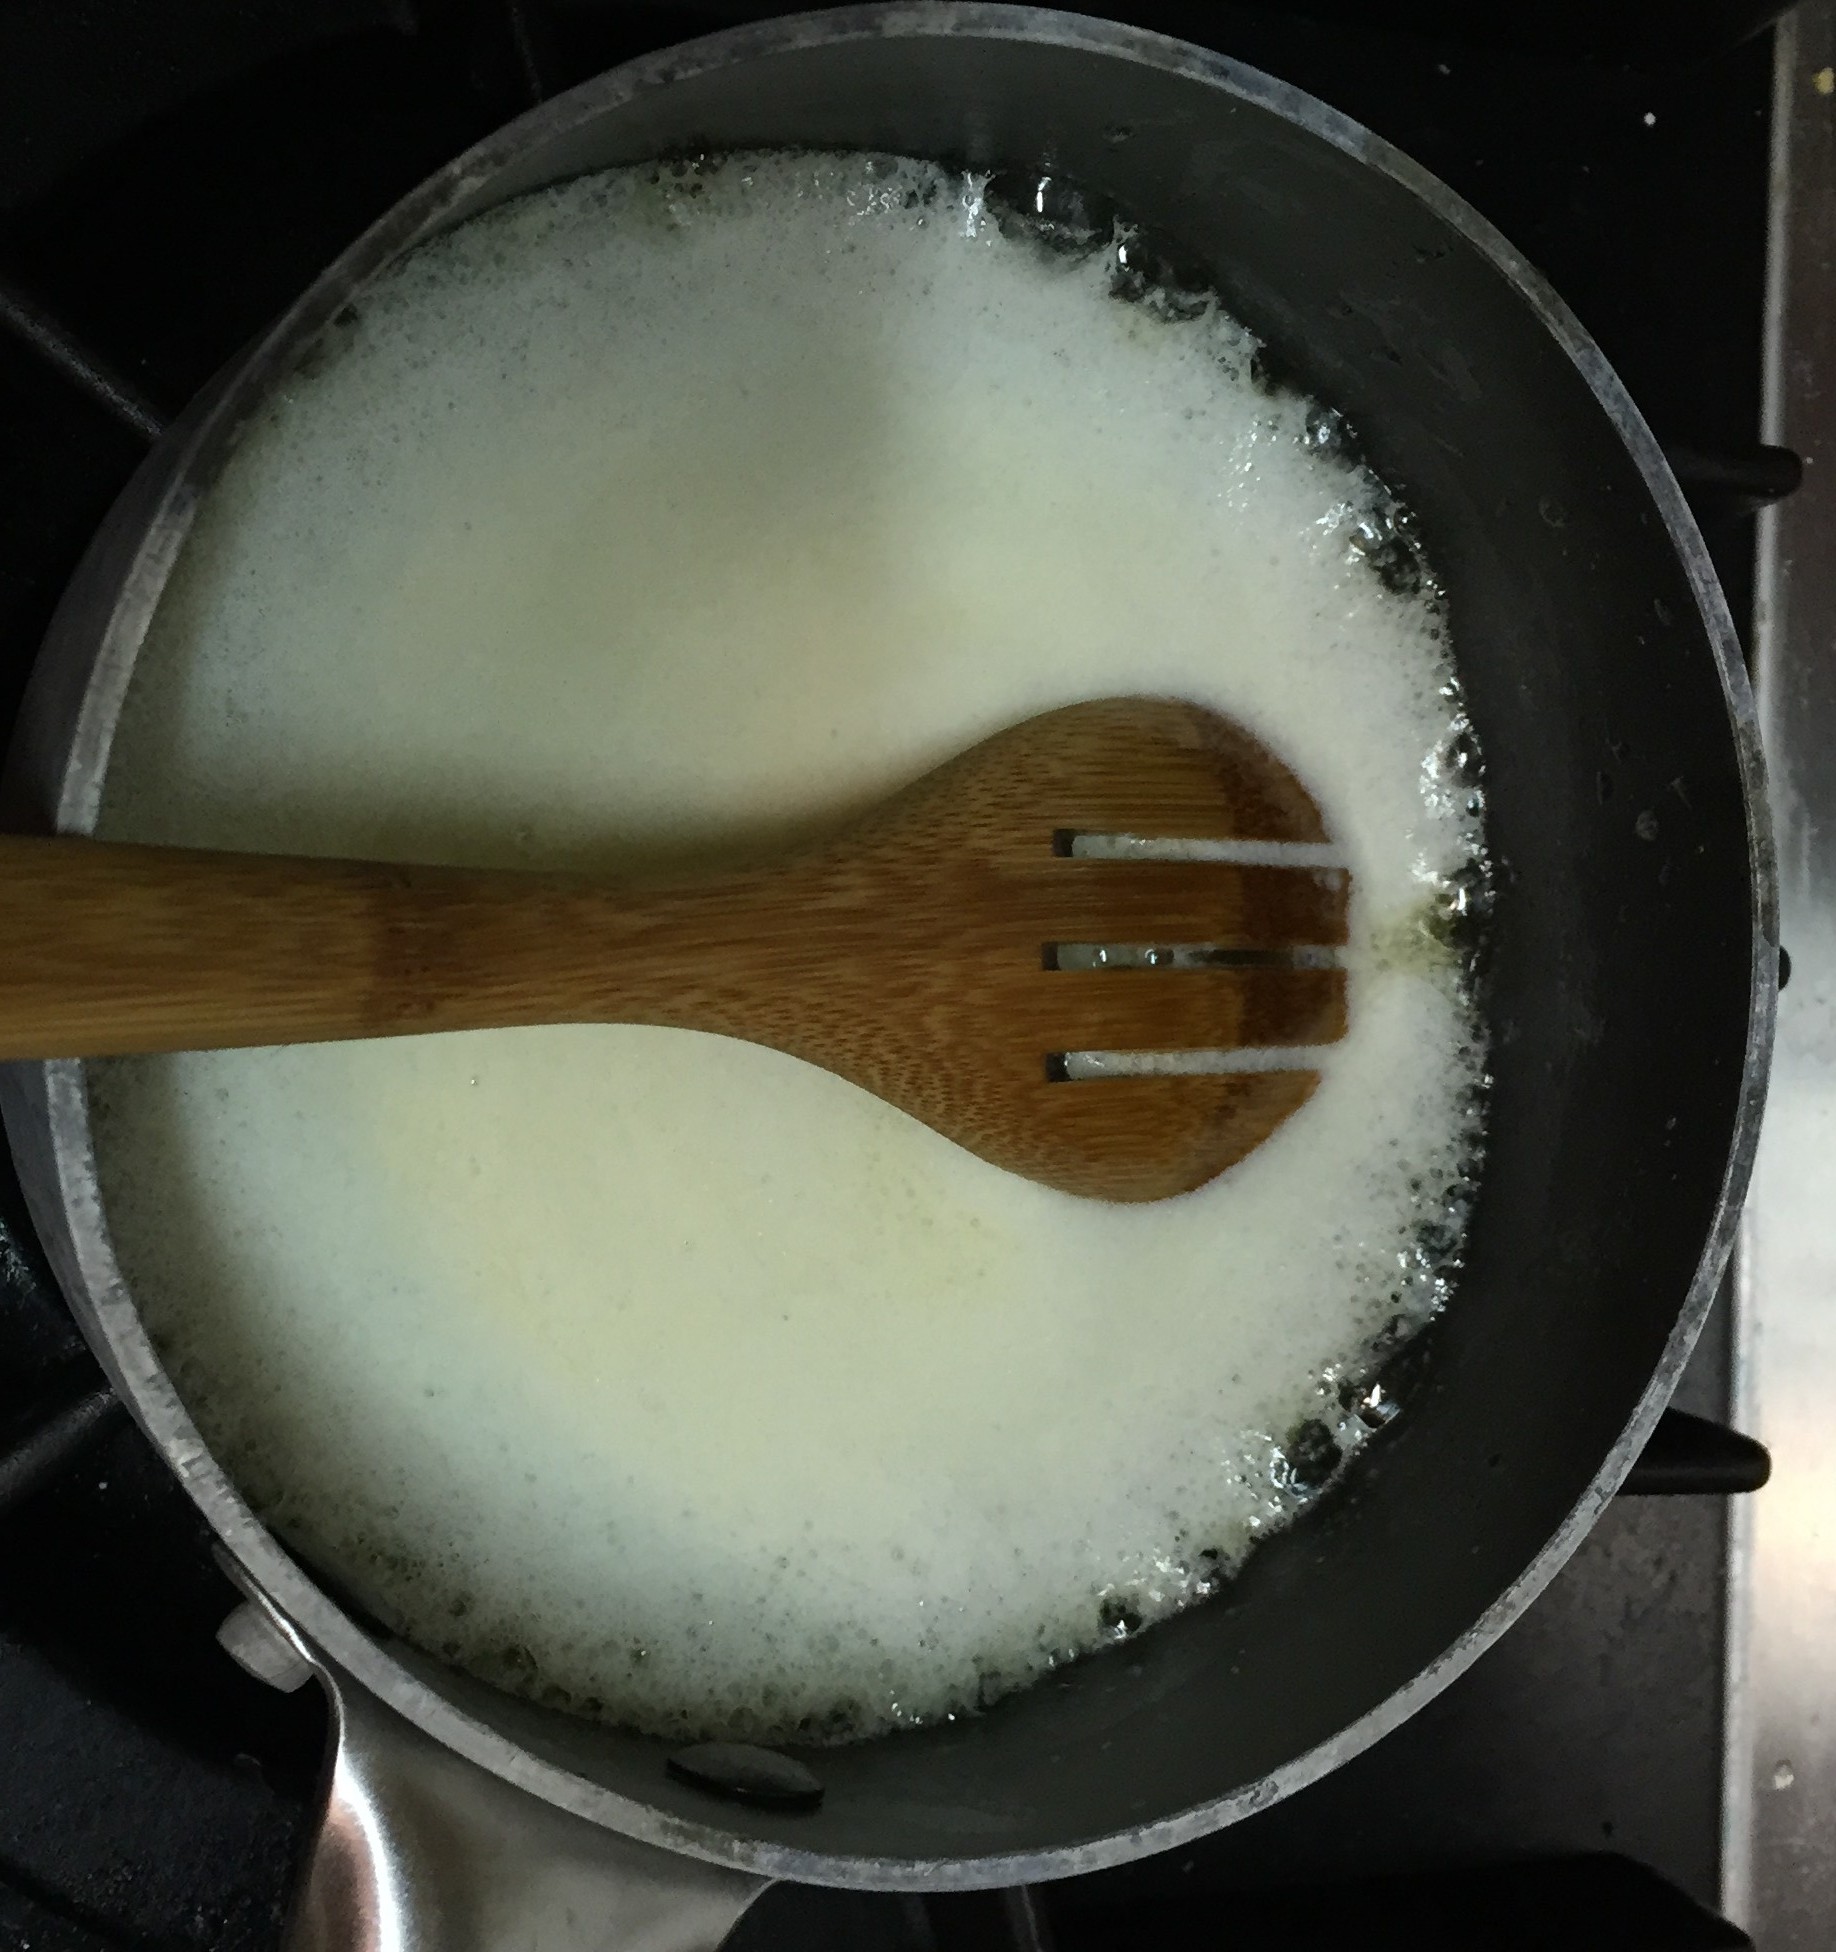
Using a small sauce pan, melt 8 oz of butter on low heat. (you may dice the butter to rush this step)
Step 2:
About a minute after the butter is all melted, the top layer will become fluffy foam. To encourage the water to evaporate, and allow air to escape, you can rest a slotted wooden spoon upside-down like the second photo below. Or gently move the foam around, by skimming the top, to let air escape.
Step 3:
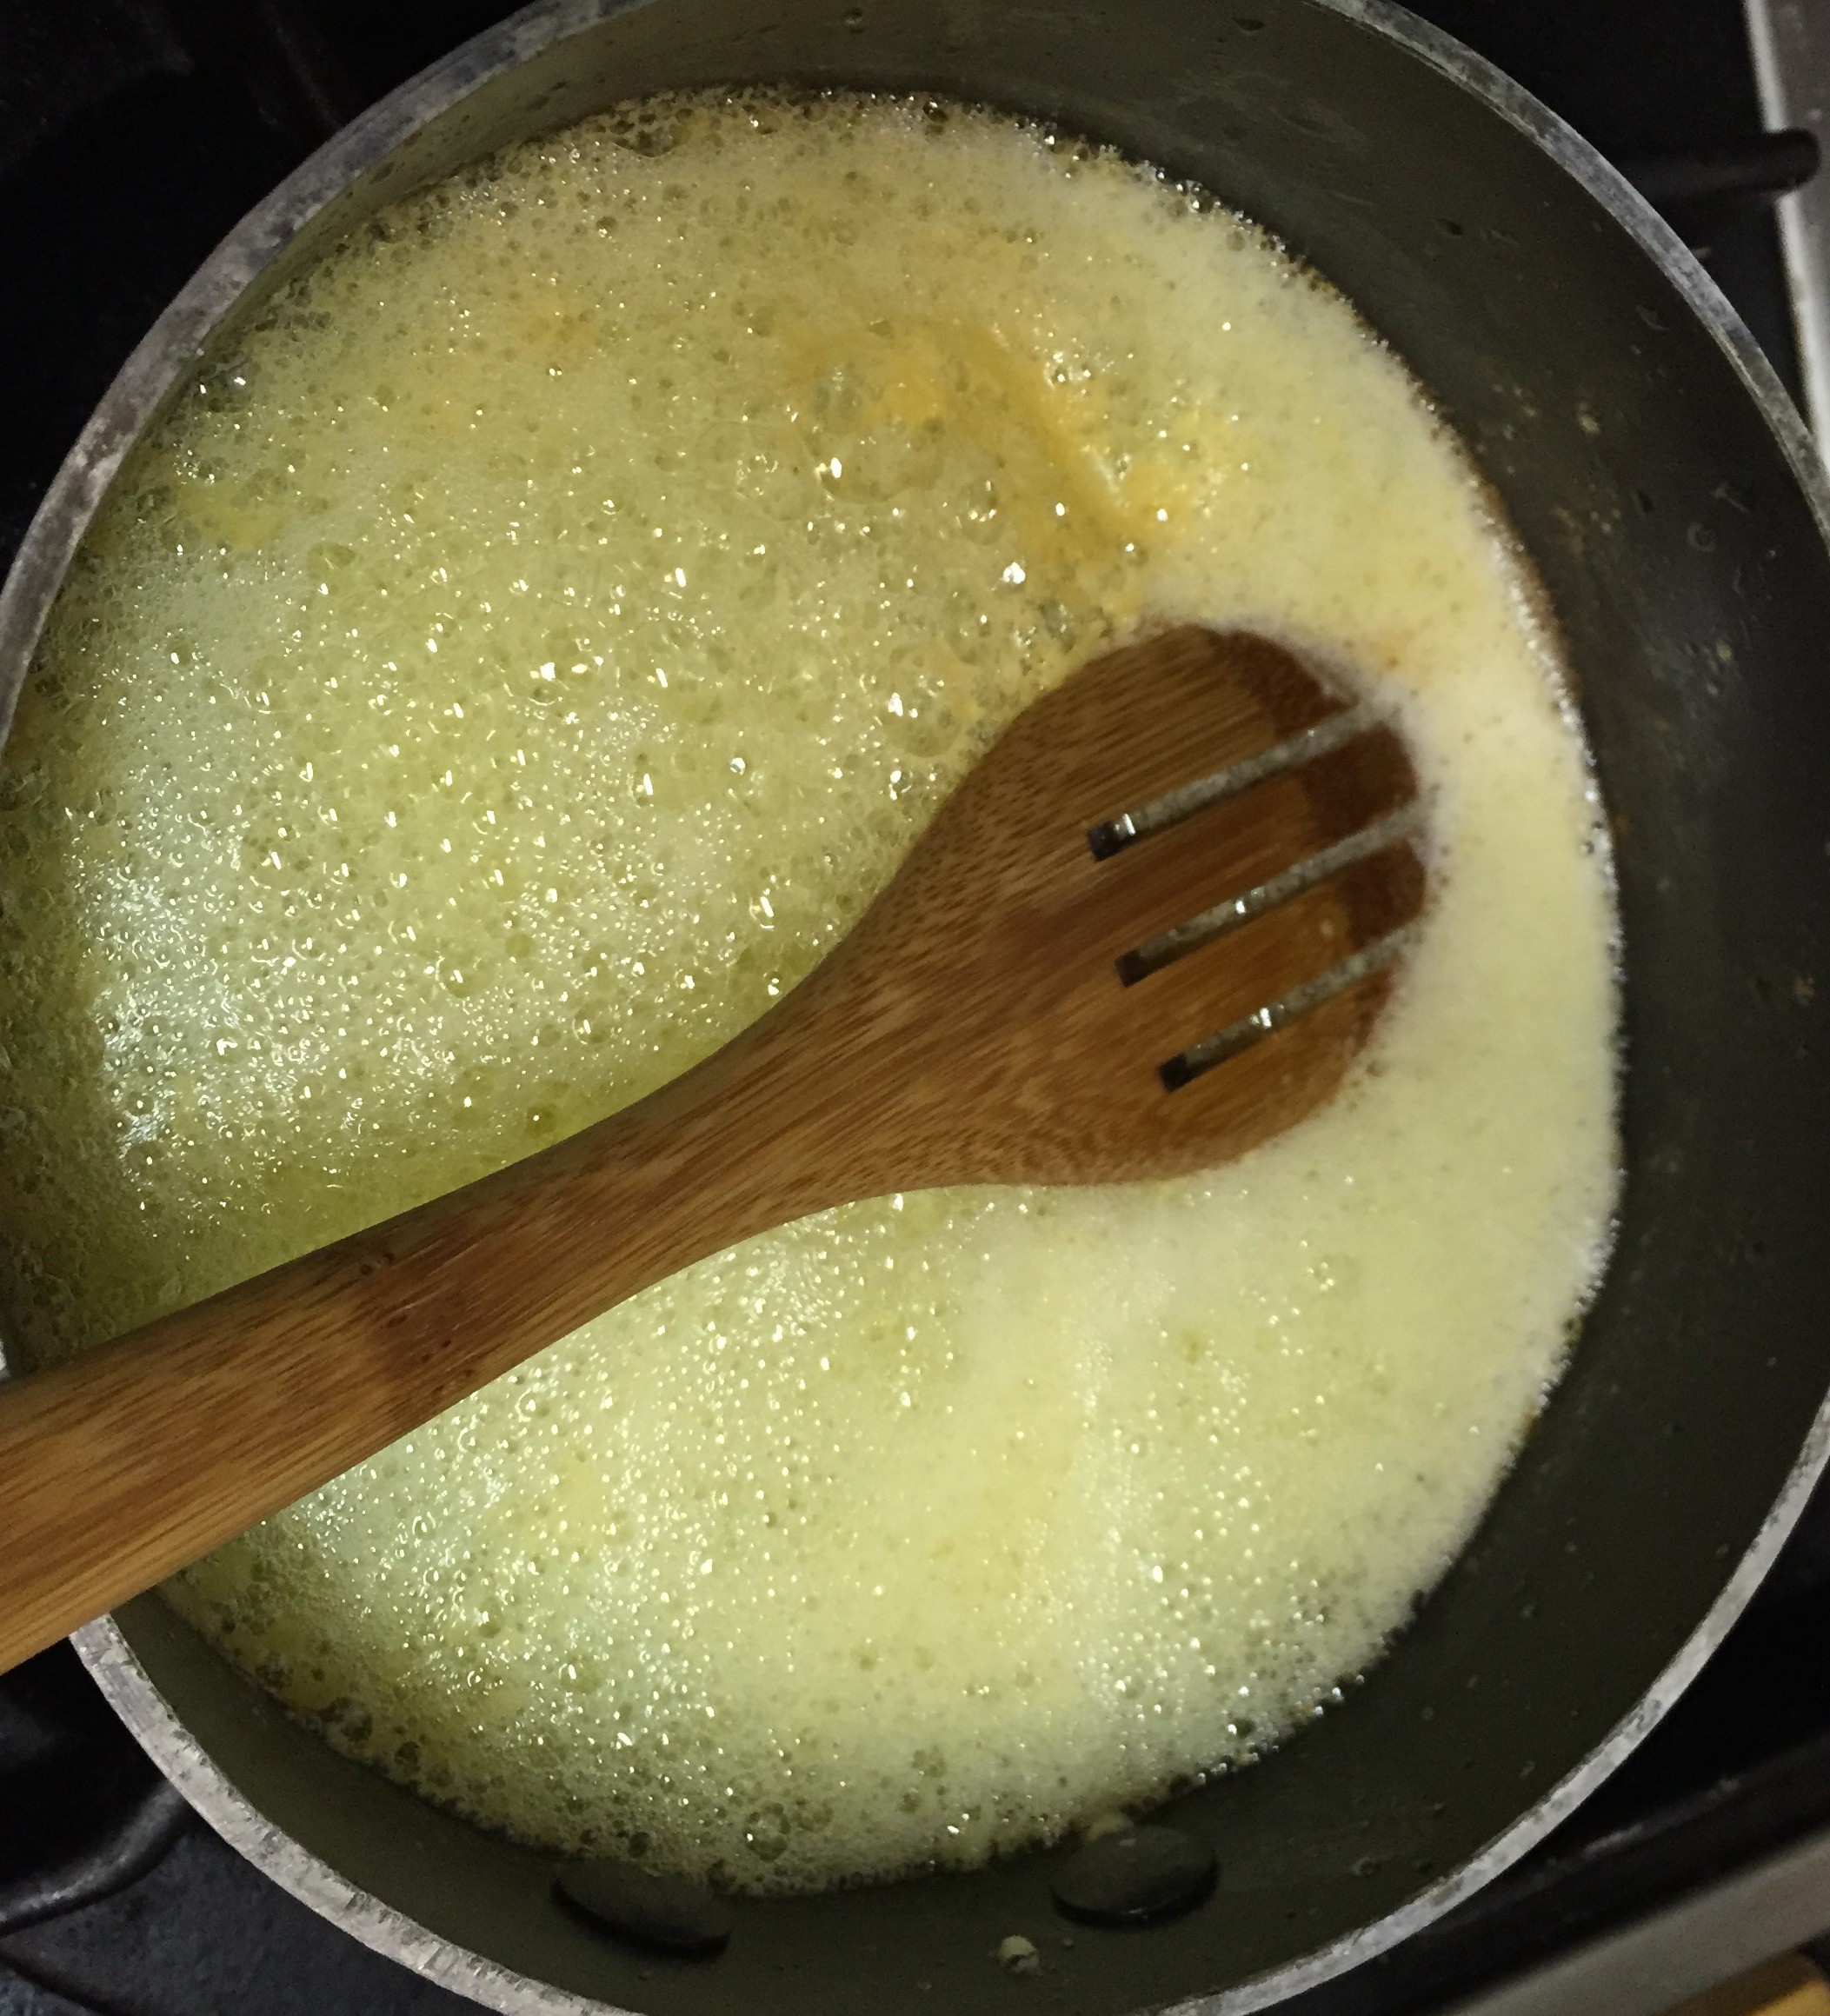
About 2 minutes later, you will notice the foam is no longer fluffy, and starts to bubble more and separate.
Step 4:
Continue cooking, and if you tilt the pan, you’ll notice almost all of the white milky solids will have fallen to the bottom of the pan, while the top is still bubbling and foaming again.
Step 5:
In these next few minutes (around 9-12 minutes into the process) the milk solids will be browning at the bottom of the pan.
Step 6:
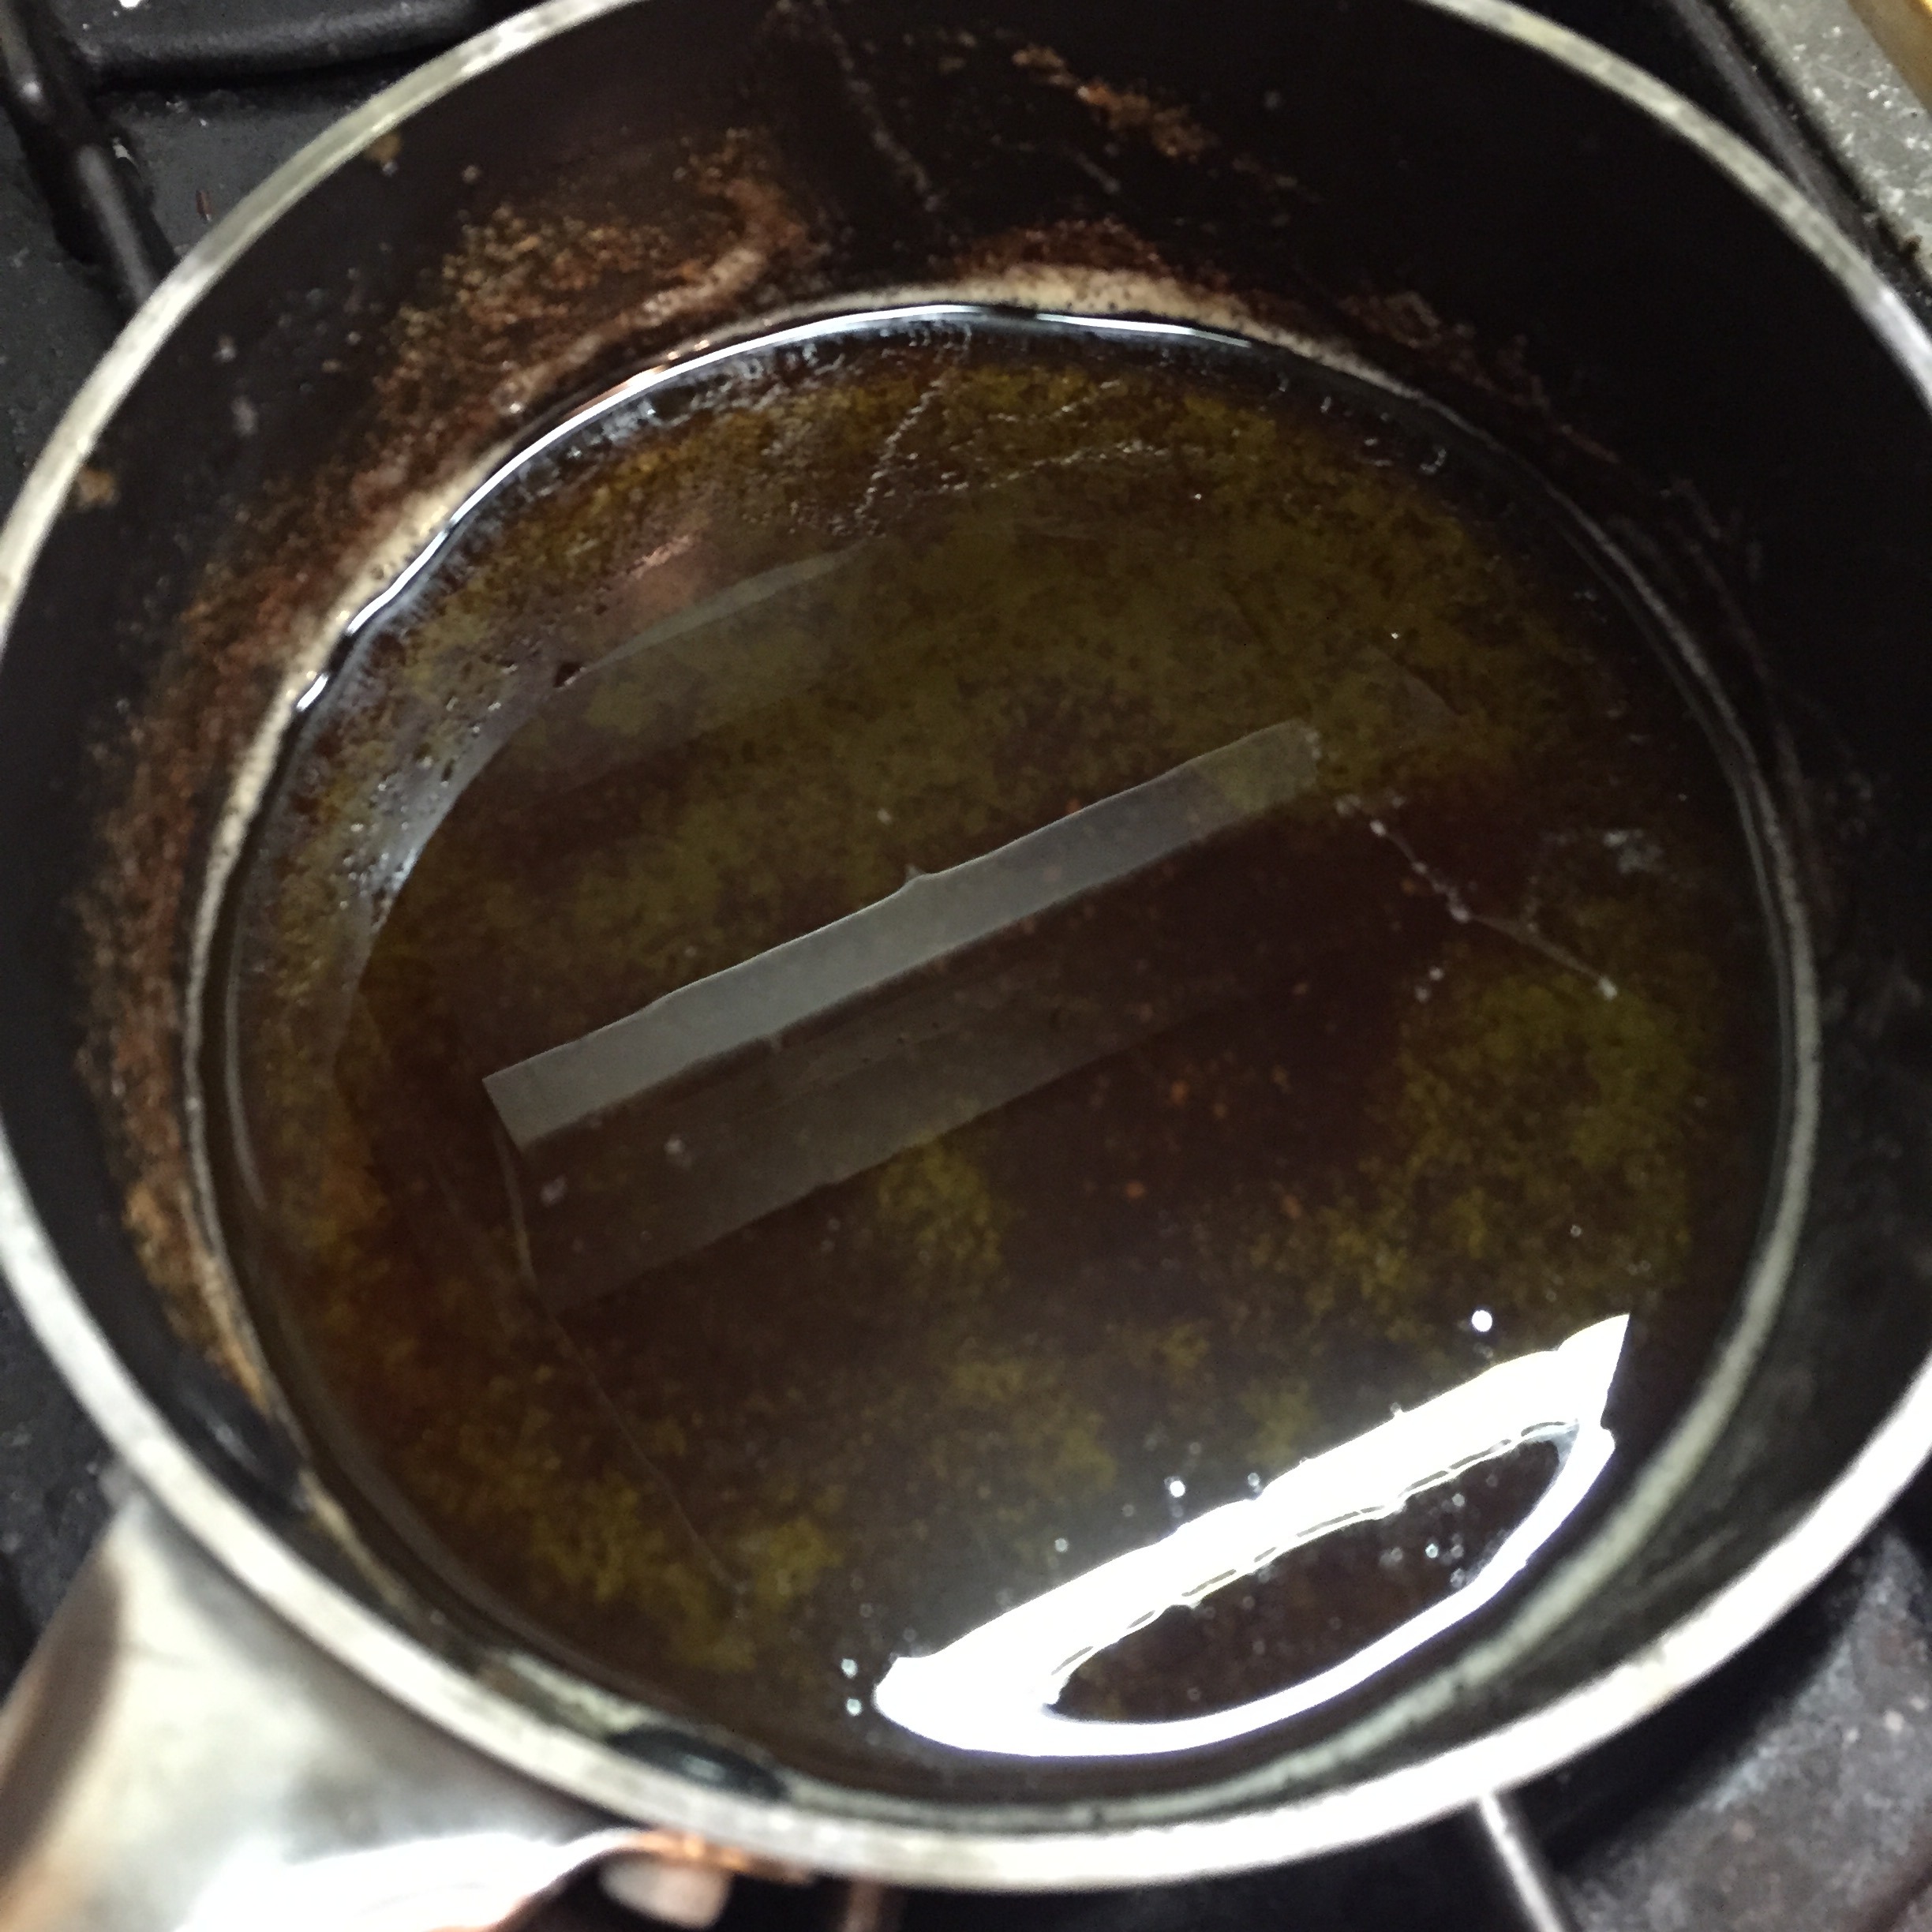
Tilt the pan to check on the browning. Keep cooking until it is dark brown, and remove the pan from the heat when it looks like it might begin to burn.
Step 7:
Allow it to cool for 10 minutes, and then skim off all of the remaining foam that floats on top. This is what you are left with:
Step 8:
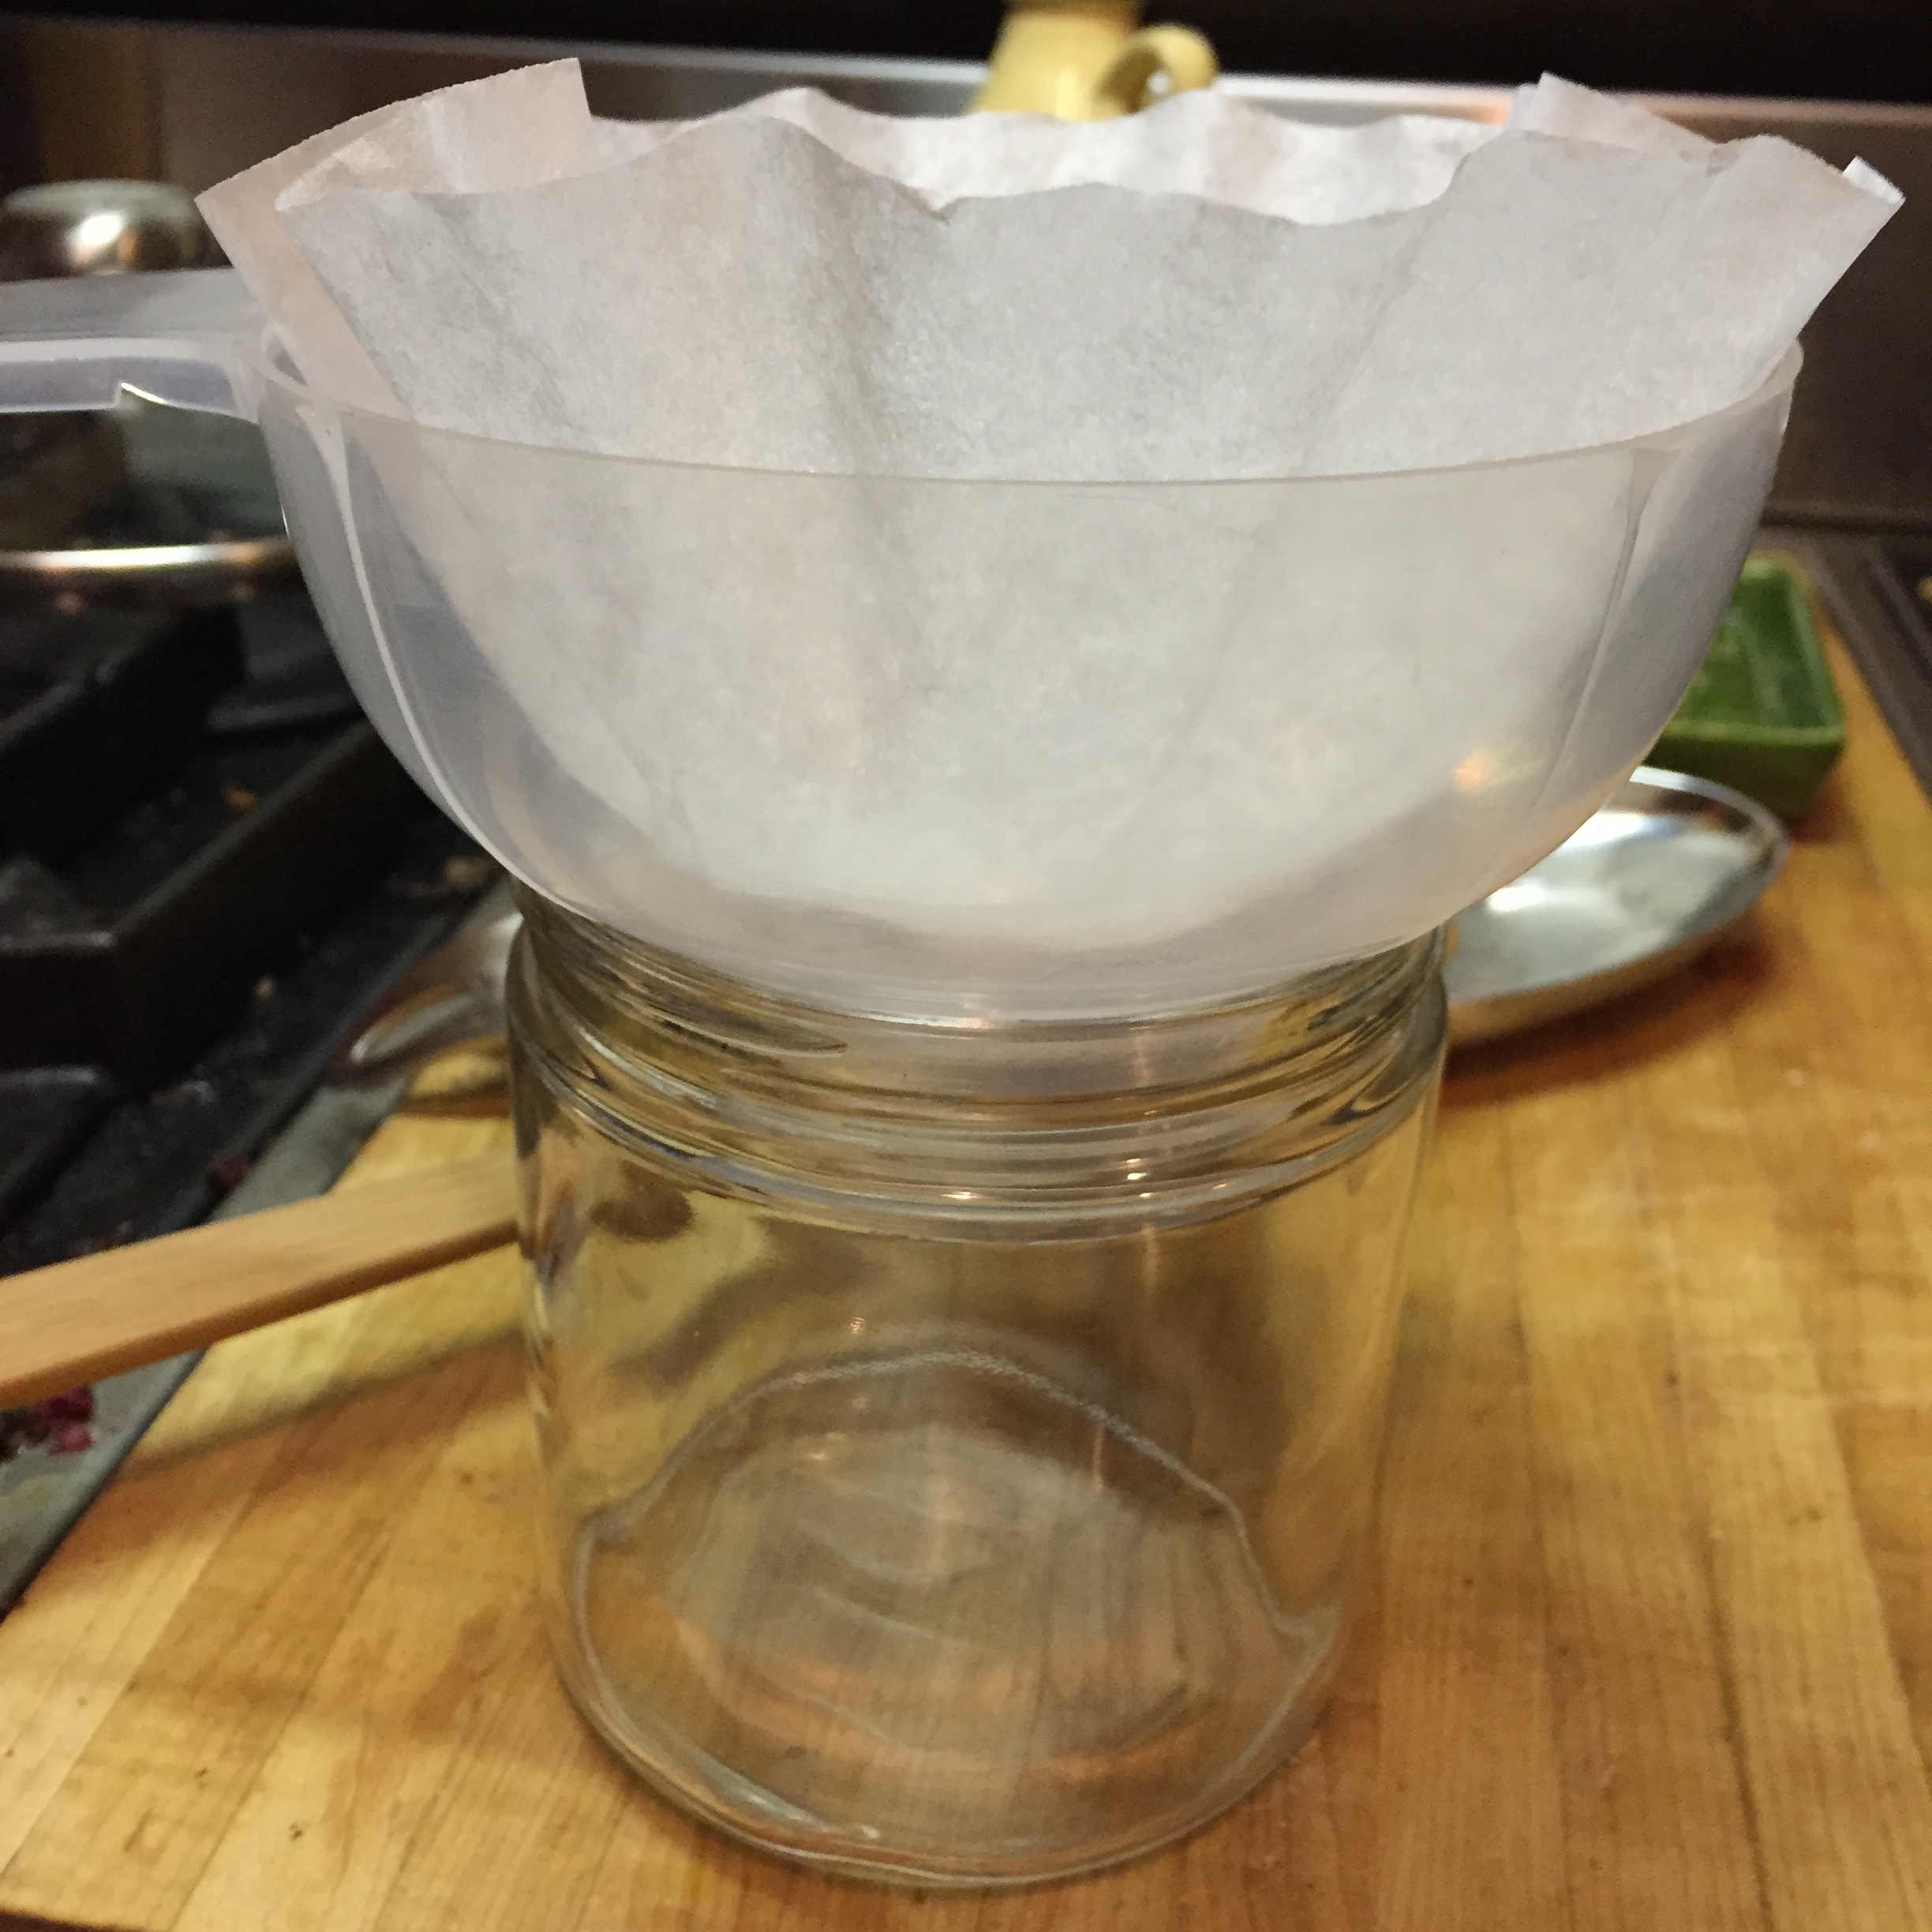
Pour the ghee through cheesecloth or a coffee filter resting on a funnel.
Congratulations! You made your own GHEE!
Ghee is safe kept in an airtight container at room temperature for up to a month, or you may refrigerate it to prevent any possibility of spoiling. Make a bunch so you can stock up! You can freeze ghee too.
*To make Clarified Butter (which has a cleaner, more neutral taste, and shorter processing time), carefully skim all of the foam off the top in Step 2. Once you have cleared off as much foam as possible, without disturbing any milk solids that settled to the bottom, you may ladle or pour out the remaining fat (carefully avoiding the milk solids on the bottom). Clarified Butter may not last at room temperature for more than a couple of weeks since it is not strained like ghee is.
I almost never make the same thing twice…but this dish happens pretty often in our house.
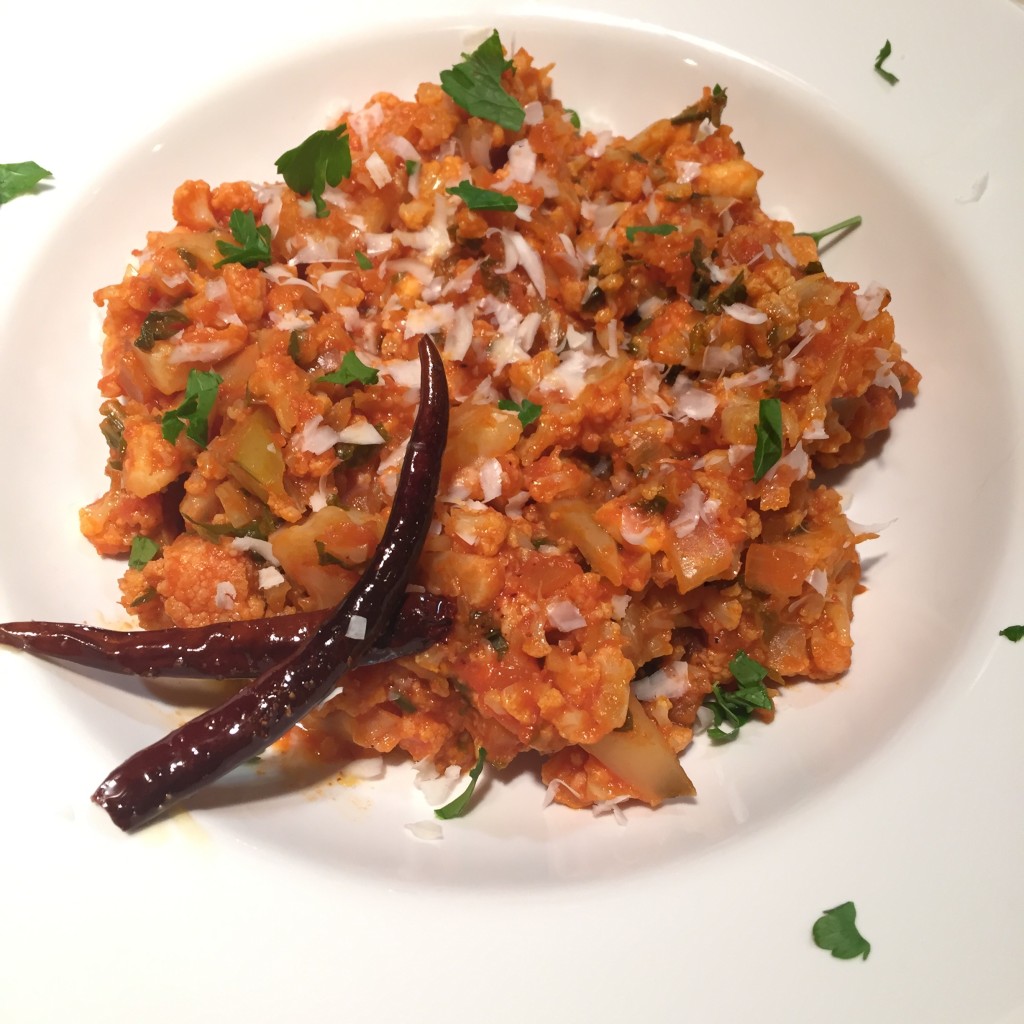
There was a time when I had so much cauliflower I didn’t know what to do with it all! This happened after a trip to Smit’s Farm, owned and sustainably operated by a family friend and their loving family. My Nonno showed us the VIP treatment, taking us into the fields to harvest the most beautiful assortment of vegetables. It was incredible to see how much variety they grew. And the cauliflower were massive!
So much cauliflower!
Sauteed cauliflower greens
Cauliflower bigger than your head
So beautiful! Cut around the cauliflower and turn like a steering wheel to release
Inspired by the versatility of cauliflower, along with a recipe from David Rocco’s book “Made in Italy” called “The Best Cauliflower Ever” or “Cavolfiori Stufati Al Pomodoro”, I slowly stewed my way to this dish. I realized I can use any tomato product, such as puree, whole peeled, or even jarred salsa, to make it. And it’s always AMAZING. Don’t forget about the greens and stems that hug the head of cauliflower. If they are still in good shape then slice them up and cook them too! I also was somewhat surprised that this dish is best at room temperature, like David Rocco suggests. The flavors stand out much more when it is at room temp, and it’s even more rich and comforting. This type of dish, that can be eaten room temp, is perfect for company or a busy day in the kitchen.
If you haven’t seen David Rocco’s Dolce Vita, do yourself a favor and DVR a few of those episodes. It’s the perfect show to help you get away, explore the beautiful country of Italy, and understand the culture’s appreciation for quality ingredients, and simple cooking.
If you are still reading now, I know you love Cauliflower more than a handsome Italian man…and I thank you. In return, I shall give you this amazing Cauliflower recipe.
Italian Stewed Cauliflower
2015-01-12 06:01:30
This warming and tender adaptation for simple white cauliflower is the perfect way to fulfill your pasta dreams, and please the whole family. The versatility of this recipe makes it even more incredible. Try it with jarred salsa, leftover sauce, or even pizza sauce. This dish is surprisingly best at room temperature. Trust me on that. I suggest doubling the recipe if you serve it as a main course. You may also freeze the finished dish for future use.
1 large head cauliflower, core removed, stems and greens saved
1 onion or 2 shallots, finely diced (can be omitted if you use a flavorful sauce or salsa instead of tomato puree)
2 cloves of garlic, minced (optional)
16 ounces Tomato Puree, Sauce, Crushed, or Diced, or Salsa
1/2 cup cubed hard cheese and rinds like parmesan, grana padano, or pecorino romano
1/4 cup extra virgin olive oil
1/2 cup fresh parsley chopped
1/2 cup water
1/2 cup grated cheese
Instructions
Cut the cauliflower florets and stems into small bite sized pieces. If the greens (including firm ribs) around the head are in good shape, slice them thinly with the cauliflower.
In a large pot, heat the olive oil on medium heat, and saute your onions until they are getting soft.
If you haven't already, cube the hard cheese into small bite size chunks.
Add the garlic and parsley to the onions, and stir to start releasing the fragrance of the garlic.
Add the cauliflower and stems, some black pepper, and a generous three-finger pinch of sea salt. Stir to combine.
Now add your water, and tomato puree or choice of tomato sauce.
Mix everything together, cover the pot, and turn the heat on medium low.
Set a timer for 40 minutes and check back every so often to give it a stir.
After 40 minutes, stir and smash the cauliflower, and taste for salt. You will likely need more salt if you used an unseasoned tomato base.
Remove the pot from the heat, and stir in the cubed cheese, and grated cheese. Mix it well, and let it sit for 15 minutes before digging in.
Enjoy at room temperature with grated cheese, and crushed or dried chilli flakes
Notes
This will serve 6 people as a side dish, and 3 people as a main dish.
This dish will be great with the addition of fennel, or even some leftover meat like italian sausage or beef. Simply add in with the cauliflower.
Tag me in your stewed cauliflower pics #mylongevitykitchen @mylongevitykitchen
By Marisa Moon
My Longevity Kitchen https://mylongevitykitchen.com/
You deserve to have a guide by your side as you navigate the steps it takes to become a healthier you.
Together we’ll find the ideal combination of challenges, accountability, and structure that you need to make it work and reach your goals.
Learn more about my coaching style—I’m relatable and realistic, and I combine health coaching with life coaching—and book your free consultation here at marisamoon.com


")


")


")


")


")