I shot my first Facebook Live cooking video alongside Chicago Biohacking Expert Anthony Diclementi. Anthony, a long time acquaintance and Hi-Vibe Ambassador, invited me into his kitchen for an informal live video about how to make my Nutty Butter Collagen Bars, all while we laughed and discussed why eating real food is so awesome. Watch the video to see Anthony’s reaction to my peanut butter substitution, and to see how you can make these low-carb, fudgy bars in 15 minutes Continue reading →
No time to read? Listen to my podcast episode dedicated to this article:
Somebody got this trend all wrong.
Well, not ALL wrong…but they messed up the only step in the recipe! We shouldn’t be soaking our overnight oats in the refrigerator, we should be soaking them with warm water, at room temperature—or even warmer. And would you believe that cooking the oats afterwards actually makes them even MORE nutritious. This is not a food you want to eat raw. Let me break down the basics for you…
Our ancestors ate whole grains after soaking them or fermenting them. Over time they figured out that this was how grains needed to be prepared—in order to avoid illness. It was probably thanks to serendipity that they figured this out back then because there weren’t any refrigerators…food was just left out. But as generations passed, and food culture diminished, we have been hastily preparing our grains…and we’ve even gone as far as thinking they are best uncooked! This is flat out wrong.
Did you know that the oatmeal box, back in the day, used to say “soak overnight” in the directions? What happened to that?
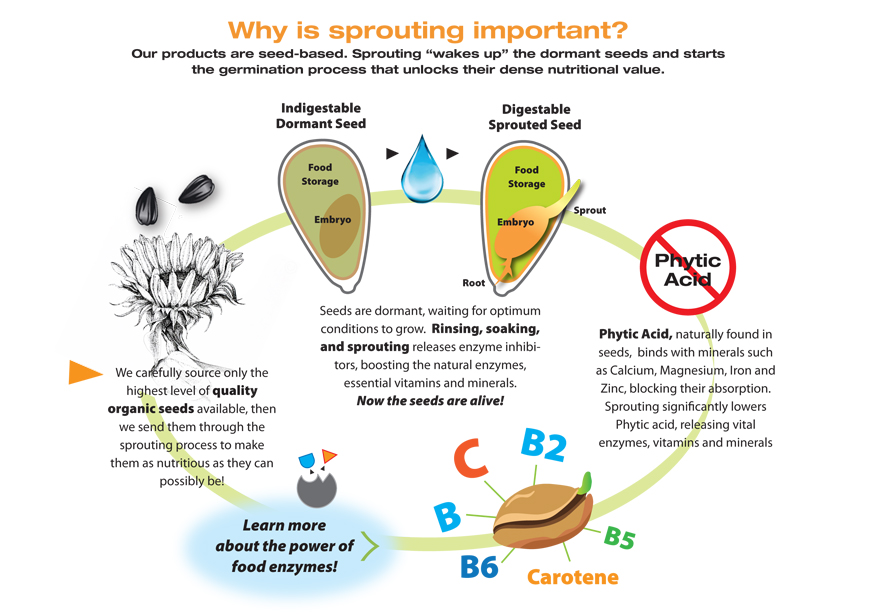
You see, all grains contain something called “phytic acid”—or phytates—in the outer layer or bran, and oats contain more phytates than almost any other grain. So, if this phytic acid is untreated, it will combine with important minerals in our body and block their absorption. I’m talking about calcium, magnesium, iron, zinc, and copper. We need these minerals, and our food supply is providing less and less of them because of modern farming methods. We should take every precaution to protect the minerals that are still available to us. Regular consumption of improperly prepared grains (also legumes, and nuts) can lead to mineral deficiencies, leaky gut, irritable bowel syndrome, bone loss, food allergies, and even mental illness…this is not only due to the phytic acid content, but more so a combination of these plant chemicals along with others like lectins, goitrogens, and oxalates to name a few. It’s the dose that makes the poison, and it varies widely from person-to-person (or gut-to-gut).
Illustration by Go Raw and EatDrinkShrink.com
So what’s the proper way to prepare these grains?
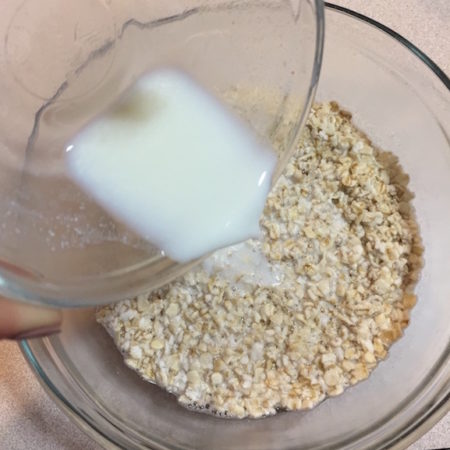
The process is simple really. All we need to do is soak the whole grains overnight at room temperature, or even warmer, and cook after soaking. It helps tremendously if, during the soak, you add an acid starter like liquid whey, kefir, yogurt, or even lemon juice. Allow the natural enzymes and other helpful organisms to begin fermenting the grains, for 7-24 hours, and this will neutralize a large portion of the phytic acid.
Soaking in warm, acidic or cultured water not only gets rid of this mineral-blocking substance, but it also releases all of the vitamins in grains, and encourages more healthy digestion by partially breaking down some of the proteins (like gluten). Win Win, all around! Finish your oatmeal by cooking for a quick 5-10 minutes (more on that in the recipe at the end of this post).
Pouring liquid whey into my soaking oats
Spread the word to those we care about.
Oatmeal is one of those things that people eat habitually…every single morning. That’s why it’s important to spread the word. Although I do not usually consume oatmeal or most grains, I felt the need to focus on this recipe because many of my closest friends and family are enjoying oatmeal on a regular basis. My goal with My Longevity Kitchen is to help explain how we can maximize the nutrients in our food, and minimize toxins. And my passion lies in the ways of our ancestors, and their time-honored traditional cooking methods. Oatmeal can be nutritious, or quite the opposite. I hope you’ve learned a thing or two on how to make it truly nourishing. Here are some more tips for you, and the recipe!
No time to read the full post? Listen here to the audio version:
My Inspiration…
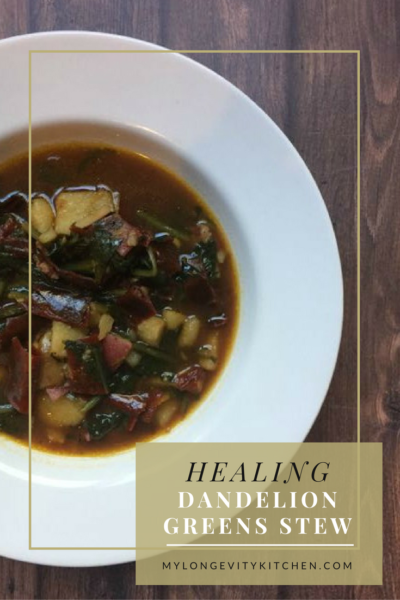
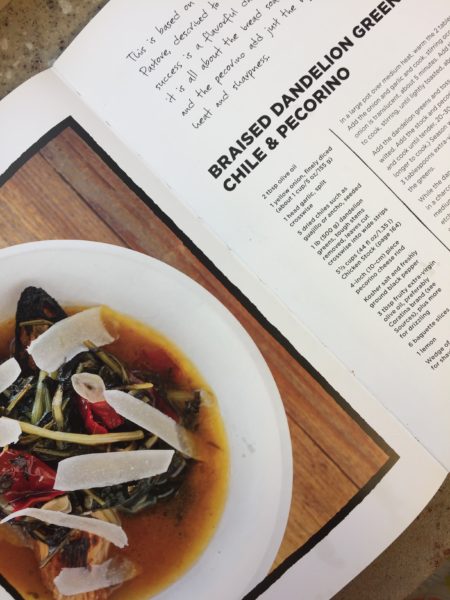
One of the first, most-interesting soups I ever made was a braised dandelion greens recipe by Top Chef Master, Chris Cosentino. It was bitter, and spicy, and full of dimension. It’s not for everyone, but that’s okay. This recipe is for anyone who appreciates bitter greens like rapini (broccoli rabe), frisse, escarole, and of course dandelion greens. The way Chris paired the greens with ancho chilies, lemon, olive oil, and true parmigiano reggiano just spoke to me. This is totally my language.
I’ve made it time and time again, swaying a bit from the recipe to make it compliant with my food and lifestyle choices. For instance, he suggests a crusty piece of bread on the bottom of your bowl so it will soak up all of the dandelion broth…and I know that sounds heavenly. But, I don’t really eat bread any more. I eat it on special occasions if it’s gluten free, or if I’m in the mood for a burger with a real bun-but otherwise I avoid it. So, I started adding potatoes to the soup instead. Bitter greens and potatoes are a popular combo with Italians, so that one was a no-brainer. I also changed the chicken broth base to a bone broth base, and the combination of bone broth with dandelion greens is what makes this recipe especially healing. Interested in Chris Cosentino’s cookbook? It’s called Beginnings – My Way To Start A Meal. It’s a beautiful book full of vegetables, cured meats, and artisanal cheeses; and it’s organized by seasons to highlight year-round ingredients for appetizers and small bites.
Longevity Tips…
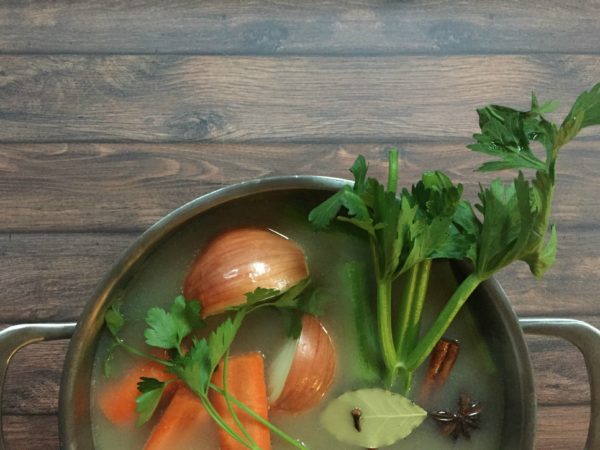
Bone Broth:
If you are a vegetarian then don’t worry, this soup can be made with water, or vegetable stock, and still turn out great! But for everyone else, let’s talk about bone broth. That’s possibly the main reason I called this recipe “Healing Dandelion Stew”; it’s the bone broth that makes it especially healing. The name “Bone Broth” either gets you excited, or Continue reading →
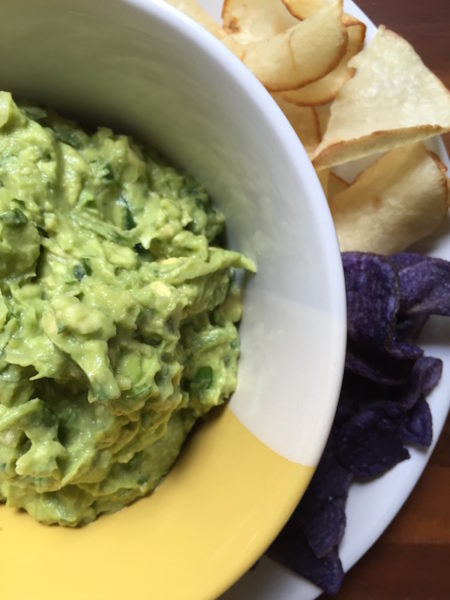
Getting your daily dose of probiotics through food doesn’t get any easier than this guacamole recipe…welllll, unless of course you’re just eating the sauerkraut out of the jar. You might be blown away by this recipe concept here, or you’ll be like me and say “why didn’t I think of this sooner?”.
I always felt bad dumping a jar of sauerkraut juice or brine after I finished the nourishing veggies. Ever since I read the back of the bag of sauerkraut by Farmhouse Culture a year ago, I realized I need to put that sauerkraut brine to use! If you think about it, that brine is really just salt water with a tart/sour taste– thanks to the healthy probiotic bacteria that occur during the fermentation process used to make the kraut. Why would we dump it down the drain when we can use it in other foods and continue to reap the benefits?
Ever since realizing this, I have been putting it in everything from guacamole to tuna salads. Continue reading →
I feel so lucky being able to visit Austin for THE Paleo conference, working alongside passionate foodies, and visionary leaders whom I admire.
I had an exciting moment when it was time to announce the Best New Blog of the Year because I was a nominee! Even though I didn’t win, I was already feeling so accomplished after being voted into to the top 4 new blogs. On the day leading up to the awards ceremony, I had the chance to speak with Tony Federico, the host of Paleo Magazine Radio, and do a short impromptu interview about my experience at PFX. You can find my interview on the Paleo Magazine Radio podcast here. (I’m the first interview which starts at 2 minutes in.)
Okay, on to my favorite products!
I’m still going gaga over some products I purchased at paleo f(x), and I knew I had to share them with you! I’m going to keep it as brief as possible, on some items more than others, because if I try to explain each item and all of the benefits, I’d be writing this post for 12 days straight. So, if you have any questions about each item please comment below or just click the product photo to head over to the company’s site.
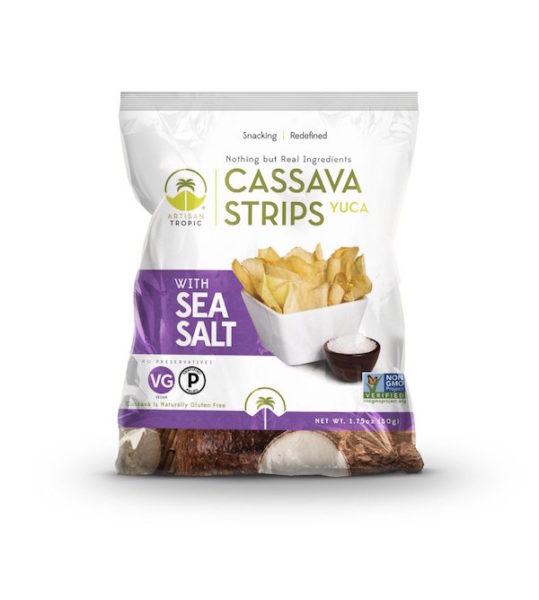
Artisan Tropics – Cassava Strips
Vegan, Grain-free, Diary-free, Soy-free, Non-GMO
These chips or strips are pretty awesome. If you’ve given up on chips because you believe there’s no such thing as a healthy chip, then think again! Continue reading →
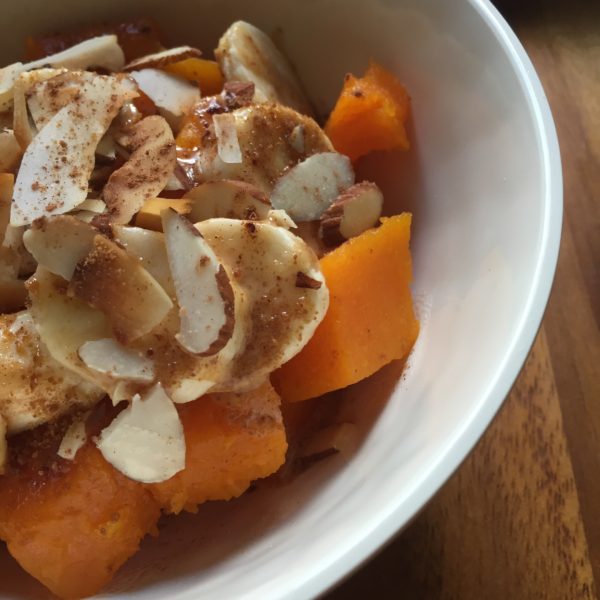
It may be difficult at first to imagine your breakfast without grains, but there are plenty of foods to replace the standard oatmeal breakfast. Winter squash is available all year round and makes for a great base in this versatile breakfast.
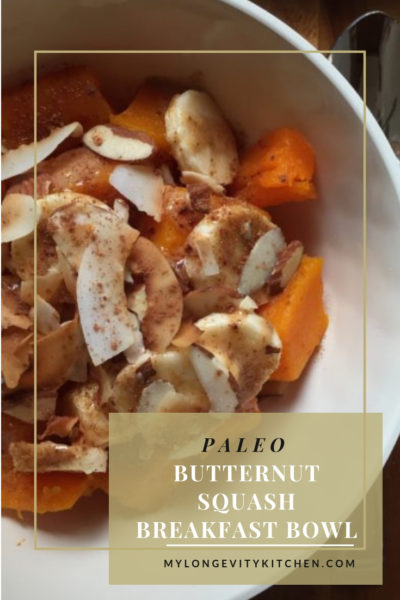
If you’ve been following me since January 2016, you would have heard that I created an e-cookbook for participants in the 6-week fitness and diet program called My6Method. This ebook helps My6Method (M6M for short) clients stick to the recommended food list, and get cookin’! This cookbook is exclusive to the M6M participants, but soon I’ll be replacing winter recipes with warm-weather recipes. That’s why I decided to share a recipe with you…the Butternut Squash Breakfast Bowl!
Longevity Tips…
I created this recipe to show oatmeal-lovers that there is a grain-free alternative they will love just the same! It’s important for me to point out that I believe protein is a significant part of a healthy breakfast, as well as keeping sugary carbs, grains, or flour-based foods to a minimum (the only instance I believe protein is not important at breakfast is if you practice intermittent fasting and have a breakfast full of healthy fats, like with bulletproof coffee).
That being said, I highly recommend enjoying this butternut breakfast bowl alongside some scrambled eggs & quality bacon (made from pork that is pasture-raised and antibiotic free), or try a simple grass-fed whey protein shake to get your protein in without filling up too much.
I’ll show you how to roast a whole butternut squash, saving you time and effort…have you ever tried slicing raw winter squash? Difficult. So, let’s skip that step. This whole-roasted squash technique results in an extra sweet, irresistible flavor that’s perfect with breakfast. Continue reading →
I’ve been diggin’ the sweet potato collection lately at my supermarket.
Have you branched out and tried the different color sweet potatoes? Most of them are more closely related to a yam…which is a good thing! They have lower sugar content and are less hybridized.
Hybridize: Crossbreeding; (of an animal or plant) breed with an individual of another species or variety.
Most of our favorite fruits and veggies have been hybridized to yield a sweeter, larger fruit. I like to shop for more heirloom and wild varieties because I know they pack the most nutrients, and have the least sugar.
These 3 sweet-potato-yammy-thingies are all quite different. My favorite is probably the Hannah (blonde on the far right), or Japanese (redhead in the center). Hannah is probably the least sweet of them all, and truly tastes like a cross between a yukon and a yam. The Japanese sweet potato in the center is sort of squash like, but still with a mild sweet potato sweetness.
The purple is my favorite to look at, and I know there are tons of antioxidants in there because of the color…but this one isn’t the best for roasting because it’s more dry and “thick” compared to the rest. When you roast it, it’s almost like eating a spoon full of peanut butter…it’s a mouthful and you need a glass of water! I like to roast because it’s convenient and I can save the roasted veggies for a bunch of different recipes later this week (I often use my sweet potatoes to pan fry with eggs). If you like the purple sweet potatoes, try roasting them around 350 degrees and wrapping them in foil. This will help keep the moisture in! Otherwise cooking them in a soup is a good idea.
Welp…
I’m gonna keep this post short because it’s not really a recipe. I just figured I’d give you a peek into my kitchen when I’m prepping or cooking whatever is left in the fridge!
I preheated the oven at 400 fahrenheit, and I loaded a pan up with these potatoes (and some other goodies I’ll get to in a sec). DON’T POKE HOLES IN YOUR SWEET POTATOES. Sweet potatoes won’t explode while baking, so there’s no need to poke holes. This keeps the moisture and sweetness inside to steam and caramelize.
Loading up the Pan to Roast
Hannah Potato Bursting When Finished
While you’re at it, you might as well throw some roasted garlic and jalapeño packs on that pan too. Not too long after this photo I snuck an Italian eggplant on the tray. Just poke holes in the eggplant with a fork (yes for eggplant, no for sweet potatoes), and stick it right on the pan.
Simply Salt, Wrap, Roast 45-60m
Ahhhhh, Soft & Juicy
Avocado Oil (for high heat), Salt, Dry Oregano
Roasted 1 Hour, 45m is Best
Whole Eggplant, Poke with Holes
Bake 1 hr ’til soft, Rest 10m
After cutting open the eggplant, you can scoop out most of the seeds, drizzle with olive oil and season with plenty of salt, pepper and parsley. You can eat it just like that or blend it all up if you’d like to make a dip! Add some oil and lemon and voila!
Let’s get ready to load ’em taters up!
Top to Bottom: Japanese w/ Kraut & Jalapeño; Hannah w/Roasted Garlic, Butter, Basil; Purple with Lime Mayo, Mexican Spices, Cilantro
My favorite toppings were Sauerkraut & Roasted Jalapeño! This was a slammin’ combo that I will do again and again. I used Bubbie’s Sauerkraut that is made without the classic caraway seeds; this makes for a more versatile sauerkraut that you can put on anything. I change it up and sometimes get the “Fair ‘N By” Sauerkraut by The Brinery. They both are only made with cabbage, sea salt, and time. If you haven’t noticed by now, I’m always pushing fermented foods like sauerkraut. We NEED this beneficial bacteria, AKA probiotics, in our daily diet; and variety is the way to go! Try new sauerkraut brands and flavors whenever you get the chance. I’m starting to see Farmhouse Culture Brand krauts at all the health food stores. These are sold in BAG! My favorite flavor is the horseradish & leek.
Sauerkraut FAQs
Q: Can’t I just take probiotic supplements?
A: I take these too, but the probiotics in fermented foods are better. Fermented foods are readily recognized, and utilized in our body. Probiotic supplements are relatively new, there’s not enough understanding on them yet, and they don’t necessarily reach the digestive tract where we need them to take effect. That’s why fermented foods are even better. These have been used in the human diet for most of our human existence; and they play a huge role in our digestive ability, our intestinal integrity, our brain function, and especially our immune systems. I take probiotic supplements periodically to introduce different bacteria strains which are not present in fermented foods.
Q: Where do I find sauerkraut?
A: You can find sauerkraut and fermented foods in a cooler at your grocery store, typically near the vegan meat & cheese substitutes. Only purchase the refrigerated sauerkraut (& kimchi) because then you know you’re getting food with live-active cultures (cultures are the beneficial bacteria/probiotics)
Q: What if I buy it and I hate it?
A: The best part about fermented foods is that we have an innate desire to eat these foods. So even if you don’t like it at first, just try about a tablespoon each day, and you’ll truly grow to love it! If you just hate the certain flavor you purchased (krauts come in all different flavors now!), then you can throw it into a cooked dish were it loses its probiotic benefits, but it turns into a tender, flavorful veggie which contains more readily available vitamins and minerals (compared to using the same ingredient in unfermented form). Ever have brats/sausage cooked with warm sauerkraut? Much more mild than the refrigerated kind. Don’t forget the juice…sauerkraut juice is where a lot of the benefits are at. You can drink a shot of it or add a shot to your salads to get the same probiotic benefits as eating it.
Q: How long will it last in my fridge?
A: Fermented foods have a long refrigerated life. Depending how much you open the jar, if you use clean utensils to dip in the jar, and how full the jar is, it can last around 6 months or so after opening! Every jar has an expiration date on it as well. If the sauerkraut smells bad when you open it, or has too much pressure building up inside, you can just cook with it so it doesn’t go to waste. This is typical for Koreans to do with kimchi (spicy fermented cabbage), as well as Polish and German Sauerkrauts; they add it to their traditional soups and stews to kill off the sour-expired taste, and utilize the healthy vegetables.
Q: What other ways can I use my kraut?
A: Try your sauerkraut in salads, on deviled eggs, in wraps or sandwiches, and even in your guacamole! Use the liquid in place of vinegar in your dressings. My family loves a side of sauerkraut or kimchi with our breakfast, but it’s on our plate as a side dish with almost every single meal.
Have you embraced fermented foods yet? Tell me about it below!
While thumbing around my Pinterest feed, I came across “The BEST Stir Fry Sauce” by the blogger behind Tastes Lovely. I liked the idea that this post was just for the sauce. The sauce is key. To me, stir fry is like frittata…there are hardly any rules, and ANYTHING can go in it. So why not just make a recipe for the stir fry sauce and change up the dish with different veggies and protein. Great idea Natalie!
I had a crazy week, and I knew a pre-made sauce would save my butt when dinner had to get on the table in 15 minutes (and it did)! Eric loved it and said it tastes like something from a Chinese takeout. Maybe I should have called this Chinese Takeout Stir Fry Sauce? Nahhhh. I recently had some healthy takeout food boulder and that inspired me to create this dish. Takeouts don’t have to be unhealthy and neither does home cooking! We’re trying to lose some weight so this recipe also seemed like a good idea for us.
P.S. I’m back into Pinterest and I am loving it! I had too many sites to focus on for a while there so I sort of left Pinterest behind in the dust. I realized it was time for me to get back in the pinning game once I started sharing boards with friends. It’s fun to share boards! If you haven’t started Pinterest yet, you totally should! Find me there at www.pinterest.com/LongevityKitch (ughhh pinterest why wouldn’t you let me choose a handle with more characters?) and let’s share ideas!
Longevity Tips…
I’d love to tell you about the ingredients I chose for my version of this Make-Ahead Stir Fry Sauce!
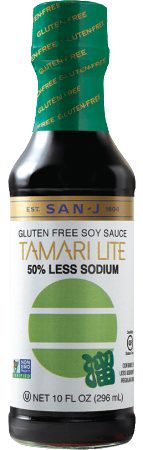
Tamari:
Raise your hand if you’ve heard of Tamari. Tamari is basically soy sauce, but more legit. Modern Soy Sauce has WHEAT as the main ingredient- often preceding even Soy on the ingredient list. That’s a bunch of hooey, and we want our soy sauce made from soy and salt…NOT WHEAT. I should begin to clarify something however; I usually tell people to stay away from Soy. There’s a lot to be said on the subject, but just hear this: Soy is a profitable crop for America to grow and utilize, so they want us to believe it’s healthy and they want to put it in everything (same goes for wheat and corn). The main problem is that soy mimics estrogen in the body and really throws our hormonal system out of whack; putting us at risk for thyroid problems, cancer, infertility, and all kinds of stuff that sucks. In countries like Japan & China, they use soy as a condiment and they would never consider it their main source of protein. 50% of the soy they eat is fermented, and they have a drastically different diet than us Americans, and their diet is much richer in micronutrients. There are a few forms of fermented soy that you may be familiar with: Soy Sauce, Tempeh, & Miso, among others. I recommend including these foods in your diet on occasion and skipping all other forms of unfermented soy. If you have children, an autoimmune disease, or are trying to conceive, keep yourself and your children as far away from soy as you can. To learn more about the many dangers of unfermented soy, read this.
Coconut Aminos is a great alternative for people avoiding all types of soy. It’s like soy sauce, but sweeter. You can find coconut aminos at most health food supermarkets in the Asian section, or you can order all of the products I recommend online through Thrive Market.
The good news is, you can buy Tamari Lite at the grocery stores now! Get your hands on some Tamari Lite or Tamari Low-Sodium. The Non-GMO certification (or Organic) is great because we know the soy plant wasn’t sprayed with the same deadly chemicals they use on GMO soy. Get it? Got it? Good.
Coconut Sugar / AKA Coconut Palm Sugar
I’m totally into this stuff. I don’t use it a lot, because it’s still sugar. But it’s minimally processed (only 2 steps!), and delivers less of a spike in our blood sugar than nearly any other sugar available. It tastes like brown sugar! No, it doesn’t taste like coconut. You can find bags of this in the baking aisle or online, so go get some!
Starch helps to thicken your sauce like the gravy at a chinese restaurant! These are smart swaps for corn starch, if you ask me. Corn starch is always GMO unless you buy organic or Non-GMO verified (this is a problem because of the dangerous chemicals they spray on the GMO plants, and the toxins the GMO corn produces to keep away insects.) Corn Starch is also insanely processed, and did you know corn is not even a digestible grain? We literally can not digest it. I know it’s sad; you like corn on the cob. Who doesn’t? Anyways, I’m not here to tell you you can’t eat corn on the cob…I’m here to tell you what you should be using in place of corn starch (for the love of heart health and all things healthy: throw away your corn oil).
Potato Starch, Arrowroot, Tapioca Starch/Flour, and Cassava flour are all awesome alternatives to corn starch. These starches are perfect for thickening soups and gravies, and you can even make a batter with them and fry up some goodies (arrowroot is the most pricey, and the most particular of them all. So I only recommend arrowroot if you have other recipes to try that call for it). My family made fried Calamari and all sorts of fried fish using potato starch on Christmas Eve…it turned out great! They did this just because they love me and know I can’t have wheat flour. Happy. There are a million recipes out in the Paleo world now using these starches, so go ahead and do a search for ideas! They store well, and potato starch is inexpensive!
It’s Time to Cook…
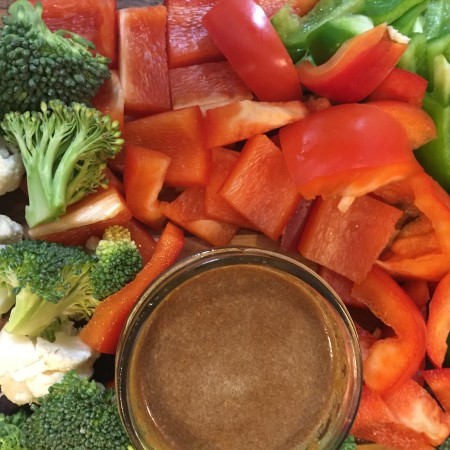
Stir Fried Shrimp Broccoli & Peppers
Stir Fry Sauce Ready When You Are
This recipe is so eeeeasy!!
Just throw it all in the blender, and save it for a rainy (raining with responsibility) day. This could be one of those weeks when you buy the conveniently pre-cut veggies from the supermarket…like I did when I made this stir fry. $6 for a package of pre-cut asparagus? That’s not a deal at all…but on occasion it’s okay because then we still eat veggies even though I’m busy, and I don’t have to worry about the prep and mess!
What are you going to put in your stir fry? I made one with shrimp, broccoli, and bell peppers; and the winning dish was chicken thighs with asparagus & kale. Do your body a flavor and buy some organic meat, free from antibiotic & hormone use, and from a farm you can trust. Want to buy directly from a farm but don’t know how? Check out the place I get our meat from: www.sevensons.net They deliver to pickup locations all over the midwest! Wouldn’t you feel saintly if you knew the farms that raised your meat? I know I would, and I do!
Okay, what are you waiting for? Make this 5 minute sauce so it’s ready when you are! Comment below or tag me in your creations #mylongevitykitchen
Make-Ahead Stir Fry Sauce
2016-02-01 06:00:27
Serves 4
Make this 5 minute sauce so it's ready when you need dinner on the table in no time! Using whatever protein and veggies you have on hand, you can create a chinese takeout dinner with endless possibilities.
2 inch piece fresh GINGER, peeled & minced (about 1 tablespoon), See Notes
2 GARLIC Cloves, chopped (help a blender out), See Notes
1/4 Cup of BROTH (water works in a pinch)
1/4 Cup Non-GMO TAMARI Lite Soy Sauce (soy-free sub is Coconut Aminos)
1 Tablespoon COCONUT SUGAR (ommit for lower carb)
1 teaspoon APPLE CIDER VINEGAR or Rice Vinegar
1 teaspoon TOASTED SESAME OIL
1 Tablespoon POTATO STARCH, See Notes for subs
Instructions
Add Everything to your blender and blend on high.
Save in a jar in the fridge for up to a week
Ready to cook? Follow these steps
If using meat/seafood, cut your meat into bite sized pieces, and heat 3 tablespoons of high heat cooking fat like avocado oil, ghee, refined coconut oil, palm oil (or even lard/tallow/bacon fat from healthy animals).
Cook your meat/seafood until 75% done, and season with salt and pepper while it cooks.
Remove the meat and set aside.
Add your veggies to the pan along with a splash of water, and half of the stir-fry sauce. Season with salt and pepper and cover the pan.
Steam-cook your covered veggies for about 3 minutes over medium heat.
Remove the cover, stir, and add back your meat/seafood. Pour the rest of your stir fry sauce onto the meat/seafood, and stir to combine everything.
Turn the heat to high and cook for 5 more minutes. Stir occasionally and watch the sauce thicken (thank you starch).
Notes
Ground Ginger can be a good substitute. Use 1/4 teaspoon
Garlic Powder can be a good substitute. Use 1 teaspoon.
Potato Starch can be swapped for Tapioca Starch, Cassava Flour, & Arrowroot Starch in this recipe. You can ommit the starch completely and still have a delicious dish that is even lower in carbs.
I’d hardly call this a recipe because it is so simple! But indeed it is a recipe for greatness, and it’s time to share it with you! It tastes like a warm and creamy vanilla milkshake, for real! It’s so frothy and delicious.
I am a Bulletproof Coffee fan, for life. But I am also trying to figure out what my brain needs to function optimally and stay focused throughout the day.
After reading the famous book “Healing ADD” by Daniel Amen, I understand that coffee may not be the best choice for my morning routine. Here and there yes, but not daily. Sooooo, I had to start toying with my green tea and make it “Bulletproof” too!..
I use coconut oil for the satisfying fats and MCT’s (medium chain fats that are good for the brain and metabolism), protein powder because most distracted brains thrive on higher protein and lower carbs (this is especially important earlier in the day to boost your focus and concentration skills), and often add in Bulletproof Brain Octane Oil for added brain boosting power. This combo of healthy fats and protein provides you with a power breakfast that’ll hold you over for hours into your day! And I still get to keep my morning routine. I don’t miss the coffee one bit!
Caffeine makes you feel more focused but unfortunately it also decreases blood flow to the brain–and over time can make ADD symptoms worse. Green tea is a better choice than coffee because it contains less caffeine, and more importantly, green tea contains Theanine and EGCG which both benefit the brain in many ways. Green tea is known to have healthy bioactive compounds that can help treat various diseases. Besides improving brain function, it may also help in fat burning and preventing type 2 diabetes. Additionally, drinking green tea can reduce bad breath and help in losing weight. So, if you are concerned about your health, you might as well consider consuming green tea instead of any other beverages. Green tea flavors like cardamom or earl grey can be sourced online. They could be available from Ahmad Tea USA sellers and similar web shops.
Disclaimer: Marisa Moon of My Longevity Kitchen is a participant in the Amazon Services LLC Associates Program, an affiliate advertising program designed to provide a means for sites to earn advertising fees by advertising and linking to awesome products they recommend from amazon.com
Coconut Green Tea
2015-10-13 23:06:41
Serves 1
Blend together hot organic green tea with nourishing coconut oil, and vanilla protein powder for a nutritious and brain-boosting breakfast alternative.
VANILLA Grass-Fed Whey PROTEIN POWDER (see notes for brands and measurements)
A generous dash of CINNAMON
Optional
Up to 1 Tbsp MCT oil or Brain Octane Oil
Instructions
Using a blender, BLEND together the HOT GREEN TEA and the COCONUT OIL first.
Touch the mixture with your finger to test the temperature. If its too hot to touch then it needs to cool a little longer before you add the whey protein powder (to avoid damaging the nutrients).
Once it's at a temperature you can touch comfortably, add the protein powder and cinnamon. Blend again. Enjoy!
Notes
Whey Protein Powders: All protein powders have different measurements and different levels of sweetness. I use Reserveage Vanilla or Primal Fuel Whey Protein and put 2 Tablespoons in my coconut green tea recipe. Terra's Grass-Fed Vanilla Bourbon Whey is also great, but you will have to double the quantity (4 Tablespoons). Do you have another brand? If so, start with 2 Tablespoons, and taste to decide if you need more. See my full list of recommended protein powders above. Happy sipping!
By Marisa Moon
My Longevity Kitchen https://mylongevitykitchen.com/
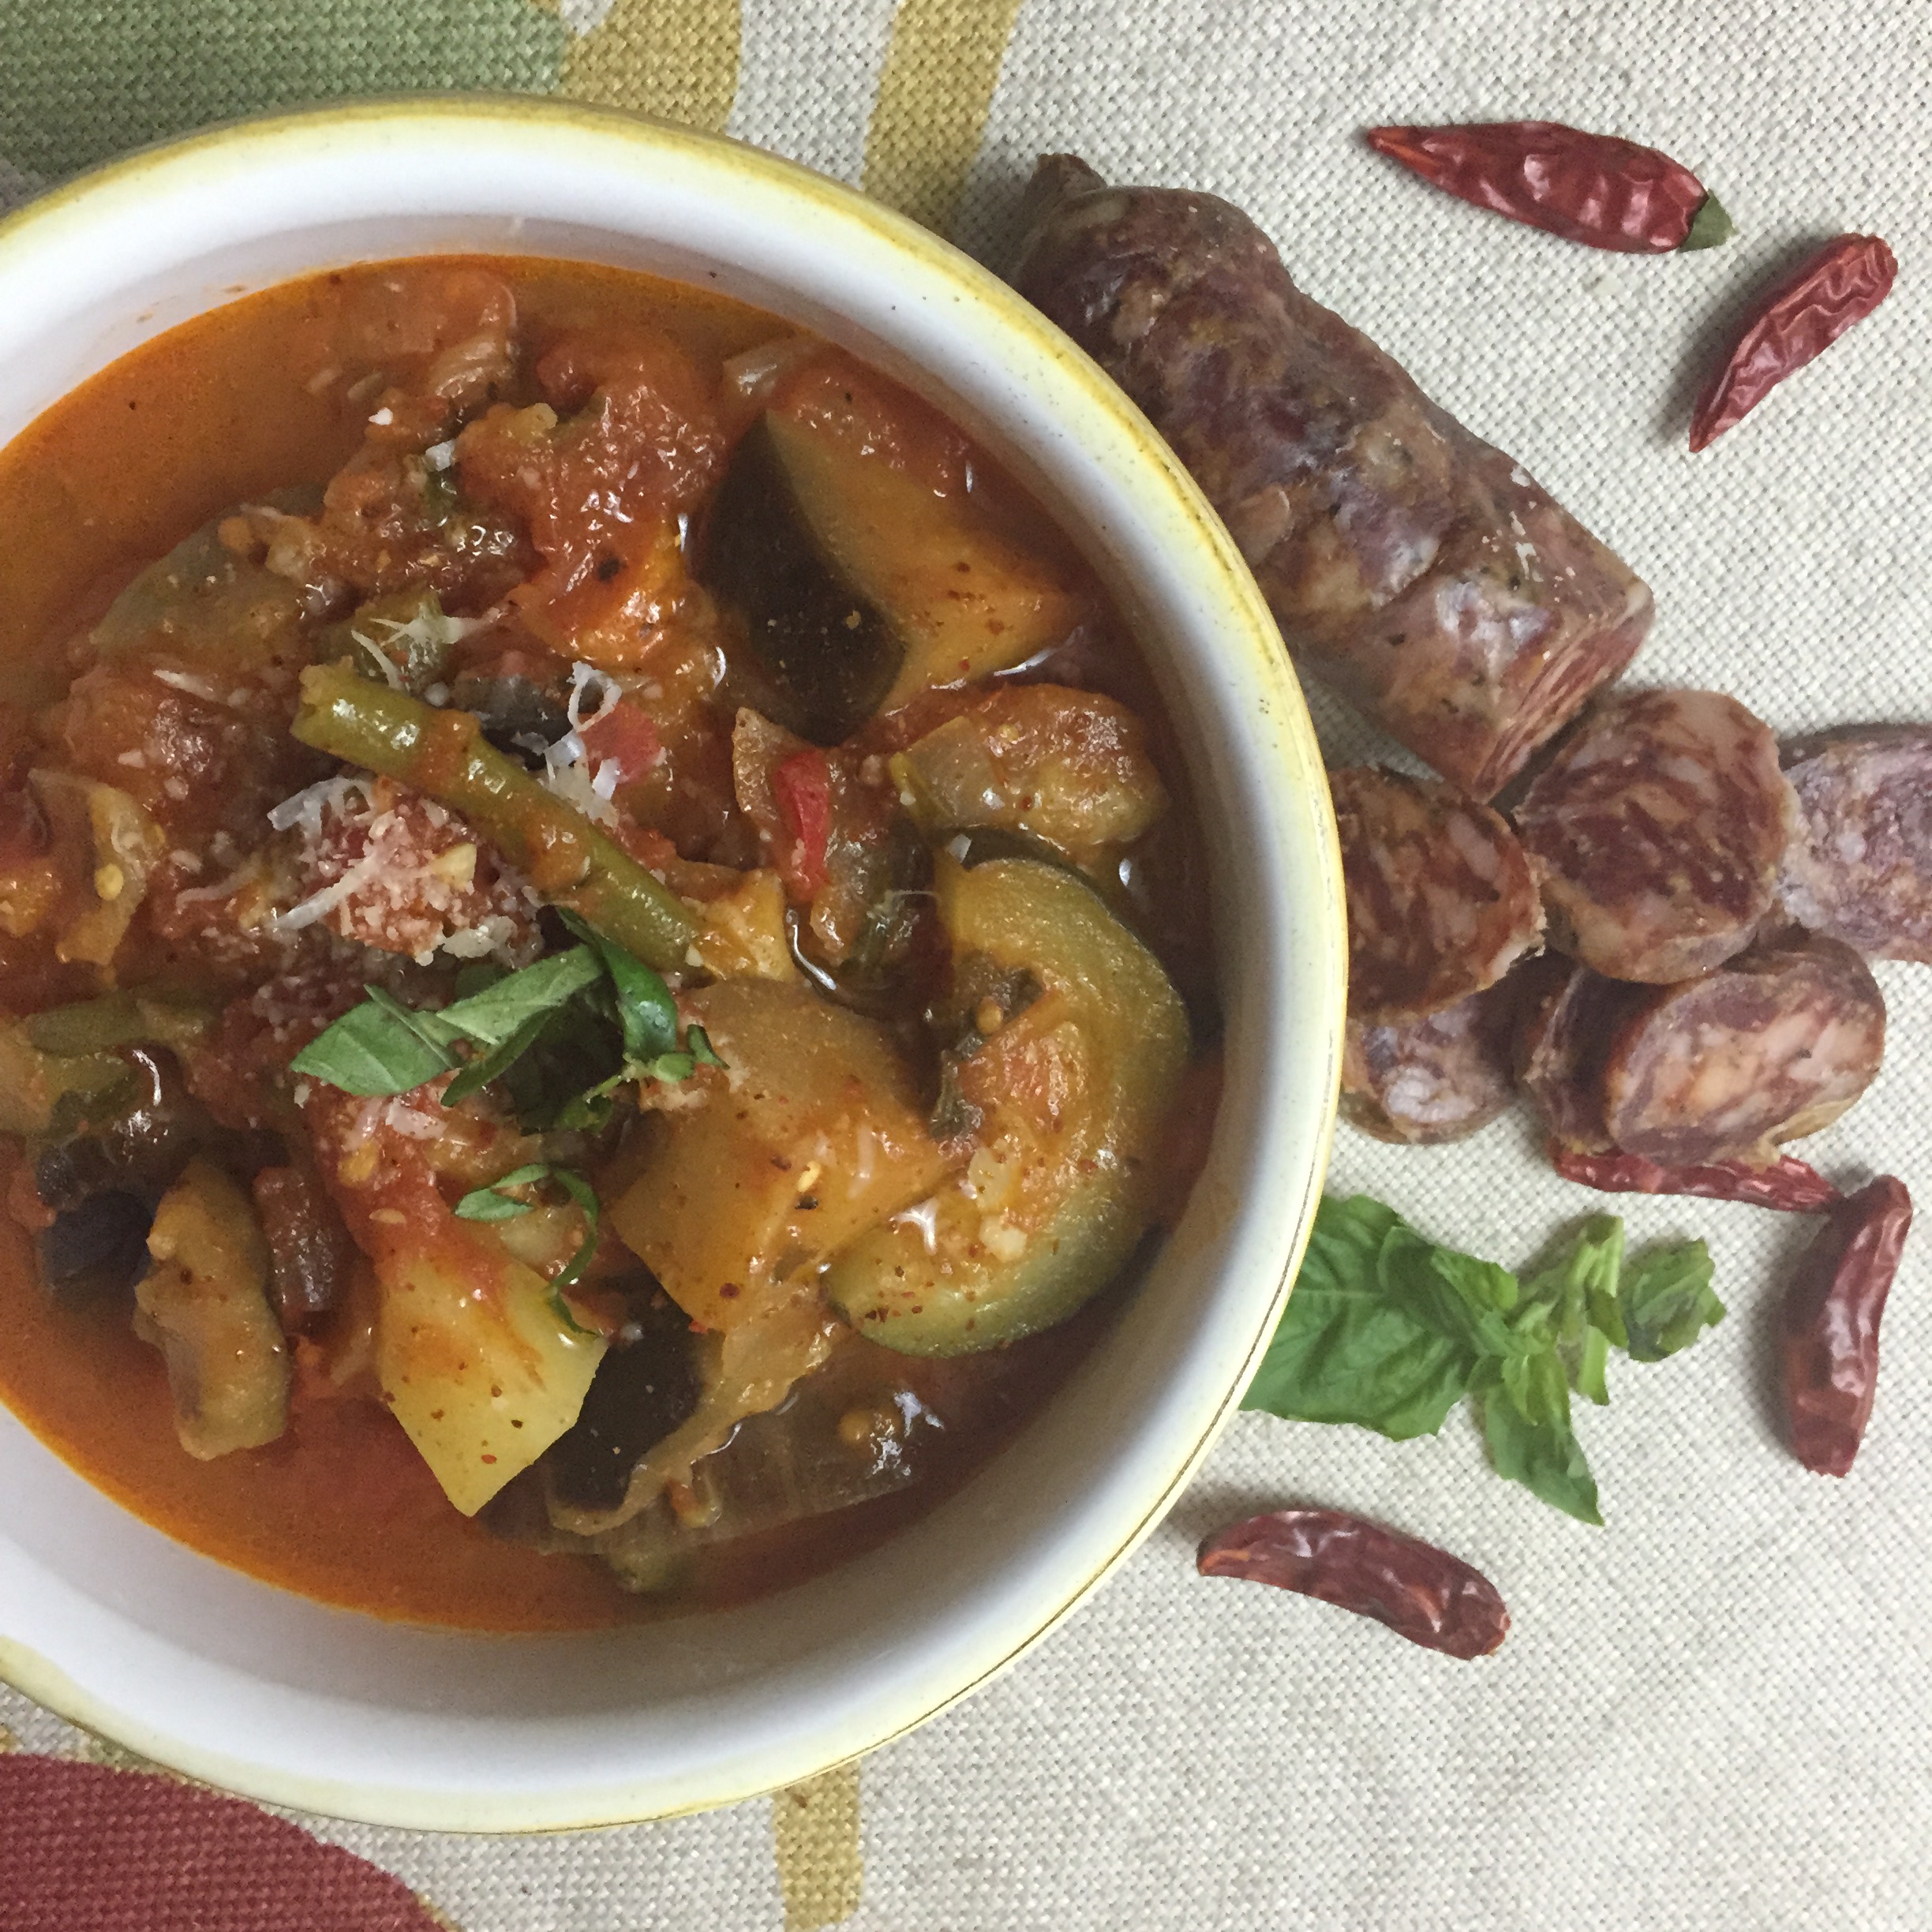
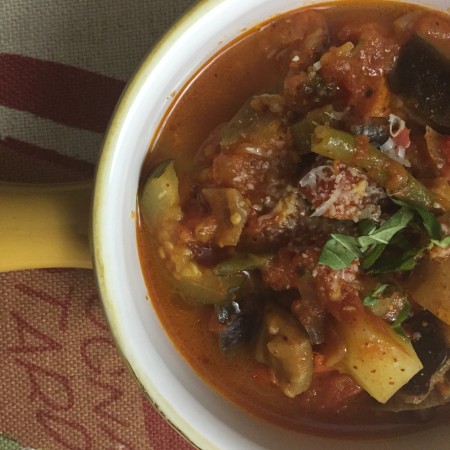
Sure enough, whenever the leaves are thinking about falling, I’m thinking about Ciambotta—pronounced Chom-BOAT-ah. This Italian vegetable stew is a southern Italian tradition. It gives you the opportunity to celebrate the bounty of your garden (or farm stand, CSA, and local produce section), kiss the Summer goodbye, and say hello to a 50 degree day. I’m okay with that.
I love Ciambotta for so many reasons! Most importantly, I grew up eating it—anything in a red sauce, with parmigiano reggiano and crushed red pepper was my favorite. But ciambotta is awesome because it’s cheap, versatile, and reminiscent of a bowl of pasta. (I should mention it freezes fantastically too. BONUS!)
Longevity Tips…
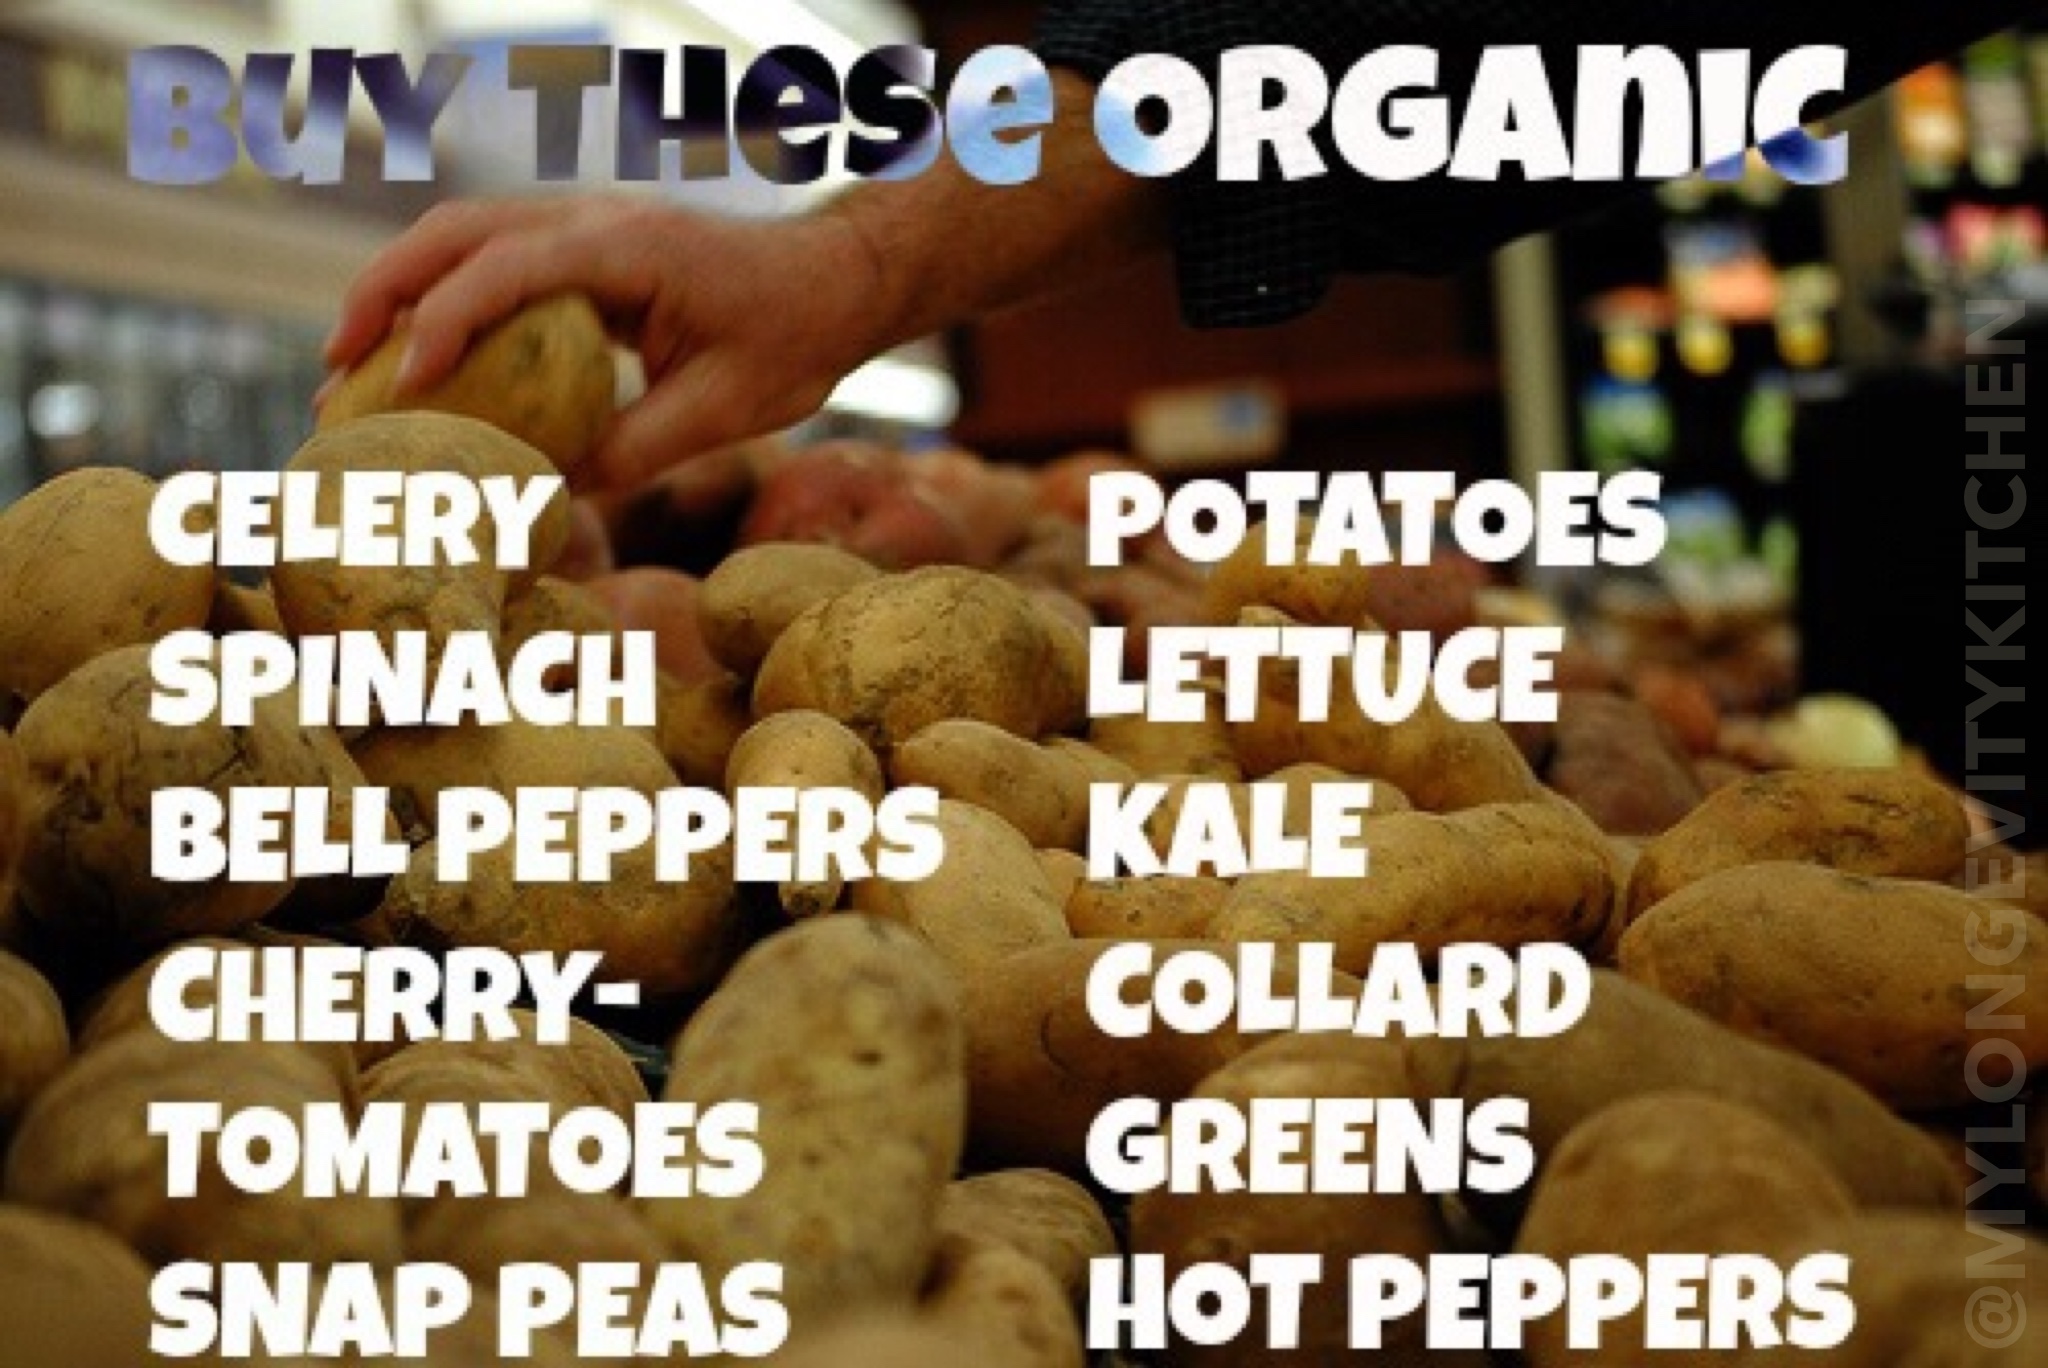
Are you buying organic produce yet? I understand it’s tough to get used to paying more, so check out this list of vegetables that are highest in pesticides (we are talking over 50 different pesticides detected on some of these veggies; not to mention that kale and hot peppers often contain chemicals that are so dangerous they should be illegal). If you buy these organic, you’ll be cutting out a majority of the pesticides/herbicides your family is exposed to.
Watch this 2 minute video to see what chemicals are in your body before switching to organic. You’ll be shocked!
I’ve said this before and I’ll say it again:
If you aren’t already buying organic tomatoes, you should start right now. Standard tomatoes are sprayed with some of the highest levels of herbicides/pesticides being used. These chemicals are “classified as ‘bad actors’ by the Pesticide Action Network (PAN). A “bad actor” is a chemical that is toxic, promotes cancer in lab tests and animal studies, interferes with reproduction, or contaminates the environment.”
And skip the traditional cans because they are lined with all sorts of chemicals that tomatoes leach from (even if they are BPA free). Go for glass jars or cartons of organic tomato products…stock up when they are on sale around $3 and save big! I heart organic tomatoes.
It’s Time To Cook…
Okay so you’re ready to make your Ciambotta, and you notice the ingredients in my recipe aren’t in precise amounts. Welcome to the world of Italian cooking! And honestly people, this is my style. Recipes don’t have to be so rigid to be great!
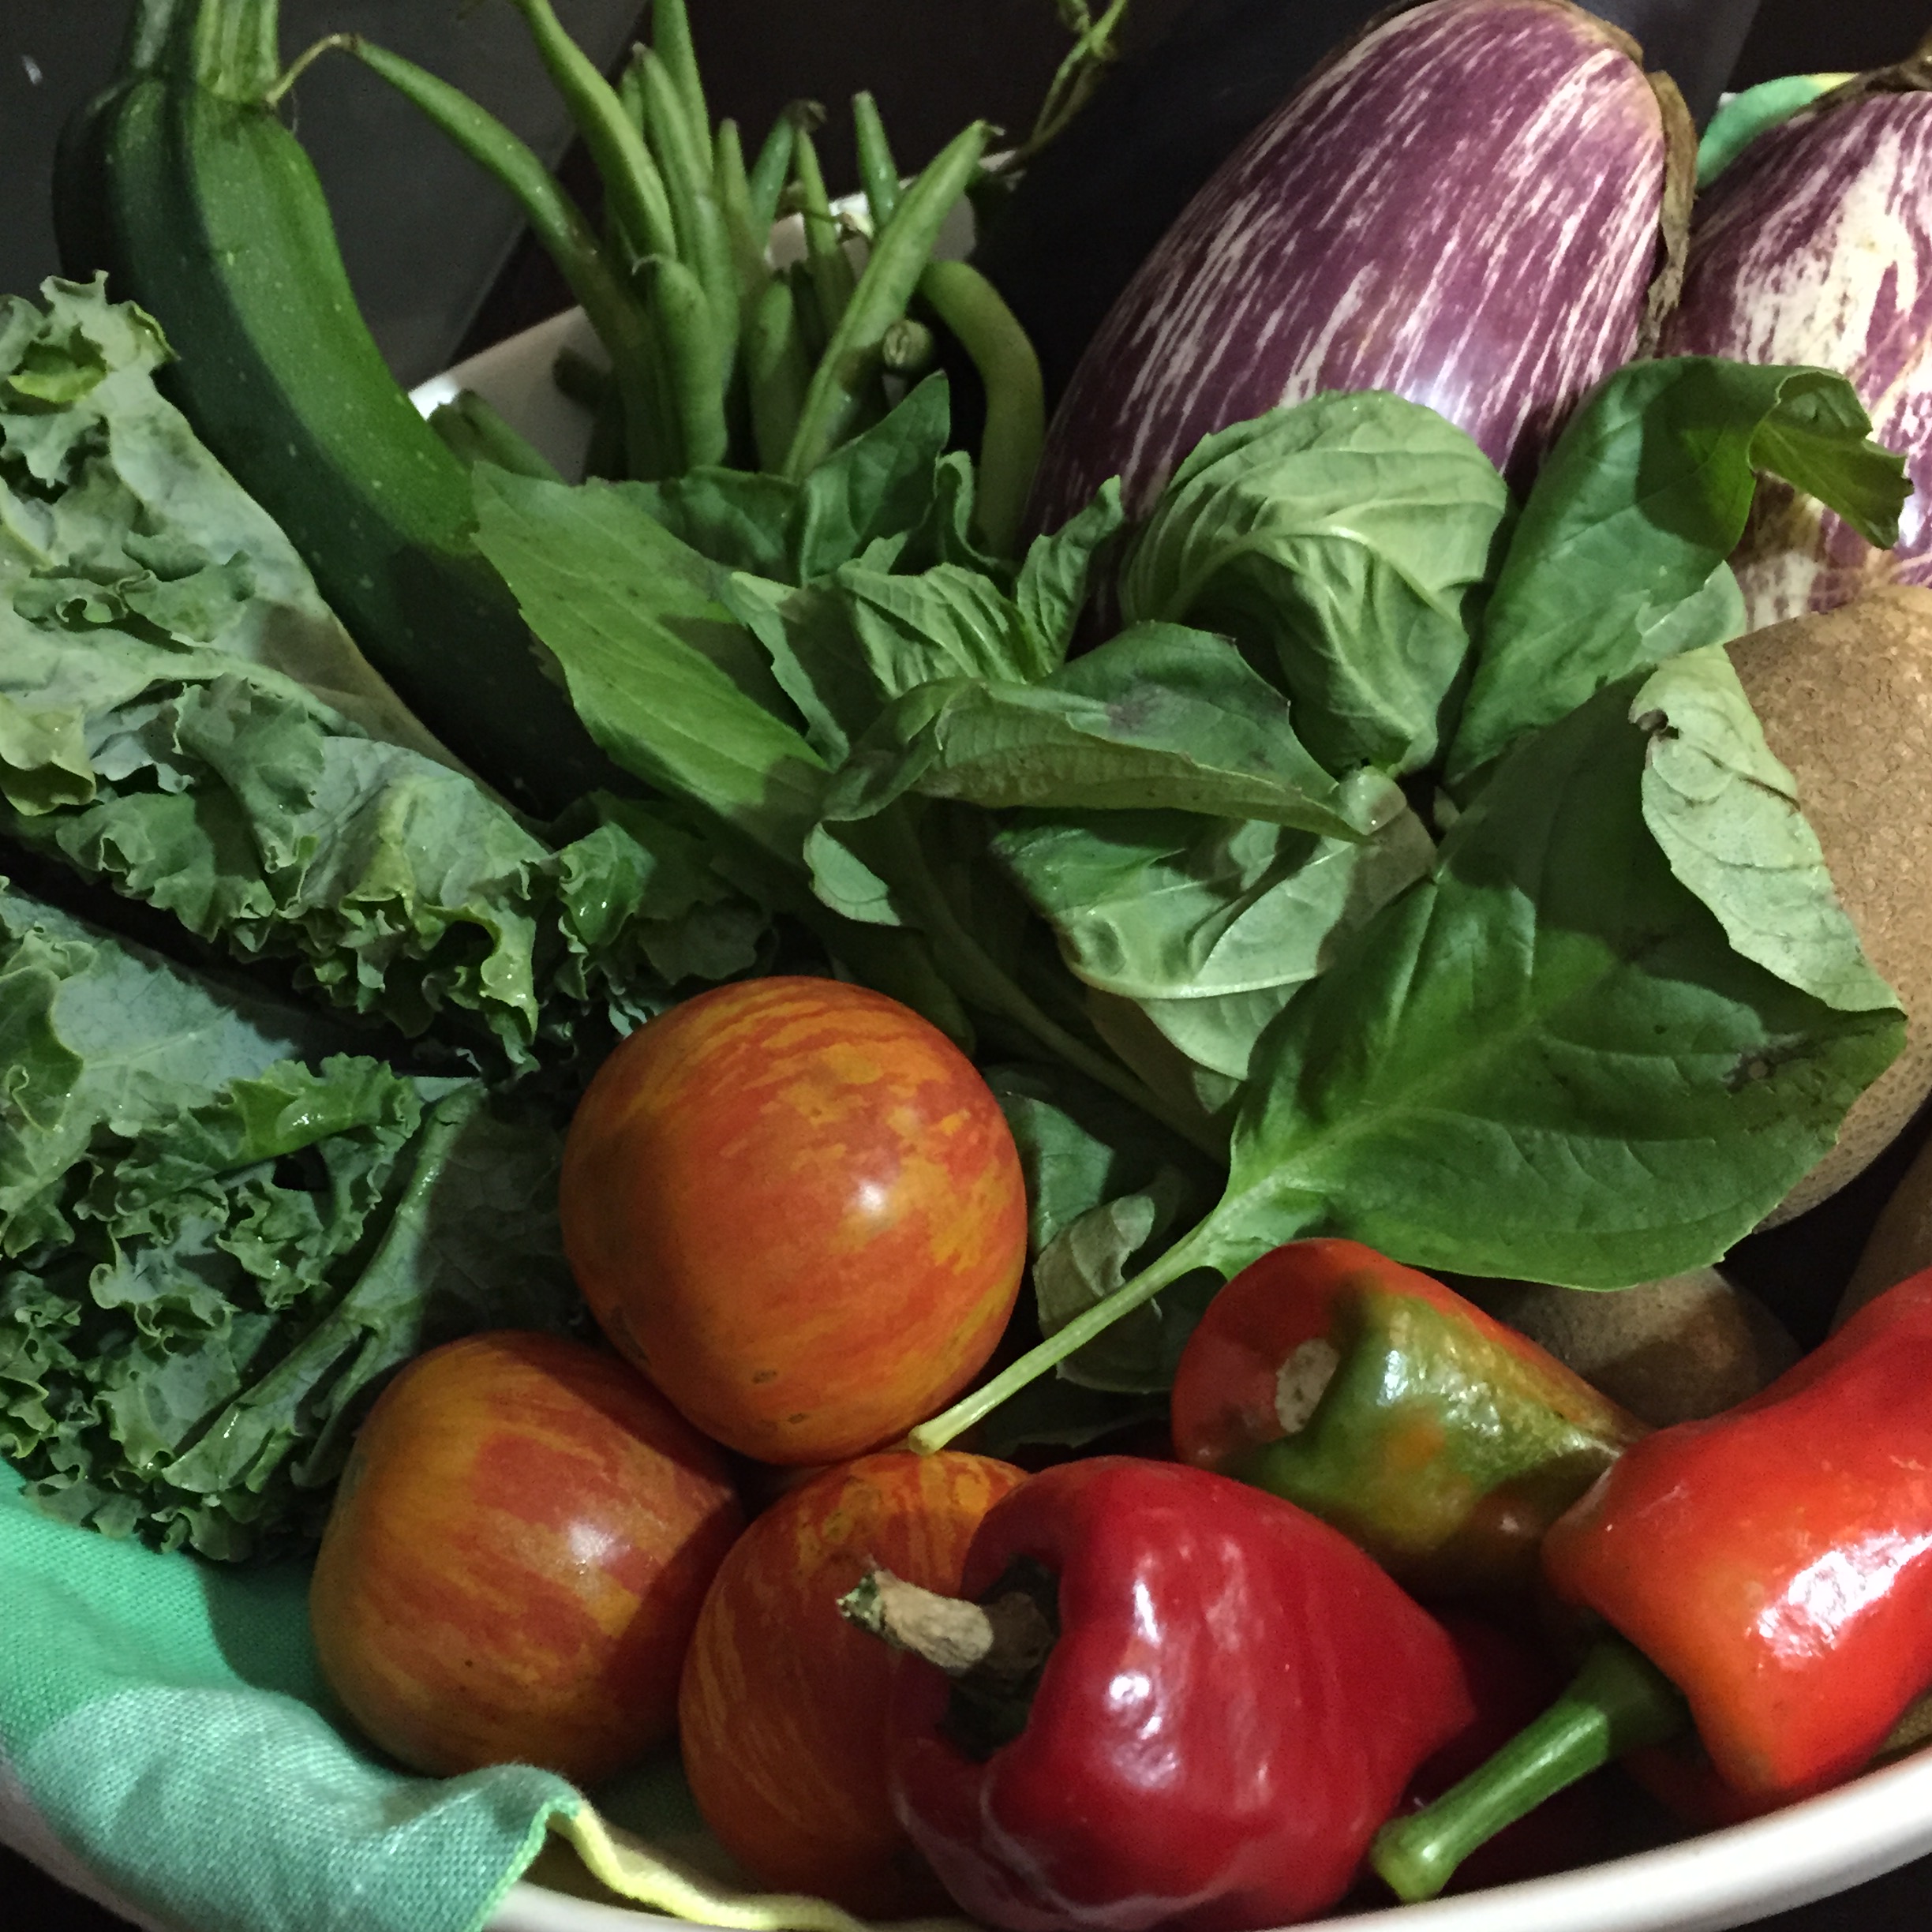
I want you to use whatever you like, and whatever you have access to. The base of a great ciambotta is usually tomatoes, eggplant, zucchini, and potatoes; but there are SO MANY GREAT WAYS to make it! My family often puts green beans or peas in this stew. Don’t like eggplant? I say try it in this dish, and you might be surprised…but you can always leave it out. Even the amount of liquid is not precise. All you need to worry about is that there is just enough liquid to cover those veggies.
Let me know how this works for you! I always make it on the stove top, but I know you can do it in the slow cooker. Give it a shot, and tag me #MyLongevityKitchen on Instagram and Facebook @MyLongevityKitchen, or comment right here!
Ciambotta: Italian Vegetable Stew
2015-10-09 20:10:24
Serves 3
Pronounced Chom-BOAT-ah, this Italian vegetable stew is a southern Italian tradition. It is a celebration of the garden's bounty slowly cooked in a rich tomato sauce.
Optional: ¼ Cup GRATED Pecorino Romano or Parmigiano Reggiano cheese (More nutritious compared to “parmesan”)
Stovetop Method
Using a large pot, heat 2 tablespoons of olive oil over medium heat.
Add the onions, carrots, and celery (if using), and a heavy pinch of salt. Stir and saute for 3 minutes.
Add the garlic and crushed chili pepper flakes, stir and cook for 1 minute.
Add all of your vegetables, tomatoes, and ¼ cup olive oil. Stir and add enough broth or water to just cover the vegetables.
Turn the heat to high, stir in the herbs, bay leaf, 2 teaspoons of salt, and 1 teaspoon of pepper.
Once it starts to boil, reduce the heat to low and cover.
Cook on low heat for 1 hour, stirring around every 15 minutes to prevent burning on the bottom.
After 1 hour, and all the veggies are super soft, you may leave off the cover to reduce the amount of liquid remaining. Simmer for 10-15 minutes until you reach the desired thickness.
Stir in the grated cheese (if using), and taste for salt. If it tastes like something is missing, add more salt.
Slow Cooker Method
Add all of the ingredients—except the grated cheese¬—to the slow cooker.
Cook on high for 3-4 hours, or on low for 8 hours, until the veggies are super soft.
If it’s too soupy, continue cooking uncovered on high or transfer to the stove uncovered and the liquid will evaporate as it simmers.
Stir in the grated cheese and taste for salt. Something missing? Add salt.
Serve with fresh herbs, grated cheese, and crushed pepper if desired.
Notes
Ingredients marked organic are specifically high in pesticides when grown conventionally
Variations: Add organic leafy greens, and ANY cooked meat to change it up.
This is hearty enough to serve as a main course and can be stretched by serving over rice or Non-GMO polenta
By Marisa Moon
My Longevity Kitchen https://mylongevitykitchen.com/
This recipe will save any dish that goes wrong in your kitchen.
It’s a game changer.
I’m talkin’ about a flavor-packed meal in the blink of an eye. With this sauce you can transform just about anything. Trust me, people will be asking for seconds.
I’ve been making chimichurri for many years now. My husband fell in love with chimichurri long before he met me because he spent some time in Brazil. Together, years later, we dined at a famous Argentinian steak house in Chicago, called Tango Sur (white tablecloth, Argentinian staff, no reservations, and BYOB!). Tango Sur serves up steaks the size of the dinner plate, and along-side is a bowl of this glorious tangy garlicky sauce: Chimichurri.
Thank you Argentina, for bringing this to the American table.
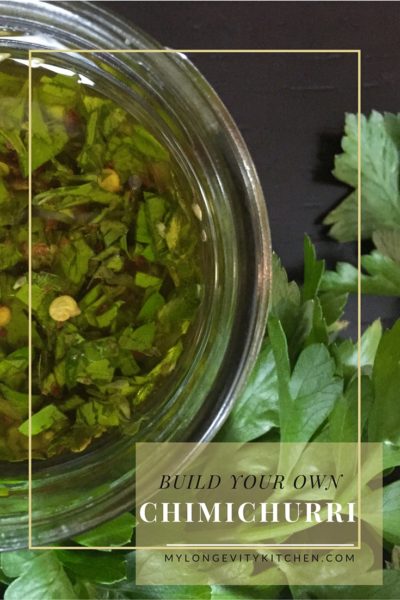
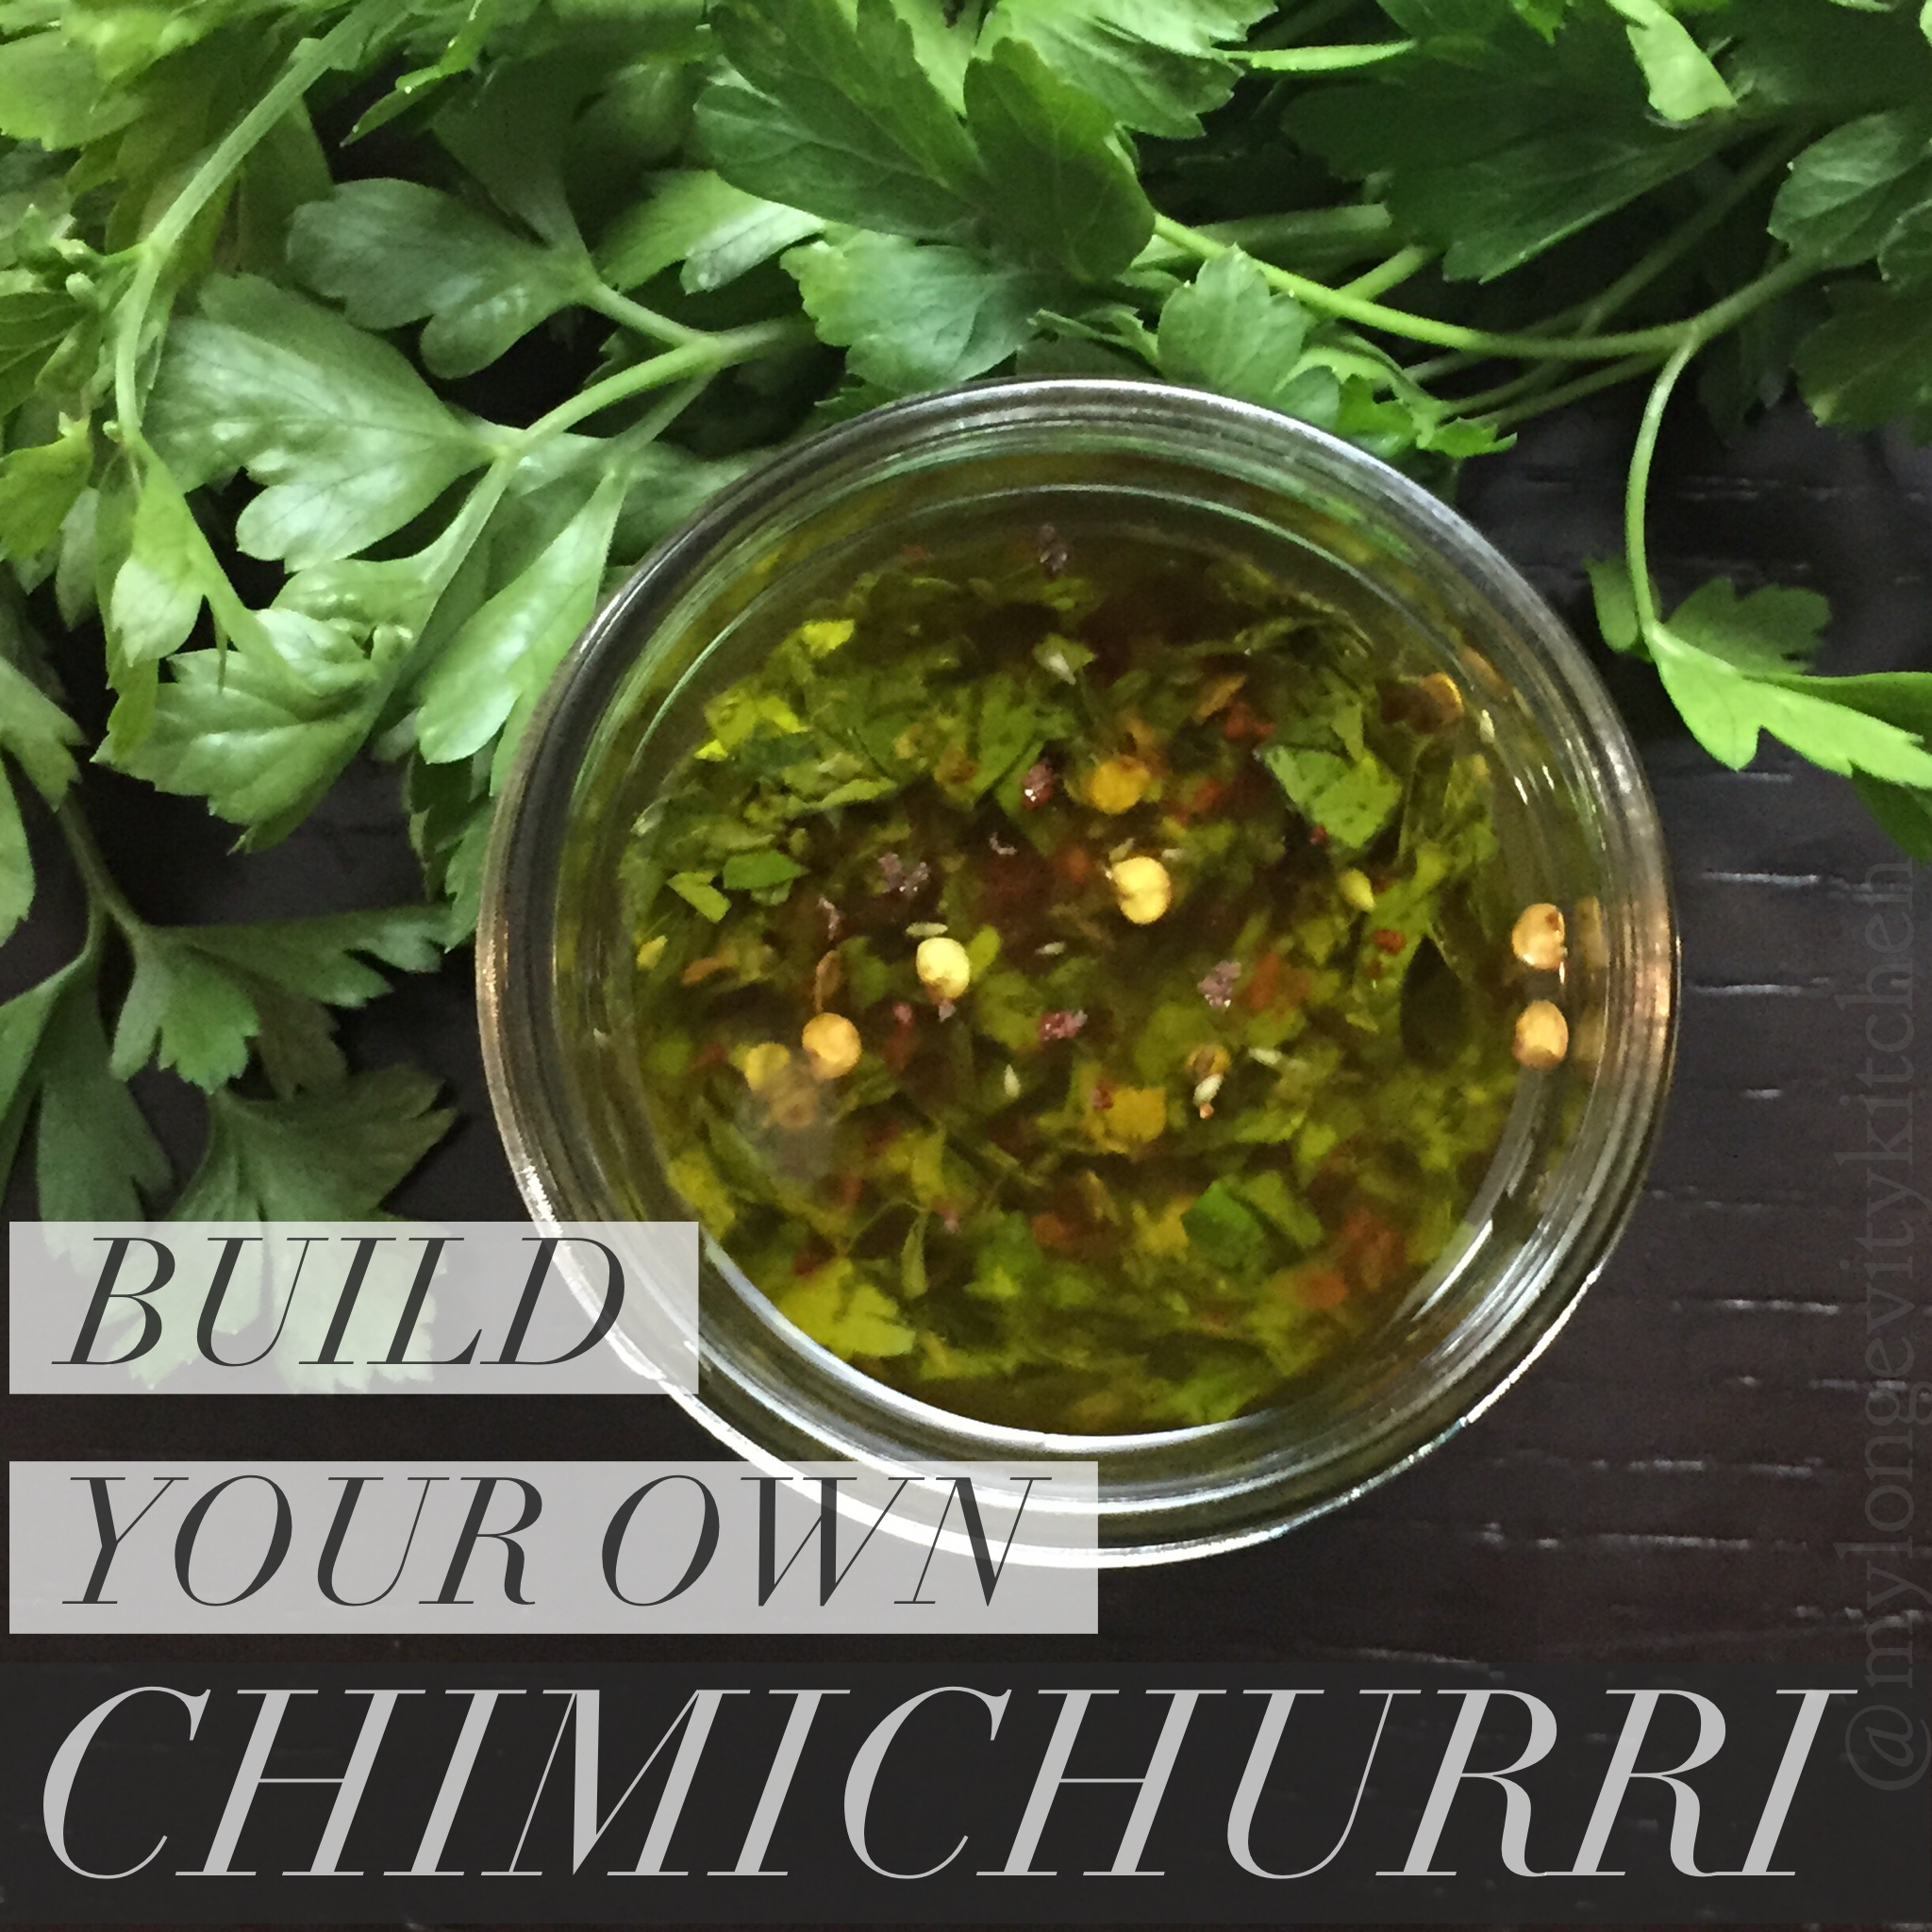
Basically, Chimichurri is like a vinegary pesto, without the cheese or nuts. It is herbs, fresh and dried, with garlic, vinegar, plenty of oil, water, sometimes lime, and peppers, onions, and spices.
What do I serve it with?
Almost ANYTHING. This stuff is like money in the bank. It will last in your fridge for weeks, and kick all your dishes up about ten notches. Try it with any seafood, any meat, and as a dip or salad dressing. Saute shrimp and greens in this sauce, or just pour it over the finished product. One of my favorite things to do with chimichurri is a quick tomato salad – especially when I am serving something with chimichurri already – putting it in the salad dressing just ties the whole meal together. And it’s so fast and easy!
I made this recipe BUILD-YOUR-OWN because you can truly customize it to your liking. I love making chimichurri with Cilantro…but honestly? That’s not really chimichurri. The authentic version would not use cilantro. BUT WE LOVE IT! It’s fun to combine cilantro and parsley in different quantities. And it’s great to be able to swap out ingredients according to what you already have on hand!
The best part is there are two ways to actually make this. You can do it by hand, chopping everything real fine, just like they would in an Argentinian kitchen; or you can use a food processor like we do in the modern world because we like everything to be FAST AND EASY! Am I wrong?
Authentic Version by Hand
Spiced Lamb with Chimichurri
Food Processor Version
Authentic Version by Hand
Cilantro Base, in Food Processor
Garnished Food Processor Version
I would like to take a moment to send a shout out to the Italian man who started The Slow Movement, in 1986. From the farming of the food, to the preparation in our homes, to the time we finish eating; food should be cherished. Time should nearly stand still.
Food is a wonderful thing, especially when it’s made with your own two hands.
Go on and rock this recipe out whichever way you’d like. Don’t be afraid to try new things, ask questions, and taste as you go! And look at my notes at the bottom of the recipe for some great ideas for serving and storing this sauce!
Tag @mylongevitykitchen on Instagram or Facebook, or #mylongevitykitchen.
Build-Your-Own-Chimichurri
2015-08-28 20:17:50
Yields 1
This vinegary herb based sauce is so versatile already. But this recipe makes it more versatile than ever! Build-your-own Argentinian-style chimichurri based on what you have on hand! Chop it up the old fashioned way, or blend it in the food processor to save time. You pick the ingredients, and you pick the method!
FRESH OR DRIED OREGANO, MARJORAM, or THYME. ¼ Cup Fresh OR 1 Tbsp Dried (oregano is traditionally used)
1 tsp each SALT & PEPPER
1/3 Cup ANY Combination of WINE VINEGAR and/or Lime Juice (Red Wine Vinegar is traditionally used)
2-4 Tbsp WATER
3-4 Cups loosely packed FRESH PARSLEY OR CILANTRO or ANY COMBINATION of these herbs (Parsley is traditional, Cilantro is a flavor explosion)
¾ Cup EXTRA VIRGIN OLIVE OIL
Optional Additions
1 FRESH HOT PEPPER OR ½ BELL PEPPER, minced
½ SHALLOT OR ¼ ONION, minced
2 teaspoons CRUSHED RED PEPPER
1 teaspoon PAPRIKA
Directions to Make By Hand (traditional method, rustic sauce, beautiful finish)
Mince all of the garlic, fresh herbs, and any onions or peppers.
To take the edge off the garlic (and onion if using), mix all base ingredients except for the parsley/cilantro and olive oil, PLUS now you will add your “optional add-ins”. Let this mixture soak for 30 minutes room temp or longer in the fridge (overnight is fine). You may also add the herbs now, which is more traditional, but the bright green herbs will turn a dull color. To save time you can skip this step and add everything at once.
Add the herbs and 3/4 cup of olive oil.
Taste and decide if the vinegar is too strong for your taste. You can add up to 2 more tablespoons of water (when you use mostly parsley, you will want to add more water; cilantro can stand up to the vinegar much better). Taste for salt, and Enjoy!
Keep this in a jar in the fridge for weeks. See notes for more ideas.
Directions to Make in Food Processor (less chopping by hand, smoother sauce)
If using food processor, still roughly chop the garlic, onion and fresh pepper to assist in proper mixing.
To take the edge off the garlic, mix all of the base ingredients EXCEPT the fresh herbs and olive oil, PLUS the “optional add-ons”. Let this mixture rest for 30 minutes at room temp, or longer in the fridge (overnight is fine). To save time you can skip the step of resting 30 minutes.
Add the fresh herbs to the food processor and pulse just a few times.
Now add everything else to the food processor and turn it on for literally a second, just to mix. For a creamier sauce you can add everything EXCEPT the olive oil, and pour it into the machine while it is running. This will thicken the sauce a bit, and really blend it smooth.
Taste if you like the strong vinegar flavor, or add up to two tablespoons of water (using parsley calls for more water, but cilantro can stand up to the vinegar better). Taste for salt, and enjoy!
Keep this in a jar in the fridge for weeks. See notes for more ideas.
Notes
My Favorite version is mostly cilantro, some parlsey, and some fresh oregano. I mix red wine vinegar and lime juice, and blend in the food processor. The flavor is insane!
You can even freeze chimichurri in ice cube trays. Once they are frozen, transfer to a freezer bag, and then use them to add flavor to dinner whenever you want!
Try it as a Salad dressing
Boil/Steam Potatoes and toss with Chimichurri for a killer potato salad
Amazing with any type of fish or meat
By Marisa Moon
My Longevity Kitchen https://mylongevitykitchen.com/
The biggest mistake people make with kale salad is when they don’t massage or marinate the kale! Don’t make this mistake. No one actually enjoys chewing on this fibrous raw veggie without a little help.
Looking for a way to get fermented foods into your diet??? This is a great way to do it. Mixing it into a salad is a sure-fire sneak-attack that will have you singing “Sauerkraut” in no time. Try it!
And onto the delicious, easy, make-ahead, keep-em beggin’ marinated kale salad recipe!
Asian Marinated Kale & Kraut Salad
2015-06-11 06:06:10
Serves 2
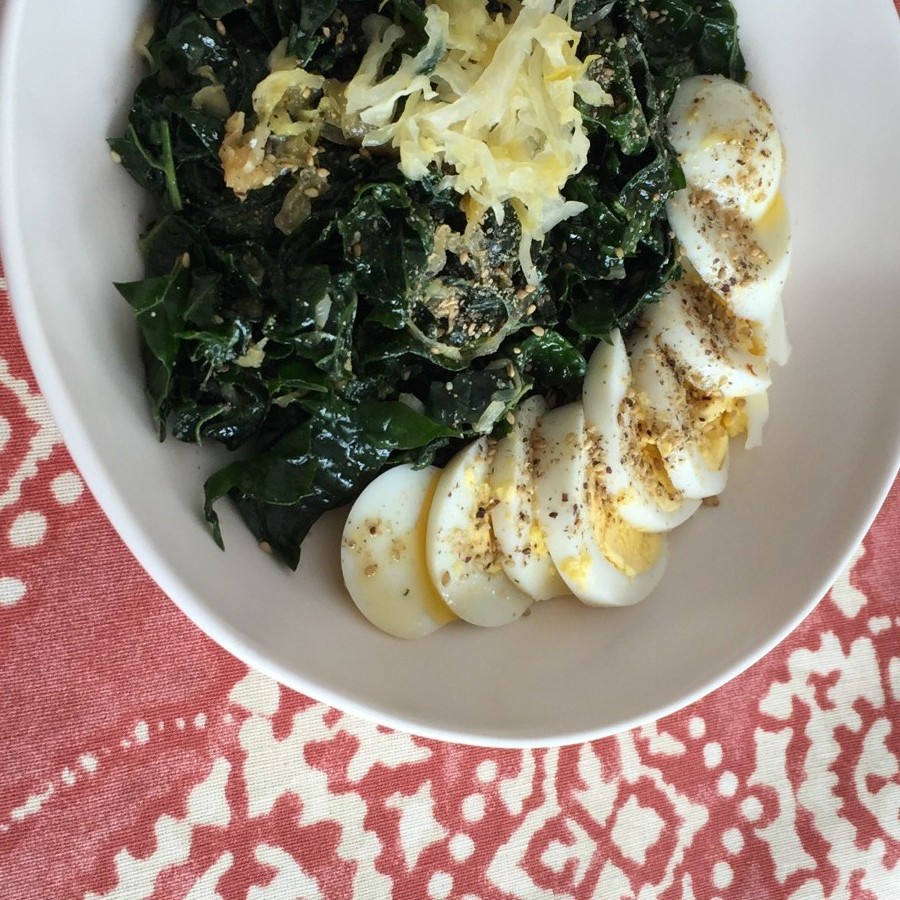
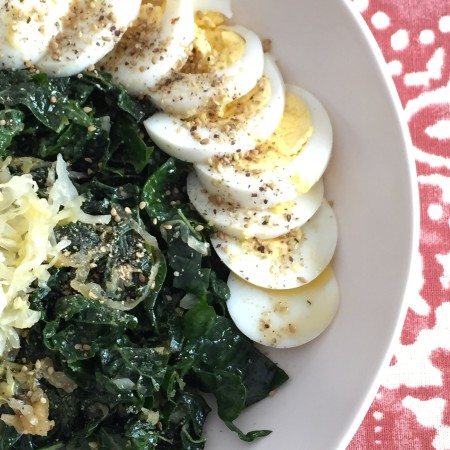
This makes a great make-ahead lunch or side dish! Give raw kale the love it deserves and massage and marinate it before you're ready to chow down. The combination of sesame oil, tangy sauerkraut, hard boiled egg, and sesame seeds works perfectly here.
2 Tablespoons Rice Vinegar (you can experiment with white wine vinegar or lime)
1 teaspoon Sesame Oil
2 teaspoons Oil of your choice (I used homemade chili olive oil, but extra virgin olive oil, or avocado oil are also good choices)
1 Tablespoon Coconut Sugar (Coconut Aminos would be great here too)
½ Tablespoon Water
½ teaspoon each of fine sea salt and black pepper
½ teaspoon mustard powder (optional; and chinese mustard, or wasabi are great subs)
Salad
1 Head Curly Kale, stemmed and ripped into 2-3 inch pieces (these vary in size, so start with less and add more once you see how much marinade is left)
2-4 Tbsp Sauerkraut or Tsukemono (Tsukemono is the same as traditional sauerkraut but without the caraway. Your ingredients should say cabbage and sea salt only; feel free to experiment with other flavors)
2 Hard Boiled Eggs, sliced or diced
*Sesame Seeds, or Furikake, or Seaweed Gomasio (see notes for more info)
Instructions
Mix the dressing ingredients in a bowl big enough for the kale
Add the kale and toss to combine
Now, take your hands and get in there, squeezing the kale to break down the fibrous texture and work in the dressing
Cover the bowl with plastic wrap and leave at room temp for 2-3 hours, or refrigerate overnight. This salad gets better with time...even days!
When you are ready to eat the salad, mix in 1-2 Tablespoons of Sauerkraut per serving.
Then add the egg. Go ahead and mix it in for a wonderfully messy combination of textures (I kept it pretty for the photos)
Drizzle your salad with a little extra olive oil or chili oil, and sprinkle generously with sesame seeds, or Furikake, or Seaweed Gomasio. Crushed Chili Flakes will be great too!
Notes
*Search Furikake or Seaweed Gomasio on Amazon.com, and buy one if you haven’t tried it! It’s awesome with eggs, rice, soup, and anything Japanese or Korean. The healthier versions are only a few ingredients: Nori flakes, Sesame Seeds, and Sea Salt.
This serves 2 people for lunch, but will serve many more as a side dish.
Tag me in your photos on IG @mylongevitykitchen and #mylongevitykitchen
Want to be part of my recipe testing team? Leave a comment on the blog to let me know!
By Marisa Moon
My Longevity Kitchen https://mylongevitykitchen.com/
Italians love their salads. There is always a salad at the family meal.
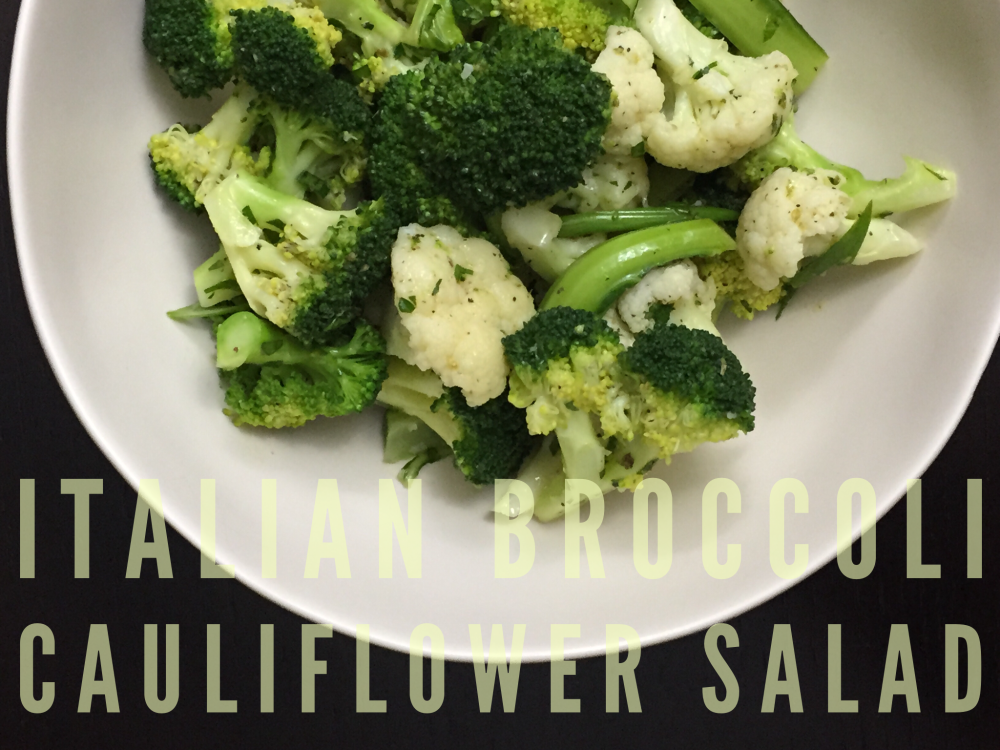
A salad isn’t just a lettuce salad though. Tomato salads, broccoli salad, potato salad (no mayo over here), zucchini salad, yada yada, baccala salad. We often consider marinated and pickled veggies a salad when we’re in a pinch. And yes, even something like Hitchcock Farms’ Broccoli burratta recipe could technically be a salad. If you think hard enough.
Here I have recreated a popular salad from my childhood. Broccoli salad was one of my Mom’s greatest hits if you ask me! I added cauliflower this time, along with the greens that surround the head. I also use scallions instead of red onions because that’s one of the only ways I can get onions past Eric. Feel free to add more or change up the onions if you’d like!
This salad is sooooo easy, but a little laborious if you make a lot at once. I say that because you can only fit so much into the steamer basket and have to steam the veggies in batches. Other than that, it’s the easiest thing, and tastes so delicious! To save time, try this recipe with one head of broccoli or cauliflower. Just divide the dressing recipe, or make the whole batch of dressing and save some in a jar for salads during the week.
Cauliflower greens add a delicious texture
Cauliflower ready to steam
Broccoli ready to steam
The steaming and chilling process of the broccoli and cauliflower is great for meal prep. You can use this steamed broccoli and cauliflower in any dish to help save time during the week.
You should always blanch or steam cauliflower for dip platters and party trays…no one likes a dry crumbly cauliflower; that’s why there’s always cauliflower on the tray! Steam it lightly and you’ll see them start flying off the tray. One trick for steaming cauliflower, and retaining its bright white color, is to add lemon juice or vinegar to the water instead of salt. The salt can make it slightly yellow. It is one of the only veggies that benefits from an acid in the water.
Quickly, before I hand over this simply delightful salad recipe, I must drop a little longevity kitchen knowledge:
Broccoli is one rapidly-aging beauty. What I mean by this is broccoli’s nutrients vanish into thin air every day that passes after harvest. It’s a darn shame I tell you! I wish everyone could grow broccoli in their yards year round, or have a farmer on speed dial. BUT, that’s not gonna happen.
I’ll keep it simple. NEVER buy broccoli that is pre-cut, or unwrapped. It’s basically just fiber you’ll get with the pre-cut stuff. So if you love broccoli that much, you are in a massive hurry, and aren’t going for nutrients, then fine. Buy the bagged pre-cut stuff. But other than that, it literally retains almost zero nutrients. Just days after harvest the broccoli can lose 50-75% of it’s nutrients. Sad, I know.
Look for broccoli that is dark green on top with tight florets. It should be wrapped in plastic, and have no yellow or pale florets. The stem should be bright green, and the bottom of the stem should be moist and flat, with no pocked holes.
Call your grocery store and ask when the broccoli comes in. Buy it that day, and steam it right when you get home. This will preserve the nutrients. If you have a farm or farmers market you visit, call in advance if possible and ask about the day they harvest the broccoli. Also ask if they chill it immediately after harvest. This is key to obtaining the most nutritious broccoli with all the anti-cancer properties we love.
Don’t worry as much about cauliflower. It doesn’t have as rapid of a respiration rate, and we can relax a little with that one.
So call that grocer, buy that broccoli, and let’s get steamin’!
This recipe works great with asparagus, potatoes, and green beans. In the summer you will love to try this with tomatoes, potatoes, and green beans all together. That will be great with some red onion. Tell me about your favorite combinations!
Italian Broccoli Cauliflower Salad
2015-02-03 02:03:57
This simple salad of steamed broccoli and cauliflower is a classic flavor and side dish you will surely fall in love with. The dressing is made of lemon, red wine vinegar, fresh garlic and herbs, and the best extra virgin olive oil you can find. Serve this salad at room temperature throughout the week along side many of your favorite dishes.
1 Clove of Garlic, minced (10 minutes or more before using. This activates the anti-cancer properties)
Juice of 1 lemon, 3 Tbsp Measure (zest if organic, and desired)
2 Tbsp Red Wine Vinegar
1 sliced Scallion
1 teaspoon dried oregano, or 1 Tbsp minced fresh
2 Tablespoons fresh parsley, minced
1 Tablespoon + 1 teaspoon fine sea salt
1 ½ teaspoon fresh ground black pepper
½ Cup Extra Virgin Olive Oil
Instructions
Prepare a steamer basket and pot of salted water for steaming. Get a large bowl filled with ice water to chill the veggies after steaming, and gather other tools such as a timer, a large slotted spoon, and a strainer.
Clean and chop cauliflower into large florets, the size of about 2 bites.
If the cauliflower greens are in good shape, cut the green stems/leaves into 2 inch long pieces, no wider than ½ inch. You may have to cut the stems lengthwise to make thinner pieces.
Prepare the broccoli florets as well. Keeping them the same size if possible.
Steam the Cauliflower florets for 3 minutes, in a single layer and in batches, using a timer. It helps to steam only pieces of the same size.
Immediately remove the steamed cauliflower and transfer to the ice bath (do not steam more than 4 minutes or most nutrients will be lost). When the next batch is steaming, move the chilled cauliflower to the strainer you’ve set aside to use.
Once all the cauliflower is steamed, you may start the cauli stems and greens. The stems might only take 2 minutes to steam, 3 minutes max.
Repeat the steaming and chilling process with the broccoli.
Now you will assemble the dressing. Start with a large bowl, big enough for all the veggies, and room to mix. Add the garlic, lemon juice, and red wine vinegar, scallions, herbs, and spices. Everything but the oil. If you would like the onion and garlic flavor then you may move on to the next step immediately. If you would like to calm the pungent flavors of the onion and garlic, let this mixture sit for 5 minutes or more.
To finish the dressing, slowly stream in the oil while whisking constantly. This will create a nice thick dressing and make each bite of the salad more consistent in flavor. Your dressing will taste salty, but that is what we want! Once you add the veggies, that will no longer be the case.
Mix in your veggies now, tossing numerous times to mix well.
Notes
This salad keeps in the fridge for a week.
If you don't have a steamer basket you may blanch in salted boiling water for 2-3 minutes, but the result will be much less nutritious.
If you are eating the salad right away, this should be the proper seasoning. You may need more olive oil, lemon or salt if you had larger heads of broccoli or cauliflower.
If you are eating this salad later, refrigerate, and remove 10 minutes prior to eating for the best flavor, and also to let the olive oil come to the right consistency.
The veggies absorb the dressing the longer they sit, so you may feel the need to add more salt, oil, or lemon/vinegar, along the way.
This salad is great to eat by itself, or you may add it to any salad greens with just a little extra oil and vinegar for a quick side salad!
By Marisa Moon
My Longevity Kitchen https://mylongevitykitchen.com/
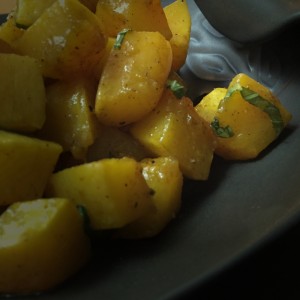
The butternut is more than just a squash. It is a long-lasting, flu-fighting, time-saving winter veggie. Dice up this golden beauty and you have a super simple side dish just when you thought you were out of veggies.
I’m talking about that day when you have used up all your greens, all your potatoes, and all your produce. You look over at your pantry and think, “there’s gotta be some canned artichokes in here or somethin!” Nope. Just when you’re about to give up and skip the veggies, you see something out the corner of your eye. It’s been decorating your kitchen with this fall harvest ornamental flair, and you think to yourself, “YES! BUTTERNUT! I am so glad you’re here!” I absolutely love butternut squash, but don’t even tell me for a second you can’t relate. Sometimes I forget it is in my kitchen, and then boom! Two weeks later that baby is still standing tall and ready to be put to use (right when I need it the most). If this hasn’t happened to you then you need to just buy one, and set it aside, and wait. It’ll happen.
We shouldn’t leave winter squash on the sidelines, however, because these starchy, hearty vegetables have some powerful immune-boosting properties that we should take advantage of.
Sweet winter squash doesn’t need much attention from the cook. But, considering it’s much less sugary than its tuberous friend the sweet potato, it makes sense to spruce it up with some sweet and spicy flavors. I only used a few ingredients here, but many of them may be new to you.
First, I will mention the spices. Have you heard of Five-Spice Chinese Powder? I first purchased a bottle of this spice blend years ago when making one of Eric’s favorite foods from his homeland in Hawaii. Shoyu chicken. It is a dynamite dish of stewed chicken thighs in a sweet and salty umami bath. (If you’re feeling adventurous or have longed for a good shoyu chicken recipe, I recommend this one from Reggies Kau Kau Time blog . I am definitely going to make a longevity version of this dish for the blog one day. It’s on the list!) Chinese Five-Spice is typically a blend of Cinnamon, Clove, Peppercorn, Fennel, and Star Anise. I recently bought a version containing ginger, but traditionally it is made without. A little goes a long way, and you’d be surprised how useful it is in the winter! I seasoned the squash here with five-spice powder, and some warming ground cumin. If you’re not familiar with cumin, I’d have to disagree with you (huh?). It’s the name “cumin” that people are unfamiliar with, not the taste. Cumin is the most important flavor in every taco seasoning packet ever!..so I’m sure you will recognize the flavor quite well. I LOVE IT.
Lastly, I’d like to introduce you to Coconut Aminos. It is a sweeter alternative to soy sauce that is prized in the paleo world, and new to the culinary scene. It’s basically salty coconut sap, but without the coconut flavor you might expect. One bottle will last you a while (unless you go coconut aminos crazy like some of us do at first) so I suggest you go for it! Tossing the butternut squash in this sauce really helps bring all the flavors together. Are you nervous about trying all of these new flavors??? I sure hope not. If you like Thai Food, or Indian Food, Moroccan Food, or trying new things, then you’ll love this dish!
PS I admit I ate it cold several times right out of the fridge. mmmm.
Six-Spice Butternut Squash
2015-01-15 09:32:37
Butternut squash coated in a warming blend of spices including cumin, cinnamon, clove, star anise, ginger, and fennel.
Cut off both ends of the squash by root and stem, and peel the skin off with a vegetable peeler.
Cut the squash in half crosswise. Then, cut both halves lengthwise and use a spoon to scoop out the seeds.
Cut the squash into 1 inch cubes.
In a mixing bowl, combine the melted fat with the coconut aminos, coconut sugar, and the rest of the spices except for the basil.
Add the squash to the mixing bowl, and toss well to coat
Roast for 25 minutes, turning the pieces after 15 minutes.
Thinly slice the basil by stacking the two leaves, rolling tightly like a cigar, and slicing across to create ribbons. Carefully mix the basil ribbons into the hot squash.
Notes
Enjoy this sqush on the side of a juicy steak or any tender braised meats.
The spices compliment many asian and latin flavors.
Try it with my Lime Marinated Grass-fed Skirt Steak.
We also ate the leftovers for breakfast in a one-pan scramble of eggs, kale, and the six-spice squash.
Tag me in your squash photos! @mylongevitykitchen #mylongevitykitchen
By Marisa Moon
My Longevity Kitchen https://mylongevitykitchen.com/
You deserve to have a guide by your side as you navigate the steps it takes to become a healthier you.
Together we’ll find the ideal combination of challenges, accountability, and structure that you need to make it work and reach your goals.
Learn more about my coaching style—I’m relatable and realistic, and I combine health coaching with life coaching—and book your free consultation here at marisamoon.com
Introducing InstaRecipes by My Longevity Kitchen: I call these InstaRecipes because the complete recipe is posted onto my instagram feed, and more importantly, they are short and to the point! You can count on InstaRecipe posts to be a brief description moving right into the recipe. I know you are in a hurry! So let's get to it!


 These 3 sweet-potato-yammy-thingies are all quite different. My favorite is probably the Hannah (blonde on the far right), or Japanese (redhead in the center). Hannah is probably the least sweet of them all, and truly tastes like a cross between a yukon and a yam. The Japanese sweet potato in the center is sort of squash like, but still with a mild sweet potato sweetness.


")
")